

Smash Burgers Recipe: 3 Ingredients for Maximum Flavor
Table of Contents
Tired of bland, boring burgers that lack that signature crispy crust and juicy center? You’re not alone. Most home cooks struggle to recreate the magic of diner-style smash burgers because they overcomplicate the recipe or use the wrong technique.
This smash burgers recipe delivers restaurant-quality results with just 3 simple ingredients. You’ll get perfectly crispy edges, a juicy interior, and maximum beefy flavor in under 10 minutes. No fancy equipment needed—just a hot skillet and the right method.
As someone who’s tested hundreds of burger variations over the past 8 years, I can confidently say that smash burgers are the ultimate game-changer for home cooks. The beauty lies in their simplicity: quality beef, proper seasoning, and high heat create burger perfection every single time.
In this guide, you’ll discover everything you need to master smash burgers: choosing the right ground beef, essential prep tips, step-by-step cooking instructions, pro techniques for that perfect crust, and answers to common questions. Let’s dive in!
Why This Smash Burgers Recipe Works
Smash burgers aren’t just another burger trend—they’re a scientifically superior cooking method that delivers incredible flavor with minimal effort. Here’s why this recipe stands out:
- Uses affordable, easy-to-find ground beef: No need for expensive cuts or special orders from the butcher. Standard 80/20 ground beef works perfectly and is available at any grocery store.
- Ready in under 10 minutes: From raw patty to finished burger, you’ll have dinner on the table faster than ordering takeout. Perfect for busy weeknights when you need something quick and satisfying.
- Maximizes the Maillard reaction: The smashing technique creates more surface area contact with the hot pan, producing that irresistible crispy, caramelized crust that’s packed with umami flavor.
- Foolproof for beginners: Unlike thick burgers that require careful temperature monitoring, smash burgers cook so quickly that overcooking is nearly impossible.
- Perfect for any occasion: Whether you’re feeding the family on a Tuesday night or hosting a weekend cookout, smash burgers always impress without requiring advanced cooking skills.
- Incredibly versatile: This base recipe works with endless variations—add cheese, special sauces, different toppings, or keep it classic. The technique stays the same.
Choosing the Right Ground Beef for Smash Burgers
The foundation of exceptional smash burgers starts with selecting the right ground beef. Your choice directly impacts flavor, juiciness, and that coveted crispy crust.
Best Fat Content for Smash Burgers
80/20 ground beef (80% lean, 20% fat) is the gold standard for smash burgers. This ratio provides enough fat to keep the patties juicy while creating maximum crust development. The fat renders as the burger cooks, adding flavor and preventing the thin patties from drying out.
Avoid lean ground beef (90/10 or 93/7) for smash burgers. Without sufficient fat, your burgers will turn out dry and lack the rich, beefy flavor that makes smash burgers special. The extra fat isn’t just for taste—it’s essential for achieving those crispy, lacy edges.
Buying Tips for Quality Ground Beef
When shopping for ground beef, keep these tips in mind:
- Look for bright red color: Fresh ground beef should be cherry red, not brown or gray. Brown spots indicate oxidation and older meat.
- Check the grind date: Always choose the freshest option available. Ground beef is best used within 1-2 days of grinding.
- Ask your butcher to grind it fresh: Many grocery stores will grind beef to order. Request chuck roast ground to 80/20 for the best flavor and texture.
- Avoid pre-formed patties: Store-bought frozen patties are often over-handled and compressed, which prevents proper smashing and crust formation.
- Feel for cold temperature: Ground beef should feel cold to the touch. If it’s warm or room temperature in the display case, choose a different package.
Beef Cut Substitutions
While standard ground beef works perfectly, you can experiment with different cuts for varied flavor profiles:
- Ground chuck: The traditional choice with excellent beefy flavor and ideal fat content.
- Ground brisket blend: Adds extra richness and a slightly smoky undertone.
- Ground short rib: Premium option with incredible marbling and deep, buttery flavor.
- Ground sirloin mixed with ground chuck: Combine 50/50 for a leaner option while maintaining enough fat for juiciness (aim for 15-20% total fat).
Avoid using ground round or ground turkey for traditional smash burgers—they’re too lean and won’t produce the signature crust and juicy texture.
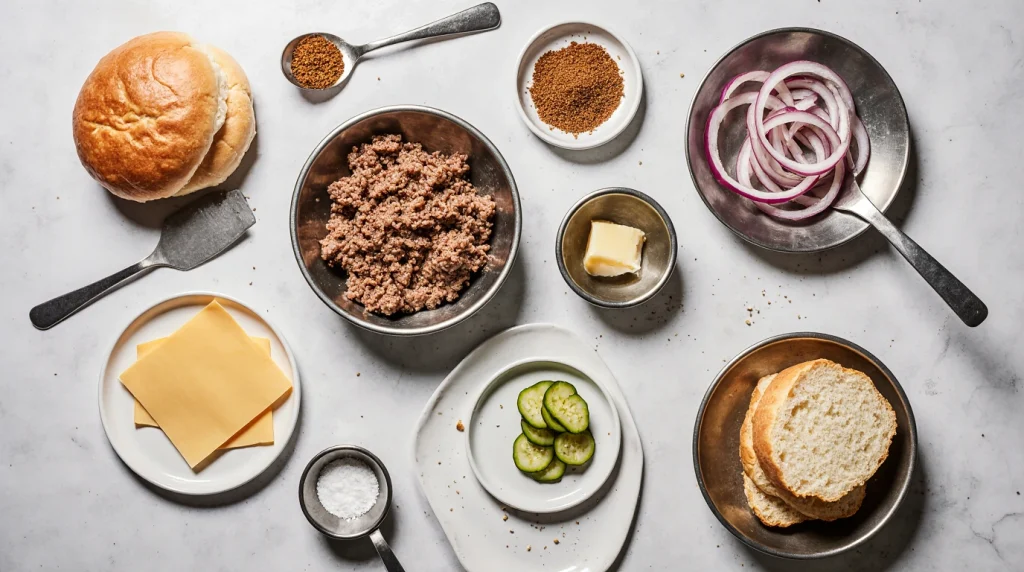
Ingredients & Prep
The beauty of smash burgers lies in their simplicity. With just three core ingredients and minimal prep, you’ll create burger perfection.
The 3 Essential Ingredients
1. Ground Beef (80/20): 1/4 pound (4 ounces) per burger. This creates the ideal thin patty that smashes perfectly and cooks quickly.
2. Kosher Salt: For seasoning. Coarse kosher salt provides better control than table salt and enhances the beef’s natural flavor without overpowering it.
3. Freshly Ground Black Pepper: Adds a subtle kick and complements the beef beautifully. Fresh-cracked pepper delivers more aromatic flavor than pre-ground.
That’s it! The simplicity is intentional—quality beef seasoned properly doesn’t need embellishment.
Ground Beef Prep Essentials
Proper preparation ensures your smash burgers turn out perfect every time:
Portioning: Divide your ground beef into 4-ounce portions (about the size of a baseball). Use a kitchen scale for accuracy—consistent sizing ensures even cooking.
Keep it cold: Store portioned beef in the refrigerator until you’re ready to cook. Cold meat holds together better and creates a better crust contrast when it hits the hot pan.
Don’t pre-form patties: This is critical! Keep the beef in loose balls until the moment you smash them in the pan. Pre-forming compresses the meat and prevents proper crust development.
Handle gently: The less you touch and compress the beef, the better. Over-handling creates dense, tough burgers. Form loose balls with minimal pressure.
Season at the right time: Season immediately before cooking, not in advance. Salt draws out moisture—you want that moisture to stay in the beef until it hits the hot pan for maximum crust formation.
Seasoning Strategy
Keep your seasoning simple but strategic:
Timing: Season the beef balls right before they go in the pan. As soon as you place a beef ball on the hot surface, sprinkle the exposed top generously with kosher salt and black pepper before smashing.
Coverage: Use more seasoning than you think you need. A good portion stays on the cooking surface, so season liberally—about 1/2 teaspoon of salt per patty.
Freshly cracked pepper: Grind your black pepper right before cooking for maximum flavor and aroma. Pre-ground pepper loses its punch quickly.
Optional Enhancements
While the 3-ingredient method is perfect as-is, consider these optional additions:
- Garlic powder: A light dusting adds savory depth without overpowering the beef.
- Onion powder: Enhances the umami flavor profile.
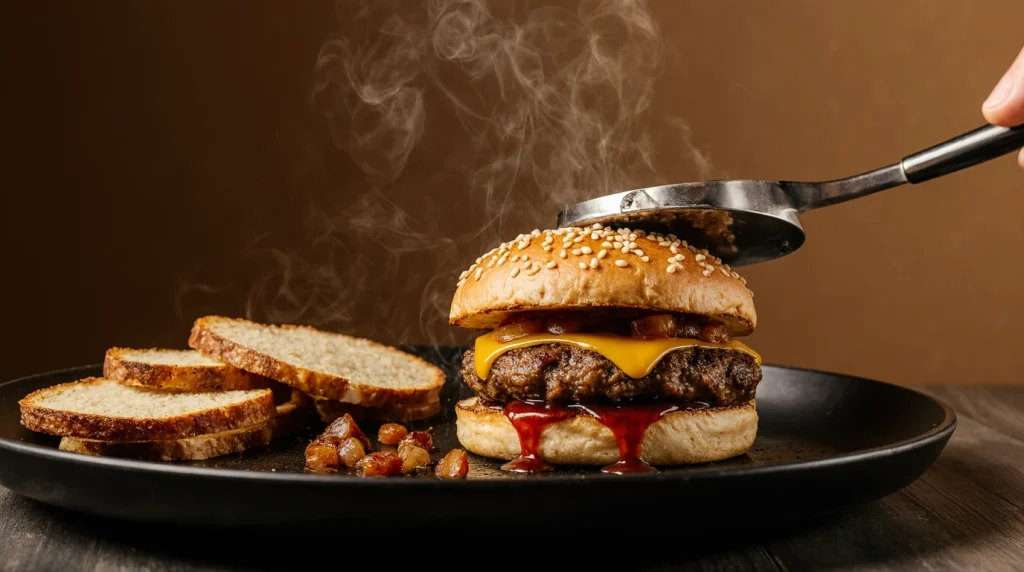
- American cheese: Not technically part of the patty, but essential for authentic diner-style smash burgers. The creamy, melty texture is unmatched.
- Burger sauce ingredients: Mayo, ketchup, pickle relish, and spices can be mixed for a classic topping.
Step-by-Step Cooking Instructions
Follow these precise steps to create smash burgers with perfect crispy edges and juicy centers every single time.
Pre-Cooking Prep
1. Bring beef to proper temperature: Remove portioned beef balls from the refrigerator 10 minutes before cooking. You want them cold but not ice-cold—this helps them smash more easily while still creating a good crust.
2. Prepare your workspace: Have everything ready before you start cooking—seasoning nearby, spatulas within reach, cheese sliced, and buns ready. Smash burgers cook quickly, so you won’t have time to search for ingredients mid-cook.
3. Gather your tools: You’ll need a heavy flat spatula (a sturdy metal turner works best), a second spatula or small saucepan for pressing, and tongs for flipping.
4. Prep your buns: Lightly toast your burger buns while the pan preheats. This adds texture and prevents them from getting soggy.
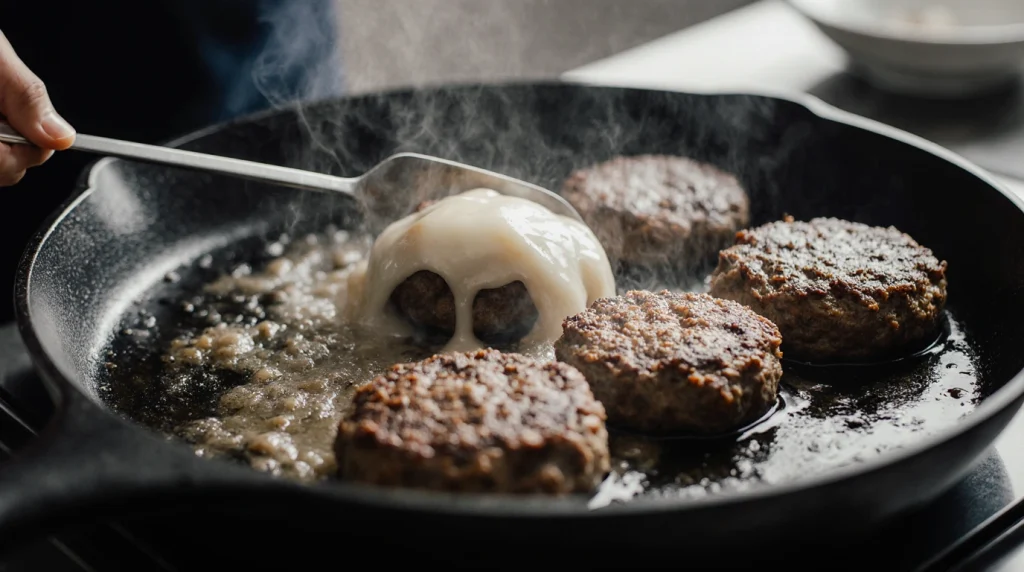
Cooking Method: The Perfect Smash Technique
1. Heat your pan to maximum temperature: Place a cast-iron skillet, carbon steel pan, or flat griddle over high heat for 5 minutes. The pan must be screaming hot—this is non-negotiable for proper crust formation. You’re aiming for 400-450°F surface temperature.
2. Add no oil: The beef contains enough fat. Adding oil prevents proper crust development and makes the burgers greasy.
3. Place the beef ball: Set one 4-ounce beef ball on the hot surface. Immediately season the exposed top generously with kosher salt and black pepper.
4. Smash immediately: Using your spatula and a second flat object (another spatula or the bottom of a small pot), press down firmly on the beef ball. Apply steady, strong pressure for 5-10 seconds to flatten the patty to about 1/4-inch thickness—thinner is better. You want the patty to be wider than your bun.
5. Don’t move it: Once smashed, leave the patty completely undisturbed for 2-3 minutes. You’ll hear aggressive sizzling—that’s the crust forming. Resist the urge to peek, press, or adjust.
6. Check for crust: The edges should look deeply browned and crispy, with the bottom developing a dark mahogany color. The patty will naturally release from the pan when the crust is ready.
7. Flip once: Using your spatula, slide it under the burger in one confident motion and flip. The cooked side should have a beautiful dark crust with crispy, lacy edges.
8. Cook the second side: This side only needs 15-30 seconds—just enough to warm through. The patty is thin, so it cooks almost instantly.
9. Add cheese (optional): If using cheese, place a slice on top immediately after flipping. The residual heat will melt it perfectly in those 15-30 seconds.
10. Remove and rest: Transfer the burger to your prepared bun. No resting period needed—smash burgers are best eaten immediately while the crust is at peak crispiness.
Doneness Check
With smash burgers, doneness is simple: the patties are fully cooked when both sides have developed a dark brown crust. Due to their thinness (about 1/4-inch), smash burgers reach a safe internal temperature of 160°F for ground beef within 2-3 minutes total cooking time.
Unlike thick burgers that require a meat thermometer, smash burgers cook so quickly that by the time the crust forms, the interior is fully cooked. The visual cue—a crispy, deeply browned crust—is your indicator of doneness.
If you prefer to check temperature, insert an instant-read thermometer horizontally through the side of the patty. It should read 160°F for food safety.
Resting: Why Smash Burgers Are Different
Smash burgers don’t need resting time. Unlike thick steaks or large burger patties that benefit from a 5-10 minute rest to redistribute juices, smash burgers are meant to be assembled and eaten immediately.
The thin patty doesn’t accumulate the same internal juices that need redistributing. More importantly, the crispy crust is at its absolute best right off the griddle. Letting smash burgers rest allows the crust to soften and lose its signature crunch—the very thing that makes them special.
Serve immediately for the best texture contrast: crispy, crunchy exterior with a hot, juicy interior.
Pro Tips for Perfect Smash Burgers
Master these professional techniques to elevate your smash burgers from good to extraordinary.
Avoiding Dry or Tough Burgers
Don’t over-handle the meat: The biggest mistake home cooks make is working the ground beef too much. Over-mixing and excessive handling develops the meat’s proteins, creating a dense, tough texture. Keep the beef in loose balls and touch it as little as possible.
Never press after smashing: Once you’ve smashed the burger initially, don’t press down on it again. Pressing mid-cook squeezes out precious juices and makes the burger dry.
Use high heat consistently: If your pan temperature drops, the beef will steam instead of sear, resulting in gray, tough meat instead of crispy, juicy burgers. Cook in batches if necessary to maintain heat.
Stick to 80/20 beef: Leaner beef simply can’t produce juicy smash burgers. The fat is essential—it’s not negotiable.
Don’t flip multiple times: Flip once and only once. Each flip releases heat and juices. The single-flip method ensures maximum crust and moisture retention.
Essential Tool Recommendations
Invest in these key tools for smash burger success:
Heavy-duty metal spatula: A thin, rigid metal turner with a sharp edge is essential for scraping under the crust without tearing it. Look for one at least 5-6 inches wide.
Cast-iron skillet or griddle: Cast iron retains heat exceptionally well and creates even crust development. A 12-inch skillet fits 2-3 burgers at once. Carbon steel is an excellent alternative.
Smash tool: While you can use a second spatula, a dedicated burger smasher (a flat metal press) makes the job easier and more consistent.
Instant-read thermometer: Though less critical for thin smash burgers, it’s good for verifying your pan temperature (aim for 400-450°F) and checking doneness if you’re unsure.
Kitchen scale: Consistent 4-ounce portions ensure even cooking. Eyeballing leads to irregular results.
Achieving Maximum Crust
The crispy crust is the hallmark of a perfect smash burger. Here’s how to maximize it:
Use extreme heat: Your pan must be significantly hotter than you’d use for regular burgers. If you’re not seeing immediate aggressive sizzling, the pan isn’t hot enough.
Smash thin and wide: Apply serious pressure. The thinner the patty (without creating holes), the more surface area contacts the pan, and the more crust you develop.
Don’t crowd the pan: Each patty needs full contact with the hot surface. Crowding drops the pan temperature and creates steam, preventing crust formation.
Use fresh-ground beef when possible: Freshly ground beef has more loosely connected protein strands, which create better texture and more pronounced lacy edges.
Let the crust fully develop before flipping: If you flip too early, you’ll tear the crust. Wait until the edges are deeply brown and the burger releases naturally from the pan.
Storage & Reheating
While smash burgers are best fresh, you can store and reheat them if needed:
Storing cooked patties: Place cooked patties in an airtight container with parchment paper between layers. Refrigerate for up to 3 days.
Freezing: Freeze cooked patties on a baking sheet until solid, then transfer to a freezer bag. They’ll keep for up to 2 months. Don’t freeze with toppings or buns.
Reheating for best results: Reheat in a hot skillet for 1-2 minutes per side. This revives some of the crispiness. Avoid microwaving—it makes the crust soggy and ruins the texture.
Make-ahead tip: You can portion and season the beef balls ahead, keeping them covered in the refrigerator until cooking time. However, never pre-smash them—always smash immediately before cooking.
Leftover strategy: Turn leftover smash burger patties into patty melts, chop them for burger bowls, or use them in breakfast scrambles.
Flavor Variations
While the classic 3-ingredient smash burger is perfect on its own, these variations let you explore different flavor profiles while maintaining that signature crispy crust.
Spicy Smash Burger Twist
Add heat to your smash burgers with these simple modifications:
Cajun seasoning: Mix 1/2 teaspoon cayenne pepper, 1/2 teaspoon paprika, and 1/4 teaspoon garlic powder with your salt and pepper. Season the beef balls just before smashing.
Jalapeño-topped: Add fresh jalapeño slices on top of the cheese during the last 15 seconds of cooking. The heat from the burger will slightly soften them.
Chipotle mayo: Mix 2 tablespoons mayo with 1 teaspoon adobo sauce from canned chipotle peppers. Spread on the bun for smoky heat.
Pepper jack cheese: Swap American cheese for pepper jack to add creamy spiciness.
Hot sauce glaze: Brush the top of the patty with your favorite hot sauce immediately after flipping for a spicy, caramelized finish.
Keto and Paleo-Friendly Options
Keep your smash burgers low-carb without sacrificing flavor:
Lettuce wrap: Skip the bun and wrap your smash burger in large butter lettuce or iceberg lettuce leaves. Crispy lettuce provides satisfying crunch that complements the crispy patty.
Portobello bun: Use grilled portobello mushroom caps as buns. Their meaty texture pairs perfectly with beef.
Cheese “buns”: Make crispy cheese buns by melting shredded cheddar in the pan until crispy, then using them to wrap the burger.
Sugar-free condiments: Use sugar-free ketchup, mustard, and mayo. Many store-bought versions contain added sugars.
Avocado addition: Top with fresh avocado slices for healthy fats and creamy texture without carbs.
The core smash burger technique remains identical—just swap the bun for these alternatives while keeping the crispy beef patty as the star.
Global Flavor Inspirations
Transform your smash burgers with international flavors:
Korean-Style Smash Burger: Season beef with gochugaru (Korean chili flakes) and top with kimchi, gochujang mayo (gochujang mixed with mayo), and sesame seeds. Use a soft potato bun.
Italian Herb Crust: Mix dried oregano, basil, and garlic powder into your seasoning. Top with provolone cheese, fresh arugula, and balsamic glaze.
Greek-Inspired: Season with dried oregano and top with crumbled feta, sliced tomatoes, red onion, and tzatziki sauce on a toasted pita.
Mexican Street Style: Season with cumin and chili powder. Top with pepper jack cheese, pickled jalapeños, cilantro, and chipotle crema on a telera roll.
Japanese Teriyaki: Brush the patty with teriyaki sauce after flipping. Top with grilled pineapple, Japanese mayo, and shredded cabbage on a brioche bun.
French Bistro: Top with caramelized onions, gruyere cheese, whole-grain mustard, and arugula on a buttery brioche bun.
Each variation maintains the essential smash burger technique—high heat, thin patty, aggressive crust—while introducing new flavor dimensions through toppings and seasonings.
Serving Suggestions
Complete your smash burger experience with perfectly paired sides, sauces, and beverages that complement the rich, crispy beef.
Classic Side Pairings
Crispy French fries: The traditional pairing. Hand-cut and double-fried fries provide the perfect textural contrast. Season with sea salt or try truffle parmesan for an upgrade.
Onion rings: Beer-battered onion rings add sweetness and crunch. Their mild flavor won’t compete with the beef.
Coleslaw: A tangy, creamy coleslaw cuts through the richness of the burger and adds refreshing crunch. Vinegar-based slaws work especially well.
Pickle spears: Serve whole dill pickles on the side. The acidity and crunch cleanse your palate between bites.
Sweet potato fries: For a slightly healthier option, crispy sweet potato fries add natural sweetness that balances the savory beef.
Grilled vegetables: Zucchini, bell peppers, and asparagus provide a lighter counterpoint to the indulgent burger.
Mac and cheese: Creamy, indulgent mac and cheese turns your burger into a complete comfort food feast.
Potato chips: The easiest side—high-quality kettle-cooked chips add satisfying crunch with zero effort.
Sauce and Topping Bar
Create a condiment station for customization:
Classic burger sauce: Mix mayo, ketchup, sweet pickle relish, and a splash of vinegar. This tangy-sweet sauce is quintessential smash burger territory.
Caramelized onions: Slowly cooked until golden and sweet, these add depth and richness.
Crispy bacon: Thick-cut bacon adds smoky, salty crunch. Cook it until extra crispy.
Fresh vegetables: Lettuce, tomato slices, red onion, and pickles let everyone build their perfect burger.
Special mustards: Offer yellow mustard, Dijon, and whole-grain for variety.
Multiple cheese options: American, cheddar, Swiss, and blue cheese satisfy different preferences.
Beverage Pairings
Beer pairings: Lagers and pilsners complement smash burgers beautifully. Their crisp, clean flavors refresh your palate without overwhelming the beef. Try an American lager, German pilsner, or amber ale.
Wine pairings: If you prefer wine, choose medium-bodied reds like Merlot or Zinfandel. Their fruity notes complement the caramelized crust. For white wine lovers, a buttery Chardonnay can work surprisingly well.
Non-alcoholic options: Classic cola or root beer provides nostalgic diner vibes. The sweetness and carbonation cut through the richness. Iced tea, lemonade, or craft sodas are excellent alternatives.
Milkshakes: For the full diner experience, pair your smash burger with a thick vanilla, chocolate, or strawberry milkshake. The creamy sweetness is the ultimate indulgent combination.
Presentation Tips
Serve your smash burgers with style:
Basket or tray lining: Use parchment paper or checkered deli paper for authentic diner presentation.
Skewer or pick: Insert a decorative pick through the burger to hold it together—especially helpful for double smash burgers.
Serve immediately: Smash burgers are at their peak right off the griddle. Serve them hot so guests experience the crispy crust at its best.
Cut in half: For easier eating (or Instagram photos), slice larger burgers in half to showcase the layers and that crispy edge.
FAQs
Can I use frozen ground beef for smash burgers?
Yes, but fresh is better. If using frozen ground beef, thaw it completely in the refrigerator first—never at room temperature. Pat it very dry with paper towels before portioning, as frozen beef releases excess moisture that can prevent proper crust formation. Fresh ground beef produces superior texture and flavor, but properly thawed frozen beef will still make excellent smash burgers.
What if I don’t have a cast-iron skillet?
Any heavy-bottomed pan works, though cast iron is ideal. Stainless steel, carbon steel, or heavy aluminum pans can all achieve excellent results if heated properly. Avoid nonstick pans—they can’t withstand the high heat needed for proper crust development, and the coating prevents the Maillard reaction that creates that crispy exterior. A flat griddle or plancha is also excellent for smash burgers.
How do I fix overcooked or dry smash burgers?
Prevention is key—smash burgers cook so quickly that overcooking happens if you leave them on heat too long. If your burgers turned out dry, the likely culprits are: using too-lean beef (use 80/20 instead), pressing on the burger after the initial smash (squeezes out juices), or cooking over insufficient heat (causes steaming instead of searing). Unfortunately, you can’t reverse overcooked meat, but you can salvage dry burgers by adding extra sauce, melted cheese, or serving them with juicy toppings like tomatoes and pickles.
Can I make smash burgers without smashing them?
No—the smashing technique is what defines a smash burger. The aggressive press creates maximum surface contact with the hot pan, which generates the crispy, caramelized crust through the Maillard reaction. Without smashing, you’ll have a regular thin burger that lacks the signature texture. If you don’t smash, you won’t get those lacy, crispy edges that make smash burgers special.
Do I need to add oil to the pan?
No oil needed. The 80/20 ground beef contains enough fat to prevent sticking and create the perfect crust. Adding oil actually interferes with crust development and makes the burgers greasy. The hot, dry pan combined with the beef’s natural fat is the correct approach. If you’re worried about sticking, make sure your pan is properly heated to at least 400°F before adding the beef.
How many smash burgers should I cook at once?
This depends on your pan size. A 12-inch cast-iron skillet can comfortably fit 2-3 smash burgers without crowding. Never overcrowd the pan—each patty needs full contact with the hot surface, and crowding drops the temperature, causing the burgers to steam instead of sear. If cooking for a crowd, work in batches and keep finished burgers warm in a 200°F oven while you cook the remaining patties.
Is this recipe safe during pregnancy?
Ground beef must be cooked to 160°F to be safe during pregnancy, which eliminates any risk of foodborne illness. Smash burgers cook quickly and thoroughly due to their thinness—by the time the crust develops (2-3 minutes per side), the internal temperature exceeds 160°F. Unlike thick burgers that might be rare in the middle, properly cooked smash burgers are always well-done. If concerned, use an instant-read thermometer to verify the temperature reaches 160°F.
Can I make double smash burgers?
Absolutely! Double smash burgers are incredibly popular. Cook two 2-ounce patties instead of one 4-ounce patty, stacking them with a slice of cheese between each layer. This creates even more crispy edges while maintaining a juicy interior. The cooking method stays the same—smash each patty individually, cook until crispy, then stack them with cheese. Two thin patties actually provide more crust than one thick patty, making doubles a favorite among smash burger enthusiasts.
What’s the best cheese for smash burgers?
American cheese is the classic choice for authentic smash burgers. Its creamy texture, mild flavor, and superior melting properties make it ideal. American cheese melts evenly without separating or becoming oily, coating the burger perfectly. However, cheddar, pepper jack, Swiss, or even blue cheese can work based on your preference. The key is adding the cheese immediately after flipping so it melts during those final 15-30 seconds of cooking.
Can I make smash burgers on a grill?
Yes, but with modifications. You’ll need a flat griddle or cast-iron pan on your grill, as you can’t smash burgers directly on grill grates—they’d fall through. Preheat the griddle on the grill over high heat until it reaches 400-450°F, then follow the same smashing technique. The grill adds a subtle smoky flavor while the griddle provides the flat surface needed for proper crust formation.
Conclusion
You now have everything you need to create restaurant-quality smash burgers at home with just three simple ingredients: quality 80/20 ground beef, kosher salt, and freshly ground black pepper. The magic isn’t in complicated recipes or secret ingredients—it’s in the technique: screaming hot pan, aggressive smashing, and letting that crust develop undisturbed.
Fire up your skillet tonight and experience the crispy-edged, juicy perfection of homemade smash burgers! There’s no better time than now to master this simple yet incredibly satisfying cooking method. Once you taste that caramelized crust and juicy interior, you’ll understand why smash burgers have taken over burger menus everywhere.
Join over 15,000 home cooks who’ve already transformed their burger game with this foolproof recipe. The best part? You probably have everything you need in your kitchen right now. No special trips to the store, no fancy equipment—just great technique and quality ingredients.
Ready for more burger inspiration? Check out our complete guide to [Classic Burger Toppings and Sauce Combinations] to take your smash burgers to the next level. Or explore our [Cast-Iron Cooking Masterclass] to perfect your technique with this essential kitchen tool.
Now grab that ground beef, heat up your cast iron, and get smashing. Your best burger is just minutes away!