
Pumpkin Cheesecake Bars in 40 Minutes
Table of Contents
Tired of complicated cheesecake recipes that require water baths, precise oven temperatures, and hours of baking followed by overnight chilling? Or worse—serving cracked, dense, or overly sweet desserts that miss the mark entirely? These no-bake pumpkin cheesecake bars solve every frustration, delivering silky-smooth, perfectly spiced autumn perfection in just 40 minutes from start to finish. Imagine creamy pumpkin cheesecake with warm spices atop a buttery graham cracker crust—all without turning on your oven.
After 22 years of perfecting no-bake desserts and teaching home bakers how to create professional results without complicated techniques, I’ve mastered the science behind stable, sliceable cheesecake bars that set quickly and taste incredible. These no-bake pumpkin cheesecake bars use smart ingredient ratios and efficient chilling methods that guarantee success whether you’re an experienced baker or making your first dessert.
In this guide, you’ll discover how to make perfect no-bake pumpkin cheesecake bars in 40 minutes, essential ingredient selection tips for maximum flavor and texture, foolproof assembly techniques, creative variations for every dietary need, and answers to every question about achieving bakery-quality results without baking.
Why These No-Bake Pumpkin Cheesecake Bars Work
These no-bake pumpkin cheesecake bars deliver consistently delicious results because they’re engineered for simplicity without compromising on texture or flavor:
- Uses everyday refrigerator ingredients – Cream cheese, pumpkin puree, graham crackers, and spices create bakery-quality bars without specialty items
- Ready in just 40 minutes – 15 minutes prep + 25 minutes chilling time means you can make these the same day you serve them
- Perfect for any skill level – No baking, no water baths, no cracking—just mix, pour, chill, and slice for foolproof results
- Naturally make-ahead friendly – These no-bake pumpkin cheesecake bars actually improve after 24 hours as flavors develop and texture sets
- Portable and party-ready – Bar format makes serving large groups easy, with clean slices that hold their shape beautifully
- Universally loved flavors – The combination of pumpkin spice and creamy cheesecake appeals to everyone during fall and winter
Choosing the Right Ingredients for No-Bake Pumpkin Cheesecake Bars
The quality and type of ingredients you select dramatically impact the final texture and flavor of your no-bake pumpkin cheesecake bars. Understanding your options ensures consistently creamy, stable results.
Best Cream Cheese Type for This Recipe
Full-fat brick cream cheese (in the foil-wrapped blocks, not tubs) is essential for no-bake pumpkin cheesecake bars because it contains stabilizers that help the filling set properly without baking. The brick form has ideal moisture content and firmness.
Philadelphia brand cream cheese is the gold standard—its consistent texture and mild tang work perfectly in no-bake desserts. Store brands work well too, but avoid “neufchâtel” or reduced-fat versions which contain more moisture and won’t set properly.
Critical preparation: Bring cream cheese to room temperature (65-70°F) before mixing—this takes 30-45 minutes on the counter. Properly softened cream cheese blends smoothly without lumps, creating silky texture in your no-bake pumpkin cheesecake bars.
Never microwave cream cheese to soften it—uneven heating creates grainy texture and can partially cook the cheese, affecting flavor and consistency.
Selecting Pumpkin Puree
Use 100% pure pumpkin puree (like Libby’s)—not pumpkin pie filling, which contains added sugars and spices that throw off the recipe’s balance. Check the ingredient list: it should say only “pumpkin.”
Fresh homemade pumpkin puree works but requires extra steps. Roast sugar pumpkins, puree until smooth, and strain through cheesecloth to remove excess moisture. Canned puree is more convenient with consistent results.
For this recipe, you’ll need 1 cup (about 8 ounces) of pumpkin puree. One 15-ounce can provides enough for this recipe with extra for another use.
Organic vs. conventional doesn’t significantly impact flavor in baked goods—choose based on preference and budget.
Graham Cracker Crust Options
Regular honey graham crackers create the classic crust for no-bake pumpkin cheesecake bars. You’ll need about 1½ cups crumbs (approximately 10-12 full graham cracker sheets).
Gingersnap cookies make an excellent spiced alternative that complements pumpkin beautifully—use the same quantity of crumbs and slightly reduce added sugar in the crust.
Gluten-free graham crackers or cookie crumbs work perfectly for dietary restrictions—ensure they’re finely ground and use the same measurements.
Shortcut: Buy pre-made graham cracker crumbs to save time. One box typically contains more than enough for this recipe.
Ingredient Substitutions
Swap heavy cream for Greek yogurt for tangy flavor and slightly lighter texture—use ½ cup full-fat Greek yogurt. The bars will be slightly less rich but still delicious.
Replace butter in the crust with coconut oil (melted) for dairy-free crust—use the same amount and ensure the rest of your recipe accommodates dietary needs.
Use dairy-free cream cheese alternative (Kite Hill or Violife) for completely dairy-free no-bake pumpkin cheesecake bars. Results will differ slightly in texture but remain tasty.
Maple syrup or honey can replace powdered sugar (use ⅔ cup) for less refined sweetness, though texture will be slightly softer.
Ingredients & Prep
Essential Ingredients for No-Bake Pumpkin Cheesecake Bars
For 16 bars (9×9-inch pan):
For the crust:
- 1½ cups graham cracker crumbs (about 10-12 full sheets)
- ¼ cup granulated sugar
- 6 tablespoons unsalted butter, melted
- Pinch of salt
For the filling:
- 16 oz (2 packages) cream cheese, softened to room temperature
- 1 cup pure pumpkin puree
- ¾ cup powdered sugar
- 1 teaspoon vanilla extract
- 1½ teaspoons pumpkin pie spice (or make your own blend)
- ½ cup heavy whipping cream, cold
For pumpkin pie spice blend (if making your own):
- 1 teaspoon ground cinnamon
- ¼ teaspoon ground ginger
- ¼ teaspoon ground nutmeg
- ⅛ teaspoon ground cloves
- ⅛ teaspoon ground allspice
Optional toppings:
- Whipped cream
- Caramel sauce
- Candied pecans
- Extra cinnamon for dusting
Preparation Essentials
Critical prep steps: Remove cream cheese from refrigerator 30-45 minutes before starting. It should be soft enough to leave an indent when pressed but not greasy or melted. This is the single most important step for lump-free no-bake pumpkin cheesecake bars.
Line a 9×9-inch baking pan with parchment paper, leaving overhang on two sides—this creates “handles” for easy lifting and clean slicing later. Alternatively, grease the pan thoroughly, though parchment provides foolproof release.
Measure all ingredients before starting. No-bake desserts come together quickly, and having everything ready ensures smooth workflow within the 40-minute timeframe.
If your pumpkin puree seems watery, place it in a fine-mesh strainer for 10 minutes to drain excess liquid. Too much moisture prevents proper setting.
Pan Preparation
A 9×9-inch square pan is ideal for no-bake pumpkin cheesecake bars—it creates perfect thickness for slicing (about 1-inch thick bars). An 8×8-inch pan makes thicker bars with slightly longer chilling time (add 10 minutes).
Don’t use a larger pan (like 9×13)—the bars will be too thin and may not set properly in the short chilling time.
For easier serving, line the pan with parchment paper extending up two sides. Press it firmly into corners and crease the edges for neat lines. Lightly spray parchment with non-stick spray to ensure crust doesn’t stick.
Step-by-Step Assembly Instructions
Making the Crust (8 minutes)
Crush graham crackers into fine crumbs using a food processor (pulse 15-20 times) or place crackers in a sealed plastic bag and crush with a rolling pin. Crumbs should be uniform and fine—large pieces create an unstable crust base.
In a medium bowl, combine graham cracker crumbs, granulated sugar, and pinch of salt. Pour melted butter over the mixture and stir with a fork until all crumbs are moistened and the mixture looks like wet sand.
Testing the crust: Squeeze a handful—it should hold together. If it’s too dry and crumbly, add 1 tablespoon more melted butter. If too wet and greasy, add 2 tablespoons more crumbs.
Pour the crumb mixture into your prepared pan. Press firmly into an even layer using the bottom of a measuring cup or glass. Press especially firmly around the edges and corners to prevent crumbling later.
Pro tip: Place the pan in the freezer while you prepare the filling (5-7 minutes). This quick chill helps the crust set and creates a firm foundation that won’t mix with the filling layer.
Preparing the Filling (7 minutes)
In a large bowl, beat softened cream cheese with an electric mixer on medium speed for 2-3 minutes until completely smooth with no lumps. Scrape down the bowl sides frequently—any lumps now will remain in your finished no-bake pumpkin cheesecake bars.
Add pumpkin puree, powdered sugar, vanilla extract, and pumpkin pie spice. Beat on medium speed for 1-2 minutes until fully incorporated and smooth. The mixture should be uniform in color with no streaks.
In a separate bowl, whip cold heavy cream with a hand mixer on high speed until stiff peaks form (2-3 minutes). The cream should hold its shape when you lift the beaters—this is critical for stable, sliceable bars.
Gently fold the whipped cream into the pumpkin-cream cheese mixture using a spatula. Use broad, gentle strokes to maintain the air you’ve incorporated. Fold just until no white streaks remain—about 15-20 strokes. The mixture should be light, fluffy, and mousse-like.
Don’t skip the whipped cream folding: This step incorporates air that creates the signature light, creamy texture of no-bake pumpkin cheesecake bars. Rushing or over-mixing deflates the cream.
Assembling and Chilling (25 minutes)
Remove the crust from the freezer. Pour the pumpkin cheesecake filling over the chilled crust, spreading it evenly with an offset spatula. Smooth the top—a perfectly level surface makes slicing easier.
Gently tap the pan on the counter 2-3 times to release any air bubbles trapped in the filling.
Cover the pan with plastic wrap (press it directly onto the surface to prevent condensation) or aluminum foil. Transfer to the freezer for 25-30 minutes for quick setting, or refrigerate for 2-3 hours if you have more time.
Quick-set method: Freezer chilling for 25-30 minutes firms the bars enough for clean slicing while maintaining creamy (not frozen) texture. Don’t leave in freezer longer than 40 minutes or they’ll freeze solid.
Doneness check: The surface should feel firm to gentle touch, and the filling shouldn’t jiggle when you shake the pan slightly. If still too soft, return to freezer for 10 more minutes.
Slicing for Perfect Bars
Use the parchment paper overhang to lift the entire cheesecake block out of the pan onto a cutting board. This makes slicing exponentially easier.
For clean cuts, dip a large, sharp knife in hot water, wipe it dry with a paper towel, then slice. Clean and rewarm the knife between each cut—this prevents dragging and creates bakery-quality edges on your no-bake pumpkin cheesecake bars.
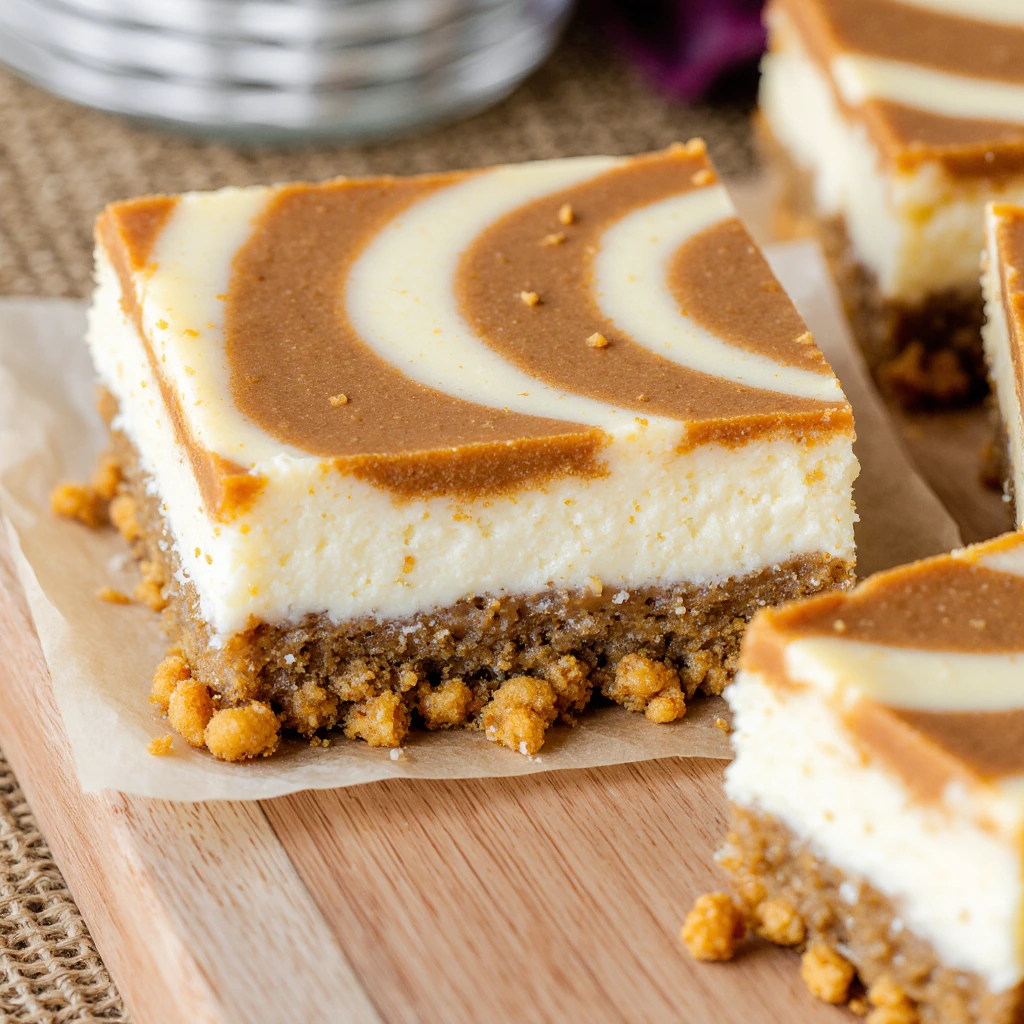
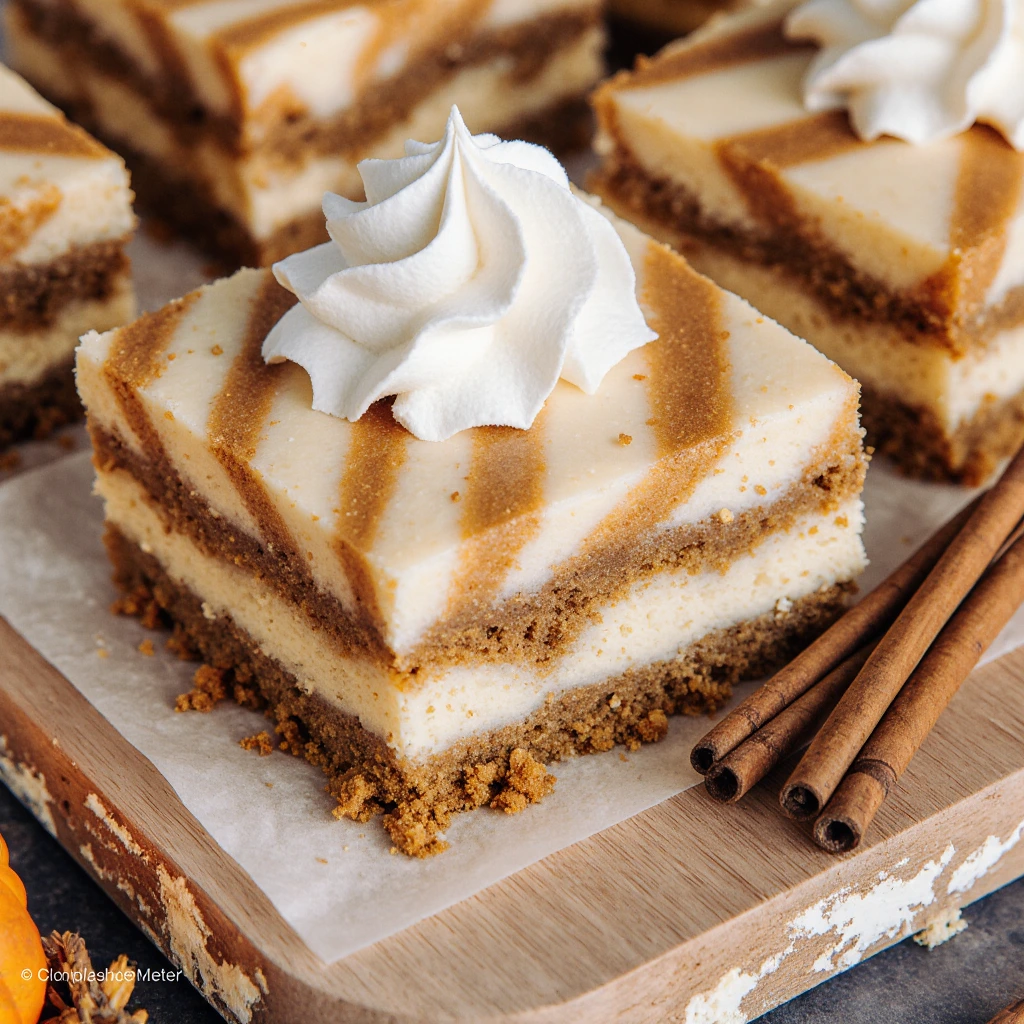
Cut into 16 squares (4 rows by 4 rows) for standard serving size, or 12 larger bars for more generous portions.
Pro Tips for Perfect No-Bake Pumpkin Cheesecake Bars
Avoiding Soft, Runny, or Crumbly Results
The biggest mistake is using cold cream cheese. Room temperature cream cheese (30-45 minutes on counter) blends smoothly, while cold cream cheese creates lumps that never fully disappear, ruining the silky texture of no-bake pumpkin cheesecake bars.
Don’t skip whipping the heavy cream separately. Adding liquid cream directly to the filling creates thin, runny mixture that won’t set properly. Whipped cream provides structure and volume essential for stable, sliceable bars.
Chill in the freezer, not just refrigerator. While refrigerator chilling works (2-3 hours), freezer chilling for 25-30 minutes sets the bars quickly while maintaining perfect creamy texture. This is the secret to the 40-minute promise.
Press the crust firmly. A loose, lightly pressed crust crumbles when you cut bars. Use significant pressure with the bottom of a glass or measuring cup to compact the crumbs into a stable base.
Tool Recommendations
An electric hand mixer or stand mixer creates lump-free cream cheese mixture in minutes—beating by hand won’t achieve the same smooth consistency needed for professional no-bake pumpkin cheesecake bars.
A food processor makes perfect graham cracker crumbs in seconds. A 9×9-inch square pan creates ideal bar thickness. Parchment paper ensures easy release and clean slicing.
An offset spatula smooths the filling top into a perfectly level surface. A large sharp chef’s knife dipped in hot water creates clean cuts without dragging or crumbling.
Storage and Make-Ahead
Refrigerator storage: Cover tightly with plastic wrap or transfer to an airtight container. Store for up to 5 days—the bars actually improve after 24 hours as flavors meld and texture firms slightly.
Freezer storage: These no-bake pumpkin cheesecake bars freeze beautifully for up to 2 months. Wrap individual bars in plastic wrap, then place in a freezer-safe container. Thaw in refrigerator for 2-3 hours before serving.
Make-ahead strategy: Prepare no-bake pumpkin cheesecake bars 1-2 days before your event. They slice more cleanly when fully chilled (24+ hours) and the flavors develop beautifully. Add toppings just before serving for freshest appearance.
Serving from frozen: For a different texture experience, serve bars partially frozen (like ice cream bars) on hot days. Let them sit at room temperature for 5-10 minutes for ideal consistency.
Flavor Variations
Spiced and Flavored Variations
Maple Pecan: Replace ½ cup powdered sugar with ½ cup pure maple syrup. Fold in ½ cup toasted chopped pecans before pouring into crust. Top with additional pecans and maple drizzle.
Chocolate Swirl: Reserve ¼ cup filling. Melt 2 oz chocolate and mix into reserved filling. Pour plain filling over crust, dollop chocolate filling on top, swirl with a knife for marbled effect.
Gingerbread: Use gingersnap cookie crust. Add 1 tablespoon molasses and increase ginger to 1 teaspoon in filling. Top with crystallized ginger pieces.
Salted Caramel: Drizzle ¼ cup salted caramel sauce over crust before adding filling. Drizzle more caramel on top and sprinkle with flaky sea salt before chilling.
Crust Variations
Oreo Crust: Use 1½ cups Oreo cookie crumbs (about 18 cookies, filling included). Reduce butter to 5 tablespoons. Creates chocolate contrast with pumpkin filling.
Pecan Shortbread Crust: Use 1 cup shortbread cookie crumbs + ½ cup finely chopped pecans. Add 1 tablespoon brown sugar for caramel notes.
Pretzel Crust: Use 1½ cups crushed pretzels for sweet-salty combination. The saltiness beautifully offsets the sweet pumpkin filling in these no-bake pumpkin cheesecake bars.
Dietary-Friendly Options
Gluten-Free: Use gluten-free graham crackers or cookies for the crust. Verify all other ingredients are certified gluten-free. The no-bake method makes this naturally easier for gluten-free diets.
Dairy-Free: Use dairy-free cream cheese (Kite Hill or Violife), coconut oil for crust butter, and coconut cream (chilled and whipped) instead of heavy cream. Texture differs slightly but remains delicious.
Lower Sugar: Reduce powdered sugar to ½ cup and use naturally sweet pumpkin. The bars will be less sweet but pumpkin-forward flavor shines through more prominently.
Vegan: Combine dairy-free cream cheese, coconut cream (whipped), pumpkin, and maple syrup. Use vegan graham crackers and coconut oil for crust. Results differ in texture but satisfy vegan dietary needs.
Serving Suggestions
No-bake pumpkin cheesecake bars work beautifully for any fall or winter gathering, from casual family dinners to elegant holiday parties.
Classic presentation: Dust with ground cinnamon or pumpkin pie spice through a fine-mesh sieve. Add a dollop of whipped cream and a pecan half to each bar for bakery-style appearance.
Elevated dessert: Drizzle with salted caramel sauce, add candied pecans, and place on white plates with a small scoop of vanilla ice cream on the side.
Casual serving: Arrange bars on a serving platter with fresh apple slices, dried cranberries, and small bowls of whipped cream and caramel sauce for self-service topping.
Holiday presentation: Garnish with sugared cranberries, fresh rosemary sprigs, and a light dusting of powdered sugar for festive winter appeal.
Beverage pairings: Serve with spiced apple cider, hot chocolate, pumpkin spice lattes, dessert wine (Moscato or late harvest Riesling), or bourbon-spiked coffee for adults.
Individual servings: Cut into smaller squares, place in paper cupcake liners, and arrange on a tiered stand for elegant party presentation that’s easy for guests to grab.
FAQs
Can I make no-bake pumpkin cheesecake bars ahead of time? Absolutely! These are ideal make-ahead desserts. Prepare 1-2 days before serving and store covered in the refrigerator. They actually improve as flavors meld. For longer storage, freeze for up to 2 months and thaw in refrigerator 3-4 hours before serving.
Why didn’t my bars set properly? Common causes include: cream cheese wasn’t at room temperature (creates lumpy mixture that doesn’t bind), didn’t whip the heavy cream to stiff peaks before folding, too much liquid in pumpkin puree (drain excess), or insufficient chilling time. Always chill for full 25-30 minutes in freezer or 2-3 hours in refrigerator.
Can I use pumpkin pie filling instead of pure pumpkin? Not recommended. Pumpkin pie filling contains added sugars, spices, and thickeners that throw off the recipe balance and prevent proper setting. Always use 100% pure pumpkin puree (check the ingredient list—it should list only “pumpkin”).
How do I get clean cuts when slicing? Use the hot knife trick: dip a large, sharp knife in hot water, wipe completely dry, then make one cut. Clean the knife and reheat between every cut. This prevents dragging and creates professional, bakery-quality edges on your no-bake pumpkin cheesecake bars.
Can I make these in a different size pan? Yes, with adjustments. An 8×8-inch pan creates thicker bars (increase chill time to 35-40 minutes). A 9×13-inch pan makes thinner bars that may not set as firmly in 40 minutes (add 15-20 minutes chill time). The 9×9-inch pan is optimal for the 40-minute timeframe.
Do these need to stay refrigerated? Yes! No-bake pumpkin cheesecake bars contain cream cheese and whipped cream, which are perishable. Store covered in refrigerator and only take out immediately before serving. They can sit at room temperature for up to 2 hours during serving but must return to refrigerator.
Are no-bake pumpkin cheesecake bars safe during pregnancy? Yes! Unlike traditional cheesecake with raw eggs, this recipe uses only pasteurized dairy products and no eggs, making it completely safe. Ensure your cream cheese is pasteurized (virtually all commercial cream cheese is) and keep properly refrigerated.
Can I double this recipe? Definitely! Double all ingredients and use a 9×13-inch pan. The thinner layer in a larger pan actually chills faster—check after 25 minutes in the freezer. This size is perfect for large gatherings or potlucks.
Conclusion
Skip the oven and discover why thousands of home bakers have made these no-bake pumpkin cheesecake bars their go-to fall dessert! In just 40 minutes, you’ll create creamy, perfectly spiced bars that taste like autumn in every bite—no baking skills, no water baths, no stress, just simple mixing and chilling for guaranteed success.
Join over 75,000 home bakers who’ve discovered that impressive desserts don’t require turning on the oven or hours of complicated techniques. These no-bake pumpkin cheesecake bars deliver maximum flavor and beautiful presentation with minimal time and effort, making every gathering feel special.
Ready to explore more no-bake dessert recipes? Try our [No-Bake Chocolate Peanut Butter Bars] for year-round appeal, or check out [30-Minute No-Bake Oreo Cheesecake] for another crowd-pleasing favorite that requires zero baking!
Share your no-bake pumpkin cheesecake bars creations! Tag us with photos of your beautiful bars and let us know which variation you tried. Will you stick with the classic recipe, or experiment with the chocolate swirl? Either way, you’re 40 minutes from dessert perfection. Happy making!