
Apple Wreath Pastries in 35 Minutes
Table of Contents
Tired of spending hours on elaborate holiday baking that leaves you stressed and exhausted before guests even arrive? Or worse—attempting impressive pastries that turn out lopsided, burnt, or just plain disappointing? Apple Wreath Pastries solve both problems, delivering stunning, bakery-quality results in just 35 minutes using simple store-bought puff pastry and fresh apples. Imagine golden, flaky wreath-shaped pastries with tender cinnamon apples peeking through—all without complicated laminating, precise folding techniques, or pastry school training.
After 19 years of teaching home bakers how to create showstopping desserts with minimal time and maximum impact, I’ve perfected the art of shortcut elegance. These Apple Wreath Pastries use smart assembly techniques and efficient baking methods that guarantee professional-looking results whether you’re an experienced baker or creating your first decorative pastry.
In this guide, you’ll discover how to make perfect Apple Wreath Pastries in 35 minutes, essential apple and puff pastry selection tips, foolproof shaping and assembly techniques, creative flavor variations for every season, and answers to every question about achieving gorgeous, Instagram-worthy pastries with minimal effort.
Why These Apple Wreath Pastries Work
These Apple Wreath Pastries deliver consistently impressive results because they’re designed for maximum visual impact with minimal complexity:
- Uses store-bought puff pastry – No need to make pastry from scratch; quality frozen puff pastry creates bakery-level flakiness in minutes
- Ready in just 35 minutes – 15 minutes prep + 20 minutes baking means you can make these the morning of your event
- Perfect for any occasion – Elegant enough for holiday entertaining, simple enough for weekend brunch, always stunning
- Naturally impressive presentation – The wreath shape looks incredibly sophisticated but requires only basic cutting and twisting
- Make-ahead friendly – Assemble hours or even a day ahead, then bake fresh when needed for warm, fragrant results
- Universally loved flavors – The combination of buttery pastry, sweet apples, and warm cinnamon appeals to every palate
Choosing the Right Ingredients for Apple Wreath Pastries
The quality and type of ingredients you select dramatically impact the final appearance and flavor of your Apple Wreath Pastries. Understanding your options ensures consistently beautiful results.
Best Puff Pastry Type for This Recipe
Store-bought frozen puff pastry (like Pepperidge Farm or Dufour) is ideal for Apple Wreath Pastries because it provides consistent, reliable flakiness without the hours of work required for homemade. All-butter puff pastry (like Dufour brand) offers superior flavor and rise compared to shortening-based versions.
Look for puff pastry sold in sheets (approximately 9×10 inches) rather than shells. You’ll need 1 sheet for a standard wreath serving 6-8 people, or 2 sheets for a larger wreath serving 12-15.
Thawing properly is critical: Thaw puff pastry in the refrigerator overnight or at room temperature for 40-45 minutes. It should be cold but pliable—not frozen solid or warm and greasy. Overwarmed pastry won’t hold its shape during baking.
Avoid phyllo dough or pie crust—neither provides the dramatic rise and flaky layers essential for impressive Apple Wreath Pastries.
Selecting the Best Apples
Firm, tart apples work best in Apple Wreath Pastries because they hold their shape during baking and balance the sweet pastry. Granny Smith apples are the gold standard—their tartness and firm texture prevent mushiness.
Honeycrisp or Pink Lady apples offer a sweeter alternative while maintaining excellent structure. They create slightly sweeter Apple Wreath Pastries that appeal to those who prefer less tartness.
Avoid Red Delicious or McIntosh apples—they become watery and mushy when baked, creating soggy pastry and unappealing texture.
For this recipe, you’ll need 2 medium apples (about 12 ounces total). This provides generous filling without overcrowding the pastry, which can prevent proper rising.
Apple Preparation Tips
Peel apples completely—skin toughens during baking and detracts from the elegant appearance of Apple Wreath Pastries. Core apples thoroughly to remove all seeds and tough center portions.
Slice apples thinly (about ⅛-inch thick) for tender results that cook through in the short baking time. Uniform thickness ensures even cooking—use a mandoline for precision if available.
Toss sliced apples with lemon juice immediately after cutting to prevent browning. This step maintains the fresh, appealing color that makes Apple Wreath Pastries so visually stunning.
Ingredient Substitutions
Swap apples for pears (Bosc or Anjou varieties) for elegant variation. Use the same preparation method and baking time. The flavor profile shifts slightly sweeter and more delicate.
Replace cinnamon with cardamom, chai spice blend, or apple pie spice for different flavor profiles while maintaining the Apple Wreath Pastries’ essential character.
Use dairy-free puff pastry (check labels—some brands are naturally vegan) for dietary restrictions. Brush with plant-based milk instead of egg wash for golden color.
For gluten-free Apple Wreath Pastries, use gluten-free puff pastry (Schar brand works well). Results will be slightly less flaky but still attractive and delicious.
Ingredients & Prep
Essential Ingredients for Apple Wreath Pastries
For one 10-inch wreath (serves 6-8):
For the pastry:
- 1 sheet frozen puff pastry (about 9×10 inches), thawed
- 1 egg, beaten (for egg wash)
- 2 tablespoons coarse sugar or pearl sugar (for sprinkling)
For the apple filling:
- 2 medium apples (Granny Smith or Honeycrisp), peeled and cored
- 2 tablespoons granulated sugar
- 1 teaspoon ground cinnamon
- 1 tablespoon lemon juice
- 1 tablespoon all-purpose flour (prevents excess moisture)
- Pinch of salt
Optional glaze:
- ½ cup powdered sugar
- 1-2 tablespoons milk or apple juice
- ¼ teaspoon vanilla extract
Preparation Essentials
Critical prep steps: Thaw puff pastry in refrigerator overnight or at room temperature for 40-45 minutes before using. It should unfold easily without cracking but feel cold to the touch—not warm or greasy.
Prepare apples just before assembling to prevent excessive browning despite lemon juice treatment. Slice thinly and uniformly for even cooking and elegant appearance in your Apple Wreath Pastries.
Flour your work surface lightly before rolling puff pastry. Too much flour toughens the dough; too little causes sticking. Just a light dusting creates the perfect work environment.
Have all ingredients measured and ready before beginning assembly—puff pastry warms quickly, and working efficiently ensures best rise and flakiness.
Equipment Setup
Line a large baking sheet with parchment paper—this prevents sticking and makes cleanup effortless. Don’t skip this step; Apple Wreath Pastries can stick to unlined pans, ruining your beautiful presentation.
Preheat oven to 400°F (200°C) before you begin assembling. Puff pastry needs immediate high heat for maximum rise and flakiness.
Have a sharp knife or pizza cutter ready for cutting pastry, a pastry brush for egg wash, and a small bowl ready for your apple filling mixture.
Step-by-Step Assembly Instructions
Preparing the Apple Filling (8 minutes)
Peel, core, and thinly slice apples (⅛-inch thickness). Place slices in a medium bowl and immediately toss with lemon juice to prevent browning.
Add granulated sugar, cinnamon, flour, and pinch of salt to the apples. Toss gently until apple slices are evenly coated with the spice mixture. The flour absorbs excess moisture, preventing soggy pastry.
Let the mixture sit while you prepare the pastry (2-3 minutes). If apples release significant liquid, drain it off before using—excess moisture is the enemy of crispy Apple Wreath Pastries.
Shaping the Wreath (12 minutes)
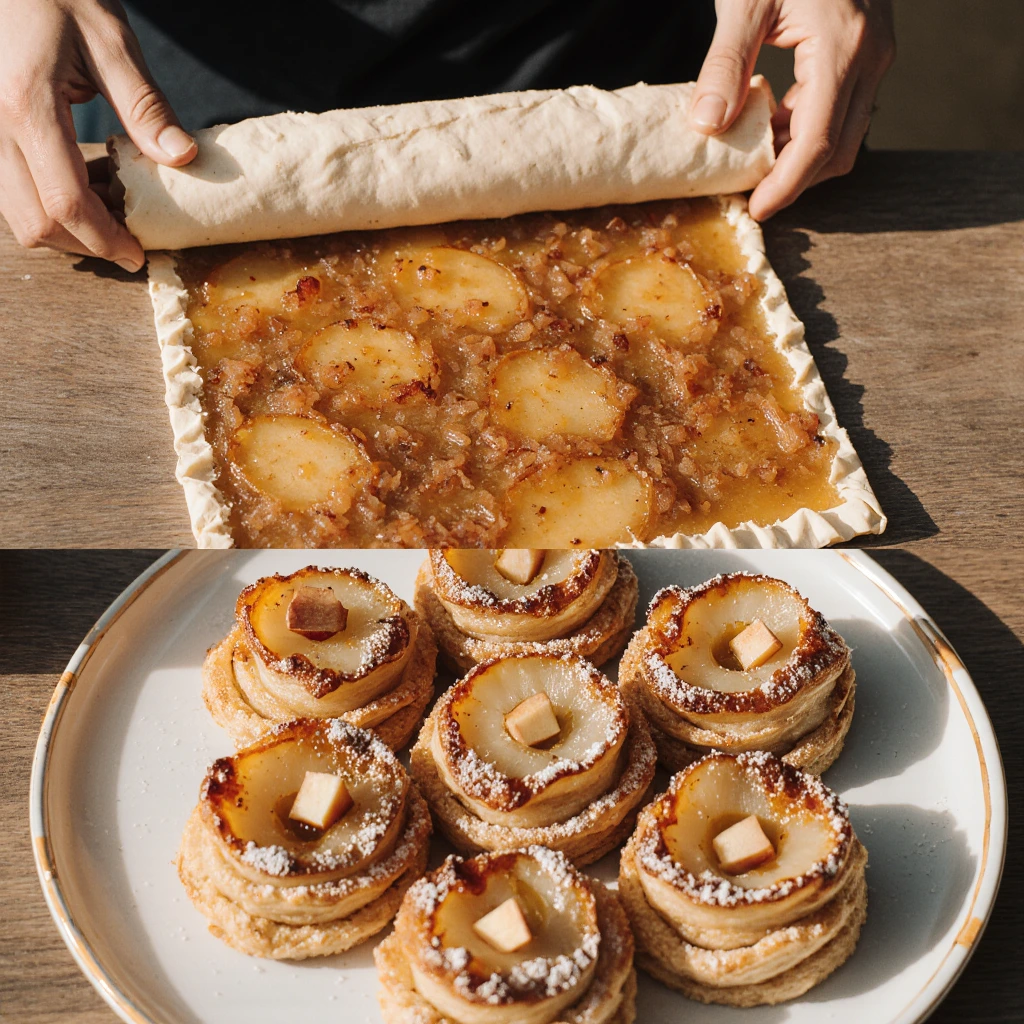
On a lightly floured surface, gently unfold thawed puff pastry. If it has creases, use a rolling pin to smooth them out and roll the pastry into a 10×12-inch rectangle.
Creating the wreath shape: Place a 4-inch round bowl or plate in the center of the pastry as a guide (don’t cut—just mark the position). This center circle is where you’ll avoid placing filling.
Arrange apple slices in a circular pattern around the center guide, leaving the marked center empty and leaving 1 inch around the outer edges. Slightly overlap apple slices for complete coverage, creating a ring of apples.
The cutting technique: Using a sharp knife or pizza cutter, make cuts from the outer edge toward the center circle, stopping at the inner edge of the apple ring. Make 16 evenly spaced cuts (like clock positions), creating 16 segments.
The twisting secret: Take two adjacent segments and twist them together twice in the same direction, then press the ends to seal. Repeat around the entire circle until you’ve twisted all segments into pairs. This creates the signature braided wreath appearance of Apple Wreath Pastries.
Remove the center guide. Your wreath should have a hollow center with twisted, braided pastry surrounding the apple filling in an elegant circular pattern.
Baking (20 minutes)
Carefully transfer the assembled wreath to your parchment-lined baking sheet using two large spatulas or sliding the parchment directly onto the sheet.
Brush the entire surface of the pastry (avoiding the apples themselves) with beaten egg wash. This creates the golden, glossy finish that makes Apple Wreath Pastries so appealing.
Sprinkle coarse sugar over the egg-washed pastry for sparkle and crunch. Pearl sugar is ideal because it doesn’t melt, creating beautiful texture.
Bake at 400°F for 18-22 minutes until the pastry is deeply golden brown and puffed dramatically. The apples should be tender when pierced with a knife, and the bottom of the pastry should be golden (carefully lift to check).
Don’t open the oven door during the first 15 minutes—temperature fluctuations prevent proper puff pastry rise. Set a timer and resist peeking.
Cooling and Finishing (5 minutes)
Let Apple Wreath Pastries cool on the baking sheet for 5 minutes. The structure needs time to set before moving, or the pastry may collapse or crack.
If using glaze, whisk together powdered sugar, milk, and vanilla while the wreath cools. Drizzle over slightly warm pastry in decorative patterns—it will set as it cools further.
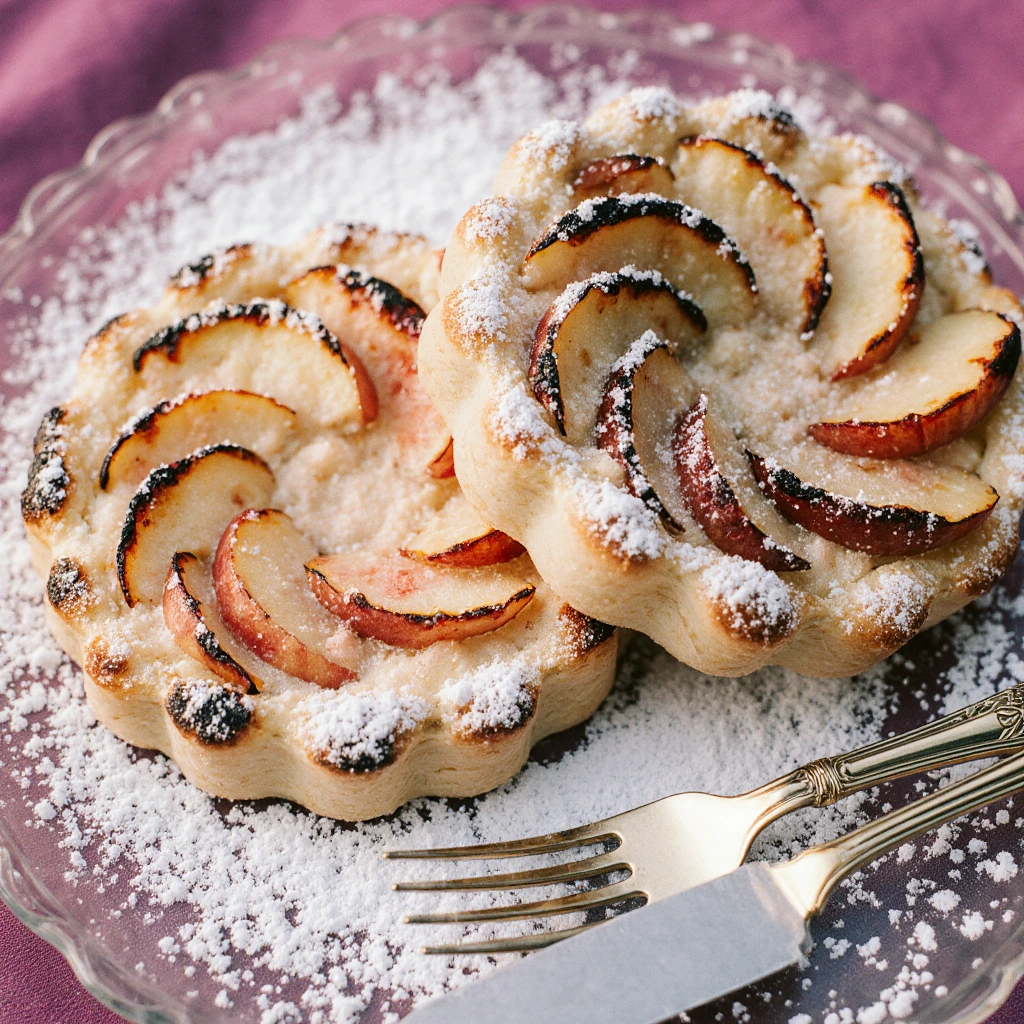
Transfer to a serving plate or wooden board for rustic presentation. Apple Wreath Pastries are best served warm or at room temperature within 4 hours of baking for optimal texture.
Pro Tips for Perfect Apple Wreath Pastries
Avoiding Soggy, Burnt, or Lopsided Results
The single biggest mistake is using warm puff pastry. Pastry must be cold (but not frozen) when it goes into the oven. Warm pastry melts before it can puff, creating flat, greasy results instead of flaky Apple Wreath Pastries. Work quickly and return to refrigerator if pastry becomes too soft.
Don’t overfill with apples. More filling seems like a good idea, but excess moisture and weight prevent proper rising. Stick to 2 medium apples for one sheet of puff pastry—this ratio creates perfect balance.
Cut segments evenly. Uneven cuts create lopsided wreaths that bake unevenly. Take time to space your 16 cuts equally around the circle—visualize a clock face for guidance.
Bake on the lower-middle rack. This position provides bottom heat that cooks the pastry base thoroughly while the top browns. Baking too high creates burnt tops with undercooked, doughy bottoms.
Tool Recommendations
A rolling pin smooths puff pastry creases and creates even thickness. A pizza cutter or sharp knife makes clean, precise cuts essential for attractive Apple Wreath Pastries.
A pastry brush applies egg wash evenly without tearing delicate pastry. A bench scraper helps transfer shaped wreaths to baking sheets without distortion.
Parchment paper is non-negotiable—it prevents sticking and allows you to assemble directly on the paper, then transfer easily to the baking sheet.
A mandoline slicer creates uniformly thin apple slices that cook evenly and look professional in your finished Apple Wreath Pastries.
Storage and Make-Ahead
Assembled unbaked wreaths: Refrigerate for up to 8 hours before baking. Cover loosely with plastic wrap, being careful not to compress the twisted design. Bake directly from refrigerator, adding 2-3 minutes to baking time.
Baked Apple Wreath Pastries: Store at room temperature covered loosely with foil for up to 8 hours. Don’t refrigerate—this makes pastry soggy. Reheat in 350°F oven for 5-7 minutes to restore crispness before serving.
Freezing: Freeze assembled unbaked wreaths on a baking sheet until solid, then wrap tightly. Freeze up to 1 month. Bake from frozen, adding 5-7 minutes to baking time. The convenience is incredible for holiday entertaining.
Make-ahead strategy: Prepare apple filling up to 24 hours ahead and refrigerate. Assemble wreaths the morning of serving and bake fresh for warm, fragrant results with minimal last-minute effort.
Flavor Variations
Seasonal Apple Wreath Pastries
Fall Harvest: Add ¼ cup chopped pecans or walnuts to apple mixture. Drizzle with caramel sauce after baking for decadent autumn flavor.
Holiday Spiced: Replace cinnamon with 1 teaspoon pumpkin pie spice or chai spice blend. Add dried cranberries scattered among apple slices for festive color.
Winter Citrus: Add 1 teaspoon orange zest to apple mixture and use orange juice in glaze instead of milk. The bright citrus cuts through rich holiday meals beautifully.
Spring Berry: Alternate apple slices with fresh strawberry slices. Reduce sugar to 1 tablespoon as berries are sweeter. Drizzle with lemon glaze after baking.
Sweet and Savory Twists
Salted Caramel: Drizzle with salted caramel sauce and sprinkle with flaky sea salt after baking. The sweet-salty combination elevates Apple Wreath Pastries to gourmet status.
Cream Cheese Filled: Spread 2-3 tablespoons softened cream cheese mixed with 1 tablespoon sugar on pastry before adding apples. Creates cheesecake-like richness.
Almond Frangipane: Spread thin layer of almond paste or frangipane on pastry before apples. Top finished wreath with sliced almonds for elegant French-inspired variation.
Maple Glazed: Replace regular glaze with maple glaze (powdered sugar + maple syrup) and top with candied pecans for Canadian-inspired Apple Wreath Pastries.
Dietary-Friendly Options
Vegan: Use vegan puff pastry and brush with plant-based milk mixed with maple syrup instead of egg wash. Results are nearly identical to traditional version.
Gluten-Free: Use gluten-free puff pastry (Schar brand). The pastry won’t rise as dramatically but creates attractive, tasty wreaths suitable for gluten-sensitive guests.
Refined Sugar-Free: Replace granulated sugar with coconut sugar or maple sugar. Use pure maple syrup glaze instead of powdered sugar glaze.
Nut-Free: This recipe is naturally nut-free. Avoid variations that add nuts, and always verify your puff pastry brand doesn’t contain almond flour or process in facilities with nuts.
Serving Suggestions
Apple Wreath Pastries work beautifully for breakfast, brunch, afternoon tea, or dessert—their versatility and visual appeal make them perfect for any gathering.
For holiday brunch: Serve as a centerpiece on a wooden board surrounded by fresh fruit, yogurt, and coffee. The wreath shape creates natural festive appeal that requires no additional decoration.
For afternoon tea: Cut into individual portions and serve on elegant plates with whipped cream or clotted cream on the side. Pair with hot tea or mulled cider.
For dessert: Serve warm with vanilla ice cream or fresh whipped cream. The temperature contrast and creamy richness transform these Apple Wreath Pastries into restaurant-quality dessert.
As edible gifts: Bake smaller individual wreaths using half sheets of puff pastry. Package in clear cellophane bags tied with ribbon for beautiful homemade gifts.
Presentation ideas: Place on a cake stand for height and drama. Tuck fresh herb sprigs (rosemary or thyme) into the center opening for natural decoration. Dust lightly with powdered sugar just before serving.
Beverage pairings: Serve with hot apple cider, spiced chai lattes, mulled wine, or champagne for celebrations. The sweet-tart apple flavor complements both warm and cold beverages beautifully.
FAQs
Can I make Apple Wreath Pastries ahead of time? Yes! Assemble wreaths up to 8 hours ahead and refrigerate covered loosely. Bake just before serving for warm, fresh results. For longer storage, freeze assembled unbaked wreaths for up to 1 month and bake from frozen, adding 5-7 minutes to baking time.
Why didn’t my puff pastry rise properly? Common causes include: puff pastry was too warm when baking (should be cold), oven temperature was too low (verify with thermometer—needs 400°F minimum), or you rolled it too thin. Always work quickly with cold pastry and avoid overhandling.
Can I use apple pie filling instead of fresh apples? Not recommended. Canned filling is too wet and thick, preventing proper pastry rising and creating soggy results. Fresh apples take just 5 minutes to prepare and deliver far superior texture and flavor in Apple Wreath Pastries.
How do I prevent the bottom from being soggy? Toss apples with 1 tablespoon flour before assembling—this absorbs excess moisture. Drain any liquid that accumulates. Bake on lower-middle oven rack for bottom heat. Don’t overbake or underbake—20 minutes at 400°F is optimal.
Can I make mini wreaths instead of one large one? Absolutely! Cut puff pastry into quarters. Use ½ apple per mini wreath and follow the same assembly process with 8 cuts instead of 16. Bake for 15-18 minutes. Mini wreaths are perfect for individual servings or gifts.
What if my puff pastry tears while assembling? Patch tears by pressing pastry gently together with your fingers. The egg wash and baking will seal minor tears. For large tears, overlap slightly and press firmly—the butter in the pastry acts as glue when heated.
Are Apple Wreath Pastries safe during pregnancy? Yes, when using fully baked pastry and cooked apples. The egg wash cooks completely at 400°F. All ingredients are pregnancy-safe. If concerned about eggs, substitute plant-based milk for egg wash.
How long do these stay fresh? Apple Wreath Pastries are best within 8 hours of baking. Store at room temperature covered loosely with foil (not airtight—creates condensation). Reheat in 350°F oven for 5 minutes to restore crispness before serving.
Conclusion
Preheat your oven and discover why thousands of home bakers have made Apple Wreath Pastries their signature impressive-but-easy dessert! In just 35 minutes, you’ll create stunning, bakery-quality pastries that look like you spent hours—no pastry school required, no complicated techniques, just simple assembly that delivers gorgeous results every single time.
Join over 85,000 home bakers who’ve discovered that showstopping desserts don’t require professional training or expensive ingredients. These Apple Wreath Pastries deliver maximum visual impact with minimal effort, making you look like a baking superstar at every gathering.
Ready to explore more quick, impressive pastry recipes? Try our [15-Minute Fruit Danishes] for another puff pastry shortcut, or check out [Easy Palmiers in 20 Minutes] for elegant French-inspired cookies that rival any bakery!
Share your Apple Wreath Pastries creations! Tag us with photos of your beautiful wreaths and let us know which variation you tried. Will you stick with classic cinnamon apples, or experiment with cream cheese filling? Either way, you’re 35 minutes from baking glory. Happy creating!