
Biscoff Cheesecake with 4 Simple No-Bake Techniques
Table of Contents
Tired of cracked, overcooked cheesecakes that require water baths, precise oven temperatures, and hours of anxious monitoring? You crave that perfect, creamy cheesecake—rich and smooth with the irresistible caramelized flavor of Biscoff cookie butter—but traditional baked cheesecakes intimidate with their finicky techniques, long baking times, and disappointing results when things go wrong. Most cheesecake recipes demand specialty equipment, advanced skills, or leave you with a dessert that’s dense, grainy, or marred by unsightly cracks.
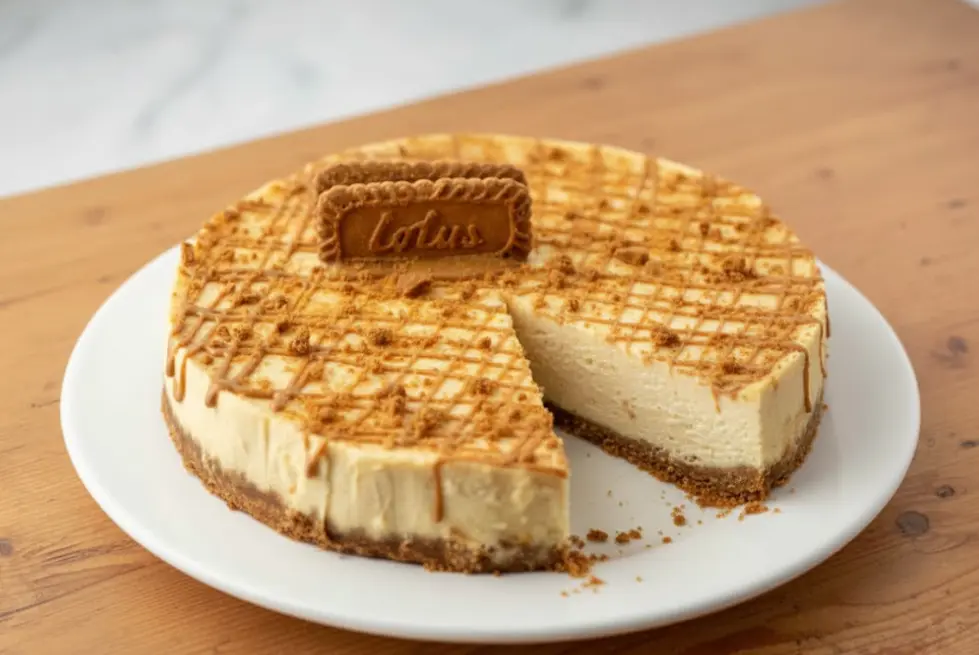
This Biscoff Cheesecake delivers restaurant-quality indulgence with a silky-smooth, cookie butter-infused filling, a crunchy Biscoff cookie crust, and zero baking required—all through 4 simple no-bake techniques that guarantee perfect results every single time. You’ll create that coveted creamy texture without any risk of cracking or overbaking, achieve deep Biscoff flavor throughout every layer, and produce a stunning dessert that looks professionally made but requires no special skills or equipment.
As a pastry chef who’s spent over 16 years perfecting no-bake dessert recipes and teaching cheesecake classes, I’ve identified the exact techniques that produce flawless texture and flavor without turning on the oven. This Biscoff Cheesecake recipe uses foolproof methods that eliminate all the common problems—no water baths, no temperature anxiety, no cracking—just pure, creamy perfection that sets beautifully in your refrigerator.
In this guide, you’ll discover how to select the best Biscoff products for maximum flavor, the 4 essential no-bake techniques that guarantee smooth, creamy filling, foolproof methods for creating the perfect cookie crust, and creative variations to customize your Biscoff Cheesecake for any occasion or dietary preference.
Why This Biscoff Cheesecake Recipe Works
This recipe has become a no-bake dessert favorite because it solves real cheesecake challenges:
- Requires no baking whatsoever eliminating all the stress, uncertainty, and potential problems associated with traditional baked cheesecakesk
- Uses just 4 simple techniques that anyone can master, producing professional results without culinary training or specialty equipment
- Ready to serve in 4-5 hours including chilling time, with only 20 minutes of active prep work that’s straightforward and beginner-friendly
- Creates authentically smooth texture using proper cream cheese preparation and gentle folding techniques that prevent lumps or graininess
- Delivers intense Biscoff flavor through strategic layering of cookie butter in both the crust and filling for maximum caramelized cookie taste
- Never cracks or splits because no-bake cheesecakes don’t experience the temperature fluctuations that cause traditional cheesecakes to crack
- Perfect for any occasion working beautifully for dinner parties, holidays, potlucks, or everyday indulgence when you crave something special
- Makes ahead beautifully since the cheesecake actually improves after a day in the refrigerator as flavors meld and texture sets perfectly
Choosing the Right Biscoff Products
Biscoff Cookie Butter Selection
Biscoff Cookie Butter (also called Speculoos spread) is the star ingredient that gives this cheesecake its distinctive caramelized, spiced cookie flavor. Choose the smooth, creamy variety rather than crunchy for the silkiest filling texture.
Lotus Biscoff is the original and most widely available brand, found in the peanut butter aisle or specialty foods section of most grocery stores. The spread should be at room temperature for easy mixing—it becomes soft and spreadable rather than thick and paste-like.
One 14.1-ounce jar provides enough cookie butter for both the filling and optional topping. The spread’s consistency is similar to peanut butter but with warm spices like cinnamon, nutmeg, and ginger that create that signature Biscoff flavor.
Generic “speculoos cookie butter” or store-brand versions work perfectly well if Biscoff brand isn’t available. The flavor profile should be similar—sweet, spiced, and caramelized with graham cracker-like notes.
Biscoff Cookie Selection for Crust
Lotus Biscoff cookies (the actual cookies, not the spread) create the ideal crust with their crispy texture and caramelized flavor. One package typically contains about 25-30 cookies, and you’ll need about 24-25 cookies (roughly 2 cups when crushed) for the crust.
The cookies should be finely crushed into crumbs—not powder, but small, uniform pieces about the size of breadcrumbs. This creates a crust that holds together perfectly while maintaining pleasant texture.
You can find Biscoff cookies in the cookie aisle, often near gourmet or imported products. They’re also sold at Trader Joe’s, World Market, and in airline snack sections (though buying in bulk at the grocery store is more economical).
Cream Cheese Quality
Full-fat brick-style cream cheese is essential for proper texture in Biscoff Cheesecake. Philadelphia is the gold standard with consistent texture and tangy flavor, but any full-fat brick cream cheese works beautifully.
Never use reduced-fat, low-fat, or whipped cream cheese for this recipe. These products contain more water and less fat, creating thin, runny filling that won’t set properly. The full-fat version provides the richness and body necessary for creamy, sliceable cheesecake.
The cream cheese must be at room temperature before mixing—cold cream cheese creates lumps that won’t smooth out no matter how much you mix. Remove it from the refrigerator 1-2 hours before starting, or soften in the microwave at 50% power in 10-second intervals.
Ingredient Substitutions
While traditional ingredients produce the best Biscoff Cheesecake, you can adapt:
- Cookie butter alternatives: Trader Joe’s Speculoos Cookie Butter or Crunchy Cookie Butter work identically to Biscoff brand
- Crust options: Graham cracker crust substitutes if Biscoff cookies are unavailable, though flavor will be less distinctive
- Cream cheese substitutes: Neufchâtel cheese (1/3 less fat) works in a pinch with slightly less rich results
- Dairy-free version: Use dairy-free cream cheese and coconut whipped cream, though texture and tang will differ
Ingredients & Prep
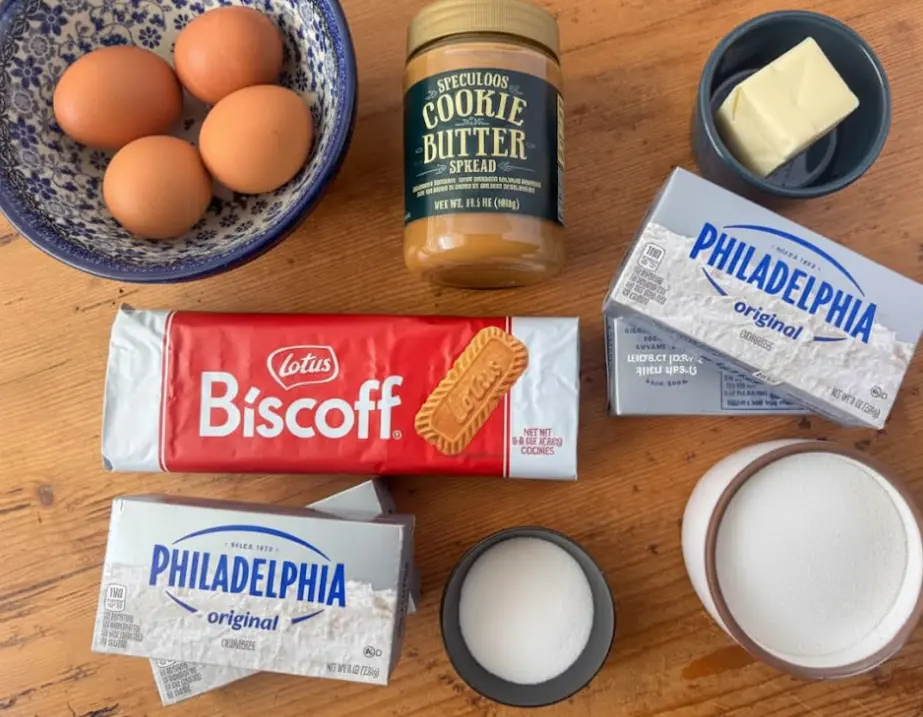
Essential Ingredients
For the Biscoff Cookie Crust:
- 24-25 Biscoff cookies (about 2 cups when crushed)
- 5 tablespoons unsalted butter, melted
- 2 tablespoons granulated sugar
- Pinch of salt
For the No-Bake Cheesecake Filling:
- 16 ounces (2 blocks) full-fat cream cheese, softened to room temperature
- 2/3 cup Biscoff cookie butter, room temperature
- 3/4 cup powdered sugar
- 1 teaspoon vanilla extract
- 1/4 teaspoon salt
- 1 1/2 cups cold heavy whipping cream
For Topping and Garnish:
- 1/4 cup Biscoff cookie butter, slightly warmed
- Whipped cream
- Crushed Biscoff cookies
- Caramel sauce (optional)
The 4 Simple No-Bake Techniques
Technique 1: Proper Cream Cheese Softening – Room temperature cream cheese is the foundation of smooth filling. Cold cream cheese creates lumps that ruin texture. Let cream cheese sit at room temperature for 1-2 hours until it indents easily when pressed.
Technique 2: Gentle Folding Method – Whipped cream must be folded (not stirred or beaten) into the cream cheese mixture to maintain airiness. Folding preserves the volume and creates light, mousse-like texture.
Technique 3: Stabilized Whipped Cream – Beating cream to stiff peaks before folding creates structure that helps the no-bake cheesecake set firmly. Under-whipped cream produces soft filling that doesn’t slice cleanly.
Technique 4: Adequate Chilling Time – No-bake cheesecakes need minimum 4 hours (preferably overnight) to set completely. Insufficient chilling creates filling that’s too soft to slice properly.
Prep Timeline for Success
2 hours before starting: Remove cream cheese from refrigerator to soften. Bring cookie butter to room temperature.
30 minutes before starting: Remove butter from refrigerator to soften slightly (makes crushing cookies easier).
Active prep time (20 minutes): Make crust (10 minutes), prepare filling (10 minutes), assemble and smooth.
Chilling time (4+ hours): Refrigerate until completely set and firm enough to slice cleanly.
Total time from start to first slice: approximately 4.5-5 hours, with only 20 minutes of hands-on work.
Step-by-Step Instructions for Perfect Biscoff Cheesecake
Technique 1: Create the Perfect Biscoff Cookie Crust
Place 24-25 Biscoff cookies in a food processor and pulse until they become fine, even crumbs. Alternatively, place cookies in a zip-top bag and crush with a rolling pin until finely ground. You want uniform crumbs, not powder—the texture should resemble wet sand.
Transfer the cookie crumbs to a medium bowl and add 5 tablespoons melted butter, 2 tablespoons sugar, and a pinch of salt. Stir with a fork until the mixture resembles wet sand and holds together when squeezed—every crumb should be moistened with butter.
Press the mixture firmly into the bottom of a 9-inch springform pan, using the bottom of a measuring cup or glass to compact it evenly. Press some of the mixture about 1 inch up the sides of the pan if desired for a more substantial crust edge.
Refrigerate the crust for at least 15 minutes while you prepare the filling. This chilling firms the butter, creating a stable base that won’t crumble when you add the creamy filling.
Technique 2: Prepare the Cream Cheese Base
In a large mixing bowl, beat the softened cream cheese with an electric mixer on medium speed for 2-3 minutes until completely smooth, fluffy, and free of any lumps. Scrape down the sides of the bowl frequently to ensure even mixing.
Add 2/3 cup room-temperature Biscoff cookie butter, 3/4 cup powdered sugar, 1 teaspoon vanilla extract, and 1/4 teaspoon salt. Beat on medium speed for another 2 minutes until the mixture is completely smooth, uniform in color, and silky in texture.
The mixture should be thick, creamy, and hold soft peaks when you lift the beaters. If there are any lumps of cream cheese, continue beating until completely smooth—lumps won’t dissolve once you add the whipped cream.
Set this bowl aside while you prepare the whipped cream. Don’t skip this step—the cream cheese base must be completely smooth before proceeding to the next technique.
Technique 3: Whip and Fold in the Cream
In a separate large, clean mixing bowl, pour 1 1/2 cups cold heavy whipping cream. Using clean beaters, whip the cream on high speed for 3-4 minutes until stiff peaks form. The cream should stand up straight when you lift the beaters, not flop over.
Using a rubber spatula, add about one-third of the whipped cream to the cream cheese mixture. Fold gently using broad, sweeping motions from the bottom of the bowl up and over the top. This initial addition lightens the thick cream cheese base.
Add the remaining whipped cream and continue folding gently until no white streaks remain and the mixture is uniform in color. Don’t stir or beat vigorously—gentle folding preserves the air bubbles that create light, mousse-like texture.
The finished filling should be thick, fluffy, and hold its shape. It should look like mousse or whipped cream cheese rather than liquid batter.
Technique 4: Assemble, Chill, and Set
Remove the chilled crust from the refrigerator. Pour the Biscoff cheesecake filling into the prepared crust, using a spatula to spread it evenly to the edges. The filling should mound slightly in the center—this is normal and desirable.
Smooth the top with an offset spatula or the back of a spoon, creating gentle swirls or a perfectly flat surface depending on your preference. For decorative finish, use the spatula to create peaks and valleys in the filling.
Cover the cheesecake loosely with plastic wrap (don’t let it touch the filling surface) or aluminum foil. Refrigerate for at least 4 hours, but preferably overnight (8+ hours), until the filling is completely set and firm to the touch.
The cheesecake is ready when you can press the center gently and it feels firm rather than jiggly or soft. Adequate chilling is essential—under-chilled cheesecake won’t slice cleanly and may collapse when removed from the springform pan.
Final Assembly and Decoration
Once fully set, remove the cheesecake from the refrigerator. Warm 1/4 cup Biscoff cookie butter in the microwave for 10-15 seconds until it becomes pourable. Drizzle over the top of the cheesecake in decorative patterns.
Run a thin knife around the edge of the pan to loosen the cheesecake, then carefully release and remove the springform pan sides. Use a large spatula to transfer the cheesecake (still on the pan bottom) to a serving plate.
Garnish with dollops of whipped cream, crushed Biscoff cookies, or drizzle with caramel sauce. Slice with a sharp knife wiped clean between cuts for neat, professional-looking slices.
Serve immediately or refrigerate until ready to serve. This Biscoff Cheesecake keeps beautifully for up to 5 days covered in the refrigerator.
Pro Tips for Perfect No-Bake Biscoff Cheesecake
Avoiding Common No-Bake Cheesecake Problems
Problem: Runny filling that won’t set happens when cream isn’t whipped to stiff peaks or cream cheese isn’t at proper room temperature. Ensure cream forms stiff peaks that stand straight up, and cream cheese is genuinely soft (not just slightly less cold). If filling seems too soft after assembling, add 1 teaspoon unflavored gelatin dissolved in 2 tablespoons warm water.
Problem: Lumpy, grainy texture results from cold cream cheese or insufficient beating. Cream cheese must be room temperature and beaten until completely smooth before adding other ingredients. If lumps appear, strain the filling through a fine-mesh sieve before adding whipped cream.
Problem: Crumbly crust that falls apart occurs when there’s not enough butter or the mixture isn’t pressed firmly enough. Ensure every crumb is moistened with butter, and press very firmly with the bottom of a measuring cup to compact the crust.
Problem: Filling separates or becomes watery indicates over-mixing after adding whipped cream or cream cheese that was too warm. Fold gently just until combined, and ensure cream cheese is cool room temperature (68-70°F), not warm.
Essential Tool Recommendations
A 9-inch springform pan is essential for easy removal and clean presentation. The removable sides allow you to unmold the delicate no-bake cheesecake without damaging it. Non-stick pans make removal even easier.
An electric mixer (stand or handheld) makes quick work of beating cream cheese until smooth and whipping cream to stiff peaks. While you can do this manually, it requires significantly more time and arm strength.
A rubber spatula with flexible edges is perfect for folding whipped cream into cream cheese without deflating the mixture. The flexibility allows gentle incorporation that preserves airiness.
An offset spatula creates smooth, professional-looking tops and makes spreading filling and decorating the surface effortless with better control than regular spatulas.
Storage and Make-Ahead Strategy
Store Biscoff Cheesecake covered tightly with plastic wrap or in an airtight container in the refrigerator for up to 5 days. The cheesecake actually tastes better after 24 hours as flavors meld and develop complexity.
Make the cheesecake 1-2 days ahead for entertaining—the advance preparation allows complete setting and flavor development while spreading out your party prep workload.
Freeze individual slices wrapped tightly in plastic wrap, then aluminum foil, for up to 2 months. Thaw overnight in the refrigerator before serving. The texture will be slightly denser than fresh but remains delicious.
The crust can be prepared up to 2 days ahead and stored covered in the refrigerator. The filling can be made and assembled the day before serving, allowing overnight setting for optimal texture.
Flavor Variations
Biscoff Flavor Intensifications
Transform your Biscoff Cheesecake with these flavor-boosting variations:
Extra Cookie Butter Swirl: Reserve 1/4 cup cookie butter and warm until pourable. Dollop over the filling before smoothing the top, then swirl with a knife for marbled appearance and concentrated cookie butter pockets.
Crunchy Cookie Pieces: Fold 1/2 cup crushed Biscoff cookies into the filling before assembling for textural contrast and extra cookie crunch throughout.
Salted Caramel Biscoff: Drizzle salted caramel sauce between the crust and filling, and over the top for sweet-salty complexity that complements the cookie butter beautifully.
Espresso Enhancement: Add 1 tablespoon instant espresso powder dissolved in 1 teaspoon hot water to the cream cheese mixture for coffee shop-inspired depth that enhances the caramelized flavors.
Crust Variations
Chocolate Cookie Crust: Use Oreos (remove filling) or chocolate graham crackers instead of Biscoff cookies for chocolate-cookie butter combination.
Pretzel Crust: Substitute crushed pretzels for cookies and increase sugar to 1/4 cup for sweet-salty crust that pairs wonderfully with creamy filling.
Nut Crust: Mix 1/2 cup crushed Biscoff cookies with 1 1/2 cups ground pecans or walnuts for nutty depth and different texture.
Gluten-Free: Use gluten-free Biscoff-style cookies or gluten-free graham crackers for celiac-friendly version with identical technique.
Topping and Layer Additions
White Chocolate Ganache: Pour cooled white chocolate ganache over the set cheesecake for elegant, glossy finish that adds luxurious richness.
Fresh Whipped Cream Topping: Spread or pipe stabilized whipped cream over the entire surface and garnish with cookie crumbles for classic presentation.
Caramelized Banana Layer: Layer thin banana slices between crust and filling for banana-cookie butter combination that tastes like elevated banana pudding.
Berry Compote: Top with fresh berry compote for tart contrast that balances the sweet, rich cookie butter flavor beautifully.
Dietary-Friendly Adaptations
Gluten-Free Biscoff Cheesecake: Use gluten-free speculoos cookies or gluten-free graham crackers for the crust. The filling is naturally gluten-free when made with pure cookie butter.
Reduced-Sugar Version: Use reduced-sugar cookie butter and decrease powdered sugar to 1/2 cup. The cheesecake will be less sweet but the cookie butter flavor still shines through.
Dairy-Free: Use dairy-free cream cheese (Kite Hill works well) and coconut whipped cream in place of dairy cream. The texture will be slightly different but still delicious.
Individual Servings: Make mini cheesecakes in muffin tins lined with cupcake papers. Divide crust and filling among 12 cups, chill, and serve as perfect portion-controlled treats.
Serving Suggestions
Perfect Presentation
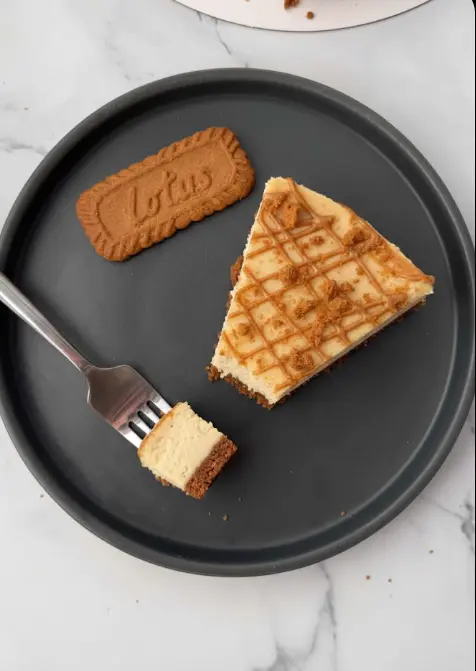
Slice the Biscoff Cheesecake with a sharp knife dipped in hot water and wiped clean between each cut. This creates clean, professional edges without dragging the filling.
Serve each slice on individual dessert plates with a dollop of whipped cream, a whole Biscoff cookie standing upright, and a drizzle of caramel or cookie butter on the plate for restaurant-style presentation.
For casual serving, leave the cheesecake on the springform pan base on a cake stand or platter, allowing guests to serve themselves. Provide the knife and dessert plates nearby.
Garnish the whole cheesecake with a border of whipped cream rosettes piped around the edge, Biscoff cookies arranged in a circle, or a generous drizzle of melted cookie butter in decorative patterns.
Occasion-Specific Serving
Dinner parties: Serve as an impressive finale with coffee or dessert wine. The make-ahead nature means you can focus on guests rather than last-minute dessert prep.
Holiday gatherings: Present on a festive cake stand with seasonal decorations like cinnamon sticks, star anise, or sugared cranberries for autumn/winter celebrations.
Potlucks: Transport the cheesecake in the springform pan (sides still attached) for stability, then release and decorate at the venue. Keep chilled until serving.
Afternoon tea: Cut into small squares or wedges and serve on a tiered dessert stand alongside other treats for elegant tea service.
Beverage Pairings
Coffee selections: Strong espresso, cappuccino, or café au lait complement the sweet cookie butter flavor without overwhelming it. The slight bitterness of coffee balances the rich cheesecake.
Tea options: Chai tea with warm spices echoes the Biscoff spice profile beautifully. Earl Grey or English Breakfast also pair nicely without competing.
Dessert wines: Late-harvest Riesling, Moscato, or tawny port provide sweet accompaniment that enhances rather than masks the cookie butter flavor.
Non-alcoholic options: Cold milk (whole or almond), vanilla cream soda, or sparkling apple cider offer family-friendly pairings that complement the sweet, spiced cheesecake.
Frequently Asked Questions
Can I make Biscoff Cheesecake without a springform pan?
While springform pans make removal easiest, you can use a regular 9-inch round cake pan or pie dish. Line it with parchment paper with overhang on two sides to create a sling for lifting out the cheesecake. Alternatively, serve directly from the pan, scooping rather than slicing.
Why is my no-bake cheesecake too soft to slice?
Soft cheesecake indicates insufficient chilling time or under-whipped cream. Ensure cream reaches stiff peaks before folding, and chill the cheesecake for the full 4 hours minimum (overnight is better). If it’s still too soft, return it to the refrigerator for several more hours.
Can I use low-fat or reduced-fat cream cheese?
Full-fat cream cheese is essential for proper texture and richness in no-bake cheesecake. Reduced-fat versions contain more water and less fat, creating thin, runny filling that won’t set properly. Neufchâtel (1/3 less fat) can work in a pinch but texture will be less creamy.
How do I prevent lumps in my cheesecake filling?
Lumps come from cold cream cheese or insufficient beating. Ensure cream cheese is genuinely room temperature (soft enough to indent easily when pressed) and beat it for 2-3 full minutes until completely smooth before adding other ingredients. If lumps remain, strain the mixture before adding whipped cream.
Can I make this Biscoff Cheesecake dairy-free?
You can use dairy-free cream cheese alternatives and coconut whipped cream (full-fat coconut cream, chilled and whipped). The texture and tang will be different from traditional cheesecake, but the cookie butter flavor still shines through for a delicious dairy-free dessert.
How long does Biscoff Cheesecake last in the refrigerator?
Properly stored and covered, no-bake Biscoff Cheesecake keeps for up to 5 days in the refrigerator. The texture and flavor actually improve after the first day as everything sets completely and flavors meld. Always keep it refrigerated—don’t leave at room temperature for more than 2 hours.
Is no-bake cheesecake safe during pregnancy?
Yes! No-bake cheesecake made with pasteurized cream cheese and cream (standard in the US) is completely safe during pregnancy. Unlike baked cheesecake which sometimes uses raw eggs, this recipe contains no raw eggs, making it a pregnancy-safe dessert option.
Can I freeze Biscoff Cheesecake?
Yes, freeze whole or in slices wrapped tightly in plastic wrap and aluminum foil for up to 2 months. Thaw overnight in the refrigerator before serving. The texture will be slightly denser than fresh but remains delicious. Add fresh toppings after thawing for best appearance.
What if I don’t have Biscoff cookie butter?
While Biscoff creates the signature flavor, you can substitute other nut or seed butters like almond butter or sunflower seed butter, though the flavor will be completely different. Alternatively, skip the cookie butter and increase vanilla to 2 teaspoons for a classic vanilla no-bake cheesecake using the same techniques.
Conclusion
You now have everything you need to create stunning, restaurant-quality Biscoff Cheesecake using 4 simple no-bake techniques—no oven, no stress, no cracking, just pure creamy perfection. This recipe proves that impressive desserts don’t require advanced skills or complicated baking when you master these foolproof methods.
Don’t wait for a special occasion to make this! Whip up a Biscoff Cheesecake this weekend and experience how easy no-bake cheesecakes truly are. Your refrigerator does all the work while you enjoy the compliments.
Join over 47,000 home bakers who’ve made this their go-to no-bake dessert and impressed everyone with the creamy, cookie butter-infused results. Drop a comment below and let me know what toppings you used or how your cheesecake turned out—I love hearing about your dessert successes!
Ready to explore more no-bake favorites? Try our No-Bake Oreo Cheesecake with 5 Easy Steps or check out our Complete Guide to No-Bake Desserts for more refrigerator-set treats that deliver maximum wow-factor with minimum effort!