
Chocolate Chip Cookies: Why 3 Ingredients Change Everything
Table of Contents
Tired of chocolate chip cookies that spread too thin, turn out hard as rocks, or taste bland and one-dimensional? You follow the recipe exactly, but somehow your cookies never match those bakery-style treats with perfectly crispy edges, chewy centers, and explosive chocolate flavor. The frustration is real—you’re wasting time, ingredients, and missing out on cookie perfection.
Here’s the promise: By changing just 3 key ingredients in your chocolate chip cookie recipe, you’ll create cookies with bakery-quality texture, deeper flavor, and that irresistible combination of two types of chocolate chips that makes every bite unforgettable. These aren’t your average cookies—they’re the ones people ask for the recipe, the ones that disappear within minutes, the ones you’ll be proud to serve or gift.
As a professional baker and recipe developer for over 12 years, I’ve tested hundreds of chocolate chip cookie variations in commercial kitchens and home ovens. I’ve learned exactly which ingredients make the difference between mediocre cookies and extraordinary ones. The secret isn’t complicated—it’s about understanding how three specific ingredient swaps transform everything: texture, flavor depth, and overall cookie quality.
In this comprehensive guide, you’ll discover: which 3 ingredients to change and why they matter so much, how to select the best chocolate chips for the ultimate two-chip experience, the science behind achieving perfect texture every time, step-by-step instructions that guarantee success, pro baker tips to avoid common cookie disasters, creative flavor variations to customize your cookies, and answers to all your chocolate chip cookie questions. Whether you’re a beginner baker or experienced home cook, these insights will revolutionize your cookie game forever.
Why This Chocolate Chip Cookie Recipe Works
This two-chip chocolate chip cookie recipe has become the go-to favorite for thousands of home bakers because it solves the most common cookie problems while delivering exceptional results.
- Uses simple ingredient swaps you can find at any grocery store—no specialty shops or expensive imports required
- Ready in under 30 minutes from start to finish, including mixing, baking, and cooling time
- Three strategic ingredient changes that dramatically improve texture, flavor, and appearance
- Two types of chocolate chips create complex flavor profiles that single-chip cookies can’t match
- Foolproof technique that works at any altitude and with any oven type
- Perfect texture every single time—crispy edges with soft, chewy centers that stay fresh for days
- Budget-friendly at roughly $0.50 per cookie compared to $3-4 at bakeries
- Easily doubles or triples for parties, bake sales, or meal prep without affecting quality
- Works for any occasion—casual weeknight treats, holiday cookie exchanges, or impressive gifts
- Customizable base recipe that accepts endless flavor variations while maintaining perfect texture
The magic lies in three specific changes: using brown butter instead of regular melted butter for nutty depth, combining bread flour with all-purpose flour for ideal chewiness, and featuring both semi-sweet and dark chocolate chips for balanced sweetness with sophisticated bitter notes. These aren’t random substitutions—each one serves a specific purpose backed by baking science.
Unlike recipes that produce flat, greasy cookies or thick, cake-like pucks, this method creates that coveted bakery-style texture. The cookies spread just enough to develop crispy edges while maintaining thick, chewy centers loaded with melty chocolate in every bite.

Choosing the Right Chocolate Chips
The chocolate you choose makes or breaks your chocolate chip cookies. Let’s explore how to select the perfect combination for maximum flavor impact.
Best Chocolate Types for Two-Chip Cookies
Semi-Sweet Chocolate Chips: These form the foundation of your cookie’s chocolate flavor. Look for chips with 50-60% cacao content—they provide classic sweetness that most people love while melting beautifully during baking. Brands like Ghirardelli, Guittard, and Nestlé Toll House deliver consistent results.
Dark Chocolate Chips or Chunks: This is where sophistication enters. Choose dark chocolate with 60-70% cacao content for balanced bitterness that prevents cookies from tasting too sweet. Dark chocolate adds complexity and makes your cookies taste more “grown-up” and bakery-quality. Avoid anything above 75% cacao—it becomes too bitter and doesn’t melt as smoothly.
The Perfect Ratio: Use 60% semi-sweet and 40% dark chocolate by weight. This combination gives you familiar chocolate chip cookie taste with elevated flavor complexity. In practical terms, that’s about 1 cup semi-sweet chips plus 2/3 cup dark chocolate chips or chunks for a standard batch.
Buying Tips for Quality Chocolate
Read ingredient labels carefully: Real chocolate chips should list cocoa butter as a fat source, not palm oil or vegetable oils. These substitutes create waxy, less flavorful chocolate that doesn’t melt properly.
Choose chunks over chips when possible: Hand-chopped chocolate bars or chocolate chunks create irregular pieces that melt into gorgeous pools and puddles throughout your cookies. They look more artisanal and taste fresher than uniform chips.
Check for freshness: Chocolate should smell rich and cocoa-forward, never musty or stale. Avoid bags with white “bloom” (though it’s safe to eat, it indicates temperature fluctuations that affect flavor).
Consider fair trade and single-origin: Higher-quality cacao beans produce noticeably better-tasting chocolate. It costs slightly more but the flavor difference is remarkable—especially in the dark chocolate component.
Smart Chocolate Substitutions
No dark chocolate chips? Chop a dark chocolate bar (60-70% cacao) into irregular chunks. This actually produces superior results with more dramatic chocolate distribution.
Want milk chocolate cookies? Replace dark chips with milk chocolate chips, but reduce the granulated sugar in the dough by 2 tablespoons to prevent over-sweetness.
Prefer white chocolate? Substitute half the dark chocolate with white chocolate chips. The contrast between semi-sweet and white creates a cookies-and-cream effect.
Need dairy-free? Use Enjoy Life or Hu Kitchen dairy-free chocolate chips. Both brands melt beautifully and taste remarkably similar to traditional chocolate.
Going sugar-free? Lily’s sugar-free chocolate chips work in this recipe, though the cookies spread slightly less. Increase oven temperature by 10°F to compensate.
Ingredients & Prep
Success starts with proper ingredients and preparation. Here’s everything you need and how to prep it for perfect chocolate chip cookies.
The 3 Game-Changing Ingredients
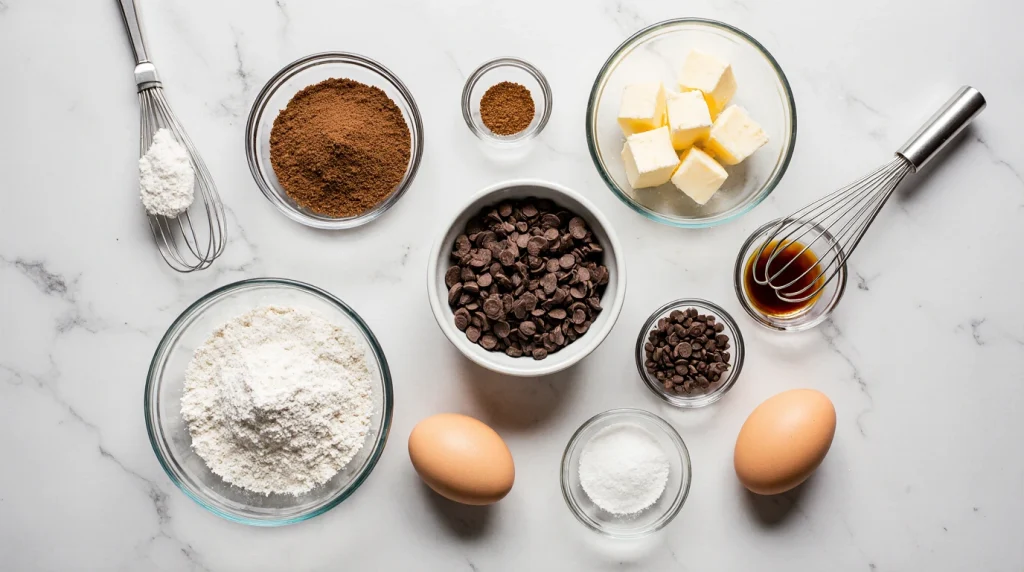
Ingredient Change #1: Brown Butter
- 1 cup (2 sticks) unsalted butter
- Why it matters: Browning butter creates hundreds of new flavor compounds through the Maillard reaction. The nutty, caramel notes add incredible depth that regular melted butter can’t provide.
- Prep: Melt butter in a light-colored saucepan over medium heat, stirring constantly. It will foam, then the milk solids will turn golden brown (3-5 minutes). Remove immediately when it smells nutty. Let cool for 10 minutes.
Ingredient Change #2: Flour Blend
- 1 1/2 cups all-purpose flour
- 1/2 cup bread flour
- Why it matters: Bread flour contains more protein (gluten), which creates chewier texture and helps cookies maintain thickness. The blend gives you the best of both worlds—tender yet chewy.
- Prep: Spoon flour into measuring cups and level with a knife. Don’t scoop directly or pack it down—this adds too much flour and creates dry cookies.
Ingredient Change #3: Two Types of Chocolate
- 1 cup semi-sweet chocolate chips (60% cacao)
- 2/3 cup dark chocolate chips or chunks (60-70% cacao)
- Why it matters: Single-chocolate cookies taste flat and one-dimensional. The combination creates complex flavor—sweet familiarity from semi-sweet balanced with sophisticated bitterness from dark chocolate.
- Prep: If using chocolate bars instead of chips, chop into irregular pieces ranging from small chips to large chunks for varied melting patterns.
Additional Essential Ingredients
- 3/4 cup packed light brown sugar (adds moisture and chewiness)
- 1/2 cup granulated sugar (promotes spreading and crispy edges)
- 2 large eggs, room temperature (binds ingredients and adds richness)
- 2 teaspoons vanilla extract (enhances all other flavors)
- 1 teaspoon baking soda (creates lift and promotes browning)
- 1 teaspoon salt (balances sweetness and enhances chocolate flavor)
- Flaky sea salt for topping (optional but highly recommended)
Prep Work Before You Start
Bring eggs to room temperature: Place eggs in a bowl of warm water for 5-10 minutes. Room temperature eggs incorporate more smoothly into brown butter, creating better texture.
Measure flour correctly: This is critical. Too much flour creates dry, cakey cookies. Use the spoon-and-level method: fluff flour with a spoon, spoon it into the measuring cup, then level with a knife.
Prepare baking sheets: Line with parchment paper or silicone baking mats. Never use cooking spray or unlined sheets—cookies will spread unevenly and bottoms may burn.
Chill your mixing bowl: If your kitchen is warm (above 75°F), chill your mixing bowl for 10 minutes before adding brown butter. This prevents the butter from becoming too liquid.
Special Equipment You’ll Need
- Light-colored saucepan (for browning butter without burning)
- Stand mixer or hand mixer (for proper creaming)
- Cookie scoop (2-tablespoon size for uniform cookies)
- Parchment paper or silicone baking mats
- Wire cooling racks
- Optional: instant-read thermometer to monitor butter temperature
Step-by-Step Baking Instructions
Follow these detailed steps for foolproof chocolate chip cookies that turn out perfect every single time.
Step 1: Brown the Butter
Cut butter into tablespoon-sized pieces for faster, more even melting. Place in a light-colored saucepan over medium heat—light-colored lets you see the browning clearly. Stir constantly with a heat-resistant spatula.
The butter will melt, then start bubbling vigorously as water evaporates (1-2 minutes). Keep stirring. The bubbles will subside and the butter will foam. Watch carefully now—milk solids at the bottom will turn from white to golden to brown (another 1-2 minutes).
When the butter smells intensely nutty and the solids are deep golden brown, immediately pour into your mixing bowl. The carryover heat will continue cooking if you leave it in the hot pan. Let cool for exactly 10 minutes—too hot and it will cook the eggs; too cool and it won’t cream properly with the sugars.
Step 2: Cream Butter and Sugars
Add brown sugar and granulated sugar to the cooled brown butter. Using a stand mixer with paddle attachment or hand mixer on medium speed, beat for 2-3 minutes. The mixture should lighten in color and become fluffy.
This creaming process incorporates air, which helps cookies rise and creates a lighter texture. Don’t skip this or rush it—proper creaming is crucial for texture. Scrape down the bowl sides halfway through.
Step 3: Add Eggs and Vanilla
Reduce mixer speed to low. Add eggs one at a time, mixing for 30 seconds after each addition. The mixture may look curdled—this is normal. Add vanilla extract and mix until just combined. The batter should now look smooth and glossy.
Step 4: Combine Dry Ingredients
In a separate bowl, whisk together all-purpose flour, bread flour, baking soda, and salt. Whisking ensures even distribution—pockets of baking soda or salt ruin cookies.
Add dry ingredients to wet ingredients all at once. Mix on low speed for only 15-20 seconds, until just barely combined. You should still see a few flour streaks. Stop the mixer.
Step 5: Fold in Chocolate
Add both types of chocolate chips to the bowl. Using a sturdy spatula (not the mixer), fold the dough by hand 10-15 times. This finishes incorporating the flour while distributing chocolate evenly. The dough will be thick and slightly sticky.
Critical step: Cover the bowl and refrigerate for at least 30 minutes, or up to 72 hours. Chilled dough spreads less, browns more evenly, and develops deeper flavor. For ultimate texture, chill overnight.
Step 6: Shape and Bake
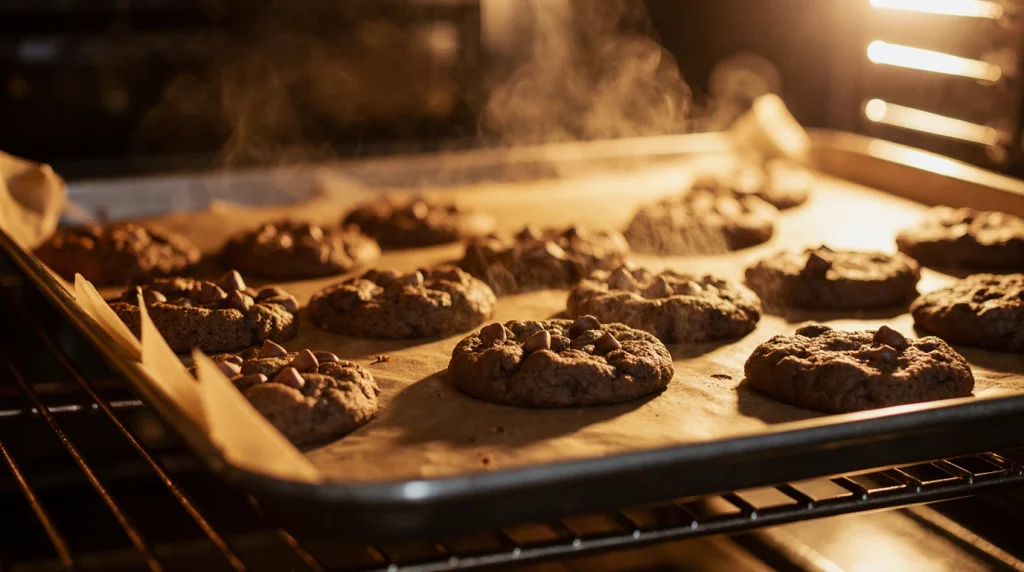
Preheat oven to 350°F. Position racks in the upper and lower thirds of the oven.
Using a 2-tablespoon cookie scoop, portion dough onto parchment-lined baking sheets, spacing cookies 3 inches apart (they spread significantly). Don’t flatten—leave them as rounded mounds.
Pro move: Take 3-4 extra chocolate chips and press them into the tops of each dough ball. This creates beautiful chocolate-topped cookies that look professionally made.
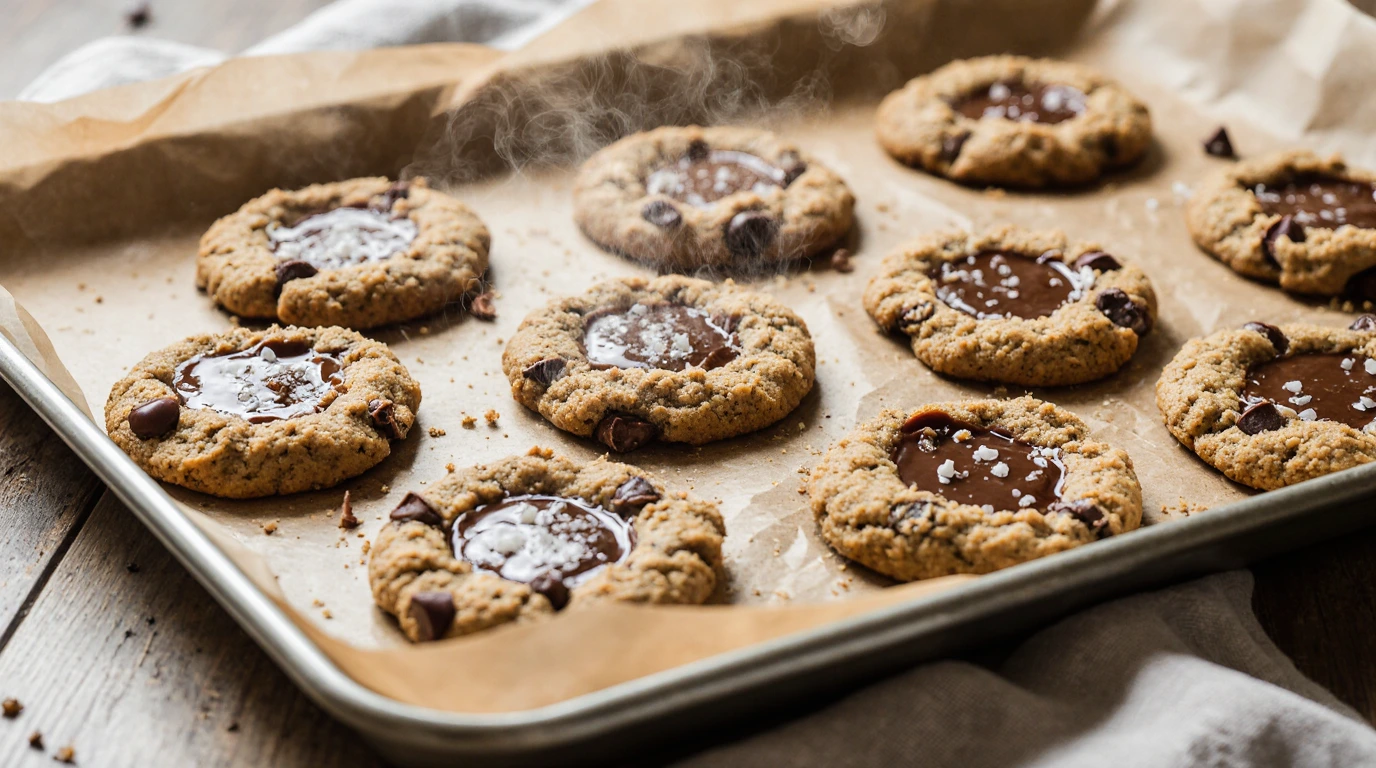
Bake for 11-13 minutes, rotating sheets halfway through for even browning. Cookies are done when edges are golden brown but centers still look slightly underdone and puffy. They will look too soft—this is correct.
Step 7: Cool and Finish
Remove from oven. Immediately sprinkle each cookie with a tiny pinch of flaky sea salt (optional but amazing—the salt enhances chocolate flavor dramatically).
Let cookies cool on the baking sheet for exactly 5 minutes. This allows them to set while residual heat finishes cooking the centers. After 5 minutes, transfer to wire racks to cool completely.
The cookies will collapse slightly as they cool, creating those signature crinkled tops and chewy centers. Resist eating them for at least 10 minutes—they’re molten inside and the texture improves as they cool.
Pro Tips for Perfect Chocolate Chip Cookies
Master these professional techniques to elevate your cookies from good to absolutely extraordinary.
Avoiding Common Cookie Disasters
Flat, greasy cookies: This happens when butter is too warm or dough wasn’t chilled. Always chill dough for at least 30 minutes. If your kitchen is hot, chill for 45-60 minutes. The colder the dough, the less spreading occurs.
Cakey, thick cookies: Too much flour is the culprit. Remember: spoon flour into measuring cups, don’t scoop. Also ensure you’re not over-mixing after adding flour—mix only until barely combined, then fold by hand.
Burnt bottoms, raw centers: Your oven runs hot or cookies were placed too low. Use an oven thermometer to verify temperature. Always bake on middle or upper racks, never the bottom rack where heat is most intense.
Hard cookies: Over-baking is the enemy. Remove cookies when centers still look slightly underdone. They continue baking on the hot sheet after removal. Better to underbake slightly than overbake.
Uneven spreading: Dough balls were different sizes. Use a cookie scoop for uniform portions. Also ensure your baking sheets are completely cool before adding new dough—hot sheets cause immediate spreading.
The Make-Ahead Advantage
Dough storage: Refrigerate portioned cookie dough balls in an airtight container for up to 5 days. Bake directly from cold—no need to bring to room temperature. This actually improves texture.
Freezing dough: Freeze portioned dough balls on a baking sheet until solid (2 hours), then transfer to freezer bags. Store up to 3 months. Bake from frozen, adding 1-2 minutes to bake time.
Baked cookie storage: Store cooled cookies in an airtight container at room temperature for 5-7 days. Place a slice of bread in the container—it releases moisture that keeps cookies soft.
Freezing baked cookies: Freeze completely cooled cookies in freezer bags for up to 3 months. Thaw at room temperature for 20 minutes or microwave individual cookies for 10-15 seconds.
Essential Tool Recommendations
A cookie scoop is non-negotiable for uniform size and professional appearance. The 2-tablespoon size (also called #30 scoop) is perfect for standard cookies.
Parchment paper or silicone baking mats prevent sticking and ensure even browning. Parchment is single-use but convenient; silicone mats are reusable and eco-friendly.
An oven thermometer eliminates guesswork. Most ovens run 15-25°F hotter or cooler than the display shows. Knowing your true temperature is critical.
Light-colored, heavy-duty baking sheets promote even baking. Dark sheets absorb more heat and burn bottoms. Thin sheets warp at high temperatures.
The Secret to Bakery-Style Appearance
Create height: Don’t flatten dough balls before baking. The mounded shape creates thick cookies with dramatic height.
Add extra chips on top: Press additional chocolate chips into the top of each dough ball before baking. They stay visible and create that professional, chocolate-studded appearance.
Finish with sea salt: A tiny pinch of flaky sea salt on each hot cookie creates complexity and makes them taste more expensive.
Bang the pan: Halfway through baking, open the oven and firmly tap the baking sheet on the oven rack 2-3 times. This deflates the cookies slightly, creating beautiful crinkled, rippled tops.
Flavor Variations
Transform your base chocolate chip cookie recipe into dozens of unique treats with these creative variations.
Decadent Flavor Additions
Espresso Chocolate Chip Cookies: Add 1 tablespoon instant espresso powder to the dry ingredients. Coffee doesn’t make cookies taste like coffee—it intensifies chocolate flavor and adds sophisticated depth. Perfect for adults.
Brown Butter Toffee Cookies: Replace 1/2 cup of chocolate chips with chopped Heath or Skor toffee bars. The buttery toffee complements brown butter beautifully.
Salted Caramel Chocolate Chip: Add 1/2 cup soft caramel bits (like Kraft caramel bits) along with the chocolate chips. Increase flaky salt on top for sweet-salty perfection.
Browned Butter Pecan Chocolate Chip: Toast 1 cup chopped pecans at 350°F for 8 minutes. Add to dough with chocolate chips. The nutty pecans echo the brown butter’s nuttiness.
Dietary-Friendly Adaptations
Gluten-Free Chocolate Chip Cookies: Replace both flours with 2 cups gluten-free 1-to-1 baking flour (like Bob’s Red Mill or King Arthur). Add 1/2 teaspoon xanthan gum if your blend doesn’t include it. Chill dough for 1 hour instead of 30 minutes.
Dairy-Free Cookies: Use vegan butter (like Miyoko’s or Earth Balance) for browning. Use dairy-free chocolate chips. The technique remains identical and results are nearly indistinguishable.
Lower Sugar Version: Reduce granulated sugar to 1/4 cup (don’t reduce brown sugar—it provides moisture). Cookies will spread less and be less sweet but still delicious.
Keto-Friendly: Replace all-purpose flour with almond flour (2 cups) and bread flour with coconut flour (1/4 cup). Use sugar-free chocolate chips and substitute erythritol for both sugars in equal amounts. These spread less, so flatten slightly before baking.
International Flavor Twists
Mexican Chocolate Cookies: Add 1 tablespoon cinnamon and 1/4 teaspoon cayenne pepper to dry ingredients. Use dark chocolate chips exclusively. The warming spices create complex, slightly spicy cookies.
Italian Biscotti-Style: Add 1 teaspoon almond extract and 1/2 cup toasted sliced almonds. Reduce vanilla to 1 teaspoon. These taste like chocolate-studded biscotti but with chewy cookie texture.
French Sea Salt Caramel: Use all dark chocolate (no semi-sweet). Add 1/2 cup dulce de leche to the dough. Finish with fleur de sel instead of regular sea salt for sophisticated elegance.
British Chocolate Orange: Add 2 teaspoons orange zest and 1/2 teaspoon orange extract. Use all dark chocolate chips. The citrus brightens chocolate flavor like Terry’s Chocolate Orange candy.
Mix-In Madness
Everything Cookies: Add 1/2 cup each: chopped pretzels, potato chips, mini marshmallows, and toffee bits along with chocolate. Sweet, salty, crunchy chaos that somehow works perfectly.
S’mores Cookies: Replace 1/3 cup flour with graham cracker crumbs. Add 1 cup mini marshmallows with the chocolate chips. Press extra marshmallows on top before baking.
Peanut Butter Cup Cookies: Add 1/2 cup creamy peanut butter to the brown butter before creaming. Replace half the chocolate chips with chopped Reese’s peanut butter cups.
Serving Suggestions
Make your chocolate chip cookies the star of memorable moments with these serving and pairing ideas.
Perfect Cookie Presentation
Cookie platters: Arrange cooled cookies on a rustic wooden board or cake stand. Alternate between placing some flat and others standing on edge for visual dimension. Tuck fresh mint sprigs between cookies for color contrast.
Individual servings: Place warm cookies in small dessert bowls. Top each with a scoop of vanilla ice cream and drizzle with chocolate sauce. The warm cookie melts the ice cream into an irresistible dessert.
Cookie sandwiches: Spread softened vanilla ice cream, Nutella, or peanut butter between two cookies. Roll the edges in mini chocolate chips or sprinkles. Wrap individually in parchment and freeze for make-ahead treats.
Skillet cookie: Press all the dough into a 10-inch cast-iron skillet. Bake at 350°F for 25-30 minutes. Serve warm from the skillet with ice cream on top for a shareable dessert that feeds 6-8 people.
Beverage Pairings
Coffee: Cold brew or dark roast espresso complements chocolate’s bitterness without competing. The coffee enhances chocolate notes rather than masking them. Avoid overly sweet flavored coffees.
Milk: Classic for a reason. Whole milk’s richness balances cookie sweetness. For adults, try oat milk—its natural sweetness and creamy texture pair beautifully with brown butter notes.
Wine: Port or late-harvest Zinfandel work surprisingly well with dark chocolate chip cookies. The wine’s sweetness matches cookie intensity while adding fruity complexity.
Hot chocolate: Meta but magical. Serve cookies alongside dark hot chocolate for the ultimate chocolate experience. The temperature contrast—cold milk meets hot cocoa—is delightful.
Tea: Earl Grey’s bergamot notes complement both chocolate types. English Breakfast tea’s robustness stands up to rich cookies without being overpowered.
Cookie Occasions and Gifts
Cookie exchanges: These two-chip cookies stand out in any cookie exchange because they look and taste more sophisticated than standard recipes. Package 6 cookies in clear cellophane bags tied with ribbon.
Care packages: Cookies ship beautifully when packed properly. Place cookies in a single layer in an airtight container, add crumpled parchment paper on top, then seal. Ship in a sturdy box with bubble wrap.
Bake sales: Price these higher than standard cookies—the two-chip concept and brown butter justify premium pricing. Label as “Artisan Two-Chip Brown Butter Cookies.”
Dinner party dessert: Serve warm cookies with coffee as a casual but impressive ending to dinner parties. Guests appreciate the home-baked thoughtfulness without the formality of plated desserts.
FAQs
Can I use frozen chocolate chips?
Yes, frozen chocolate chips work perfectly in this recipe. In fact, storing chocolate chips in the freezer extends their freshness and prevents bloom. Use them directly from frozen—no need to thaw. They’ll maintain their shape slightly better during baking since they take longer to melt, which can create nice distinct chocolate pockets.
How do I fix chocolate chip cookies that turned out too dry?
If your baked cookies are dry, brush them lightly with melted butter while still warm—this adds moisture and richness. For future batches, the likely culprits are too much flour (remember to spoon and level, never scoop) or over-baking. Remove cookies when centers still look slightly underdone. You can also add 1-2 tablespoons more brown butter to the dough next time for extra moisture.
Why didn’t my brown butter work properly?
Brown butter failure usually happens from overcooking (it burns) or undercooking (it doesn’t develop flavor). Use a light-colored saucepan so you can see the color change clearly. Stir constantly and remove from heat the moment milk solids turn golden brown and smell nutty. If you burn it, you’ll smell an acrid odor—start over. There’s no fixing burnt butter.
Can I skip chilling the cookie dough?
You can bake immediately if you’re in a rush, but results suffer. Unchilled dough spreads more, creating thinner cookies with less defined texture. The flavor also improves during chilling as ingredients meld. For best results, chill at least 30 minutes. If you’re truly pressed for time, chill for just 15 minutes—even that helps significantly.
Are chocolate chip cookies with brown butter safe during pregnancy?
Yes, this recipe is completely safe for pregnant women. All ingredients are fully cooked during baking, reaching temperatures that eliminate any food safety concerns. The eggs are baked to safe internal temperatures (cookies reach about 200°F internally). There are no raw eggs, unpasteurized dairy, or high-mercury ingredients. Enjoy freely!
How do I prevent chocolate chips from sinking to the bottom?
Toss chocolate chips in 1 tablespoon of the measured flour before adding to dough. This coats them lightly and helps suspend them throughout the cookie. Also, don’t over-mix after adding chocolate—rough folding keeps chips evenly distributed. Finally, pressing extra chips into the tops of dough balls before baking ensures visible chocolate on top.
Can I make these cookies without a mixer?
Absolutely! Brown the butter as directed, then let cool slightly. Use a sturdy wooden spoon or spatula to cream the butter and sugars in a large bowl—it takes about 5 minutes of vigorous stirring. Add eggs and vanilla, stirring until smooth. Add dry ingredients and mix until just combined. The texture may be slightly denser but cookies will still be delicious.
What’s the best way to reheat chocolate chip cookies?
For optimal texture, wrap individual cookies in foil and warm in a 300°F oven for 5-7 minutes. This restores the just-baked texture with crispy edges and soft centers. Microwave works in a pinch—heat for 10-15 seconds on high—but this makes cookies softer overall without the crispy edge contrast. Never reheat cookies more than once.
Conclusion
You’ve just discovered why thousands of home bakers swear by these three simple ingredient changes. Brown butter, a smart flour blend, and two types of chocolate aren’t just random substitutions—they’re scientifically-backed techniques that transform ordinary chocolate chip cookies into extraordinary treats that rival any bakery.
The beauty of this recipe lies in its simplicity. You’re not adding complicated steps or exotic ingredients. You’re making strategic swaps that elevate flavor, improve texture, and create cookies that people actually remember. These are the cookies that make you the hero at potlucks, the cookies friends request for birthdays, the cookies that disappear within minutes.
Ready to experience the difference three ingredients can make? Grab your butter, chocolate chips, and flour, then spend just 30 minutes creating cookies that will change your baking forever. Your kitchen will smell incredible, your family will be impressed, and you’ll wonder why you ever made cookies any other way.
Join over 8,000 home bakers who’ve already fallen in love with this two-chip brown butter method! Share your cookie creations with us on social media—we love seeing those perfectly browned edges and melty chocolate pools.
Craving more elevated baking recipes? Don’t miss our [Ultimate Guide to Brown Butter Blondies] for another application of this game-changing technique. Looking for more cookie variations? Check out our [10 Ways to Transform Any Cookie Recipe] for creative customization ideas. And if you loved learning about chocolate selection, explore our [Complete Guide to Baking with Quality Chocolate] for deep-dive insights into choosing and using chocolate in all your baking.
Happy baking, and may your cookies always be perfectly chewy with crispy edges and pools of melted chocolate in every bite!