

Chocolate Fingers Recipe – Easy Soft Chocolate Biscuits
Table of Contents
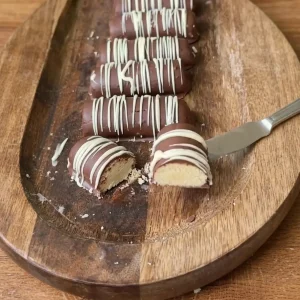
If you love bakery‑style treats that look elegant but are surprisingly easy to make at home, these Chocolate Fingers are for you. Soft cocoa biscuits coated in silky milk chocolate and finished with delicate white chocolate drizzles — perfect for coffee time, gifting, or special occasions.
Why You’ll Love This Recipe
- ✅ Beginner‑friendly with simple pantry ingredients
- ✅ Soft and tender texture that melts in your mouth
- ✅ Elegant presentation with minimal effort
- ✅ Perfect for holidays, tea time, or edible gifts
- ✅ Customizable — use dark, white, or flavored chocolate
This recipe balances rich cocoa flavor with a smooth chocolate coating for a bakery-quality result at home.

Tools
You don’t need special equipment — just basic kitchen tools:
- Mixing bowl
- Hand whisk or electric mixer
- Spatula
- Baking tray
- Parchment paper
- Microwave-safe bowl or double boiler
- Fork or piping bag (for chocolate drizzle)
- Cooling rack (optional but recommended)
Ingredients & Prep
For the Dough:
- 125g soft margarine (room temperature)
- 1 tablespoon powdered sugar (icing sugar)
- 1 whole egg
- 1 tablespoon cornstarch
- 1 teaspoon vanilla extract
- 1½ tablespoons unsweetened cocoa powder
- 200–250g plain flour (added gradually)
- ½ teaspoon baking powder
For the Chocolate Coating:
- 150g milk chocolate
- 2 tablespoons neutral oil (vegetable or sunflower oil)
For Decoration:
- Melted white chocolate (for drizzling)
Prep Tips:
- Make sure the margarine is soft, not melted.
- Sift the cocoa powder to avoid lumps.
- Add flour gradually — the dough should be soft but not sticky.
How to Make
Step 1: Prepare the Dough
In a bowl, beat the soft margarine with powdered sugar until creamy and smooth.
Add the egg, vanilla extract, cornstarch, and cocoa powder. Mix until fully combined.
Gradually incorporate the flour and baking powder. Knead gently until you get a soft, smooth dough that doesn’t stick to your hands.
Step 2: Shape
Form the dough into equal finger-shaped logs. Try to keep them uniform in size for even baking.
Place them on a baking tray lined with parchment paper, leaving a little space between each piece.
Step 3: Bake
Bake in a preheated oven at 170°C (340°F) for about 15 minutes.
💡 They should remain slightly light in color. Avoid overbaking to keep them soft.
Let the biscuits cool completely before coating.
Step 4: Chocolate Coating
Melt the milk chocolate with the oil using a double boiler or microwave (heat in short intervals, stirring in between).
Dip each cooled biscuit into the melted chocolate, allowing excess chocolate to drip off.
Place them on parchment paper or a cooling rack.
Step 5: Decorate
Drizzle melted white chocolate over the top using a piping bag or fork.
Allow the chocolate to set fully at room temperature before serving.

Storage
- Store in an airtight container at room temperature for up to 5 days.
- In warm climates, refrigerate for longer freshness (up to 7–8 days).
- If refrigerated, let them sit at room temperature for 10 minutes before serving for best texture.
- These biscuits can also be frozen (without coating) for up to 2 months.
Similar Recipes
- Mini Pancake Bowl Recipe | Easy & Fluffy Breakfast
- Rich Lemon Cake (Made with Whole Boiled Lemon)
- No-Bake Fluffy Jar Cake (Easy Steamed Sponge Cake in a Jar)
- Berry Croissant Bake Recipe: A Simple and Cozy Breakfast
Frequently Asked Questions
Can I use butter instead of margarine?
Yes. Unsalted butter works perfectly and adds a richer flavor.
Can I use dark chocolate instead of milk chocolate?
Absolutely. Dark chocolate gives a more intense cocoa taste and less sweetness.
Why did my biscuits turn hard?
They were likely overbaked. Remove them once the bottoms are lightly set — they will firm up as they cool.
Can I make them ahead for events?
Yes! They’re ideal for making 1–2 days in advance. Store in an airtight container.
Can I skip the oil in the chocolate?
The oil helps create a smoother coating and shinier finish. You can skip it, but the coating may be thicker.
Recipe
Chocolate Fingers
Ingredients
For the Dough:
- 125 g soft margarine room temperature
- 1 tablespoon powdered sugar icing sugar
- 1 whole egg
- 1 tablespoon cornstarch
- 1 teaspoon vanilla extract
- 1½ tablespoons unsweetened cocoa powder
- 200 –250 g plain flour added gradually
- ½ teaspoon baking powder
For the Chocolate Coating:
- 150 g milk chocolate
- 2 tablespoons neutral oil vegetable or sunflower
For Decoration:
- Melted white chocolate for drizzling
Instructions
- Preheat oven to 170°C (340°F) and line a baking tray with parchment paper.
- In a mixing bowl, beat the soft margarine with powdered sugar until creamy.
- Add the egg, vanilla extract, cornstarch, and cocoa powder. Mix well.
- Gradually add flour and baking powder. Knead gently until a soft, smooth dough forms (not sticky).
- Shape into equal finger-sized logs and place on the prepared baking tray.
- Bake for about 15 minutes. Do not overbake — they should remain soft.
- Allow biscuits to cool completely.
- Melt milk chocolate with oil until smooth.
- Dip each biscuit into the melted chocolate and place on parchment paper.
- Drizzle melted white chocolate over the top.
- Let set completely before serving.
Notes
- Do not overbake to keep the texture soft.
- Butter can be used instead of margarine for richer flavor.
- Store in an airtight container for up to 5 days.
- Refrigerate in warm climates.
These homemade Chocolate Fingers are simple, elegant, and guaranteed to impress.