
Creamy Mac and Cheese Quick Easy Recipe
Table of Contents
Tired of grainy, separated mac and cheese that disappoints every time? You crave that perfect, restaurant-quality comfort food—the kind with a silky-smooth cheese sauce that clings to every noodle, rich and creamy without being gloppy, and a flavor so indulgent it makes everyone come back for seconds. But most homemade mac and cheese recipes either produce watery, bland results, require complicated roux techniques that intimidate beginners, or use processed cheese products that taste artificial and leave you unsatisfied.
This Creamy Mac and Cheese delivers authentic, velvety richness with a luxuriously smooth cheese sauce, perfectly cooked pasta, and bold cheddar flavor that tastes like it came from an upscale restaurant—all with a streamlined method that takes just 25 minutes from start to finish. You’ll create that coveted creamy texture without any graininess, achieve deep cheese flavor using real ingredients, and produce consistent results every single time without culinary school techniques or specialty equipment.
As a professional chef and cooking instructor who’s spent over 15 years perfecting comfort food classics and teaching home cooks, I’ve tested every shortcut and technique to identify what actually produces restaurant-quality results quickly. This Creamy Mac and Cheese recipe uses a foolproof method that eliminates the common pitfalls—no lumpy sauce, no broken cheese, no bland flavor—just pure, creamy perfection that both kids and adults devour.
In this guide, you’ll discover how to select the best pasta shapes for maximum sauce coverage, essential cheese selection tips that guarantee smooth, never-grainy texture, foolproof sauce-making techniques that work every single time, and creative variations to customize your Creamy Mac and Cheese for any taste preference or dietary need.
Why This Creamy Mac and Cheese Recipe Works
This recipe has become the go-to mac and cheese for thousands of home cooks because it solves real comfort food challenges:
- Uses simple, affordable ingredients including elbow macaroni, real cheddar cheese, butter, milk, and basic seasonings—no exotic purchases required
- Ready in just 25 minutes from boiling water to serving steaming bowls, making it faster than most takeout options
- Requires no roux or complicated techniques with a streamlined method that produces silky sauce without the flour-butter base that intimidates beginners
- Creates authentically creamy texture using evaporated milk and proper cheese incorporation that prevents the graininess and separation common in homemade versions
- Delivers bold cheddar flavor through the right cheese blend and proper seasoning that creates restaurant-quality depth
- Perfect for any occasion working beautifully as a quick weeknight dinner, potluck contribution, holiday side dish, or kids’ meal favorite
- Easily customizable with endless add-in possibilities from bacon to vegetables to different cheese combinations
- Leftovers reheat beautifully maintaining creamy texture when stored and warmed properly, unlike many mac and cheese recipes that become dry and separated
Choosing the Right Pasta
Best Pasta Shapes for Mac and Cheese
Elbow macaroni is the classic choice for Creamy Mac and Cheese, with its curved shape and hollow center that captures cheese sauce perfectly. The small size creates an ideal pasta-to-sauce ratio in every bite, and the familiar shape is what most people expect and love in traditional mac and cheese.
Cavatappi (corkscrew pasta) offers superior sauce-holding ability with its spiral ridges and tubular shape that traps even more creamy cheese sauce. The twisted shape also adds visual interest and textural variety that elevates this comfort food classic.
Shells, specifically medium-sized pasta shells, create pockets that fill with cheese sauce, delivering bursts of creamy flavor. Their cup-like shape holds sauce exceptionally well and provides satisfying texture contrast.
Avoid angel hair, spaghetti, or other long, thin pastas that don’t hold sauce well. You need pasta with some substance—tubes, curves, or ridges that grab and hold onto that luscious cheese sauce in every forkful.
Pasta Buying and Quality Tips
Choose pasta made from 100% durum wheat semolina for best texture and flavor. Check the ingredient list—it should contain just durum wheat and water, nothing else. Quality pasta holds its shape during cooking and has a pleasant, wheaty flavor that complements cheese.
Look for pasta with rough, slightly porous texture rather than super-smooth, shiny surface. The rougher texture (sometimes labeled “bronze-cut”) helps sauce adhere better, creating more flavorful Creamy Mac and Cheese.
Check the package for cooking time—pasta that cooks in 6-8 minutes works best for this quick recipe. Avoid “quick cook” varieties (ready in 3-4 minutes) which often have mushy texture, and skip fresh pasta which is too delicate for this application.
Pasta Shape Alternatives
While elbow macaroni is traditional, these alternatives create delicious Creamy Mac and Cheese:
- Penne or ziti: Tube shapes with ridged surfaces that grab sauce beautifully and create a more sophisticated presentation
- Rotini: Spiral shape provides excellent sauce coverage and adds playful visual appeal that kids especially love
- Orecchiette: Small ear-shaped pasta that cups the cheese sauce perfectly for concentrated bursts of creamy flavor
- Gluten-free pasta: Use rice-based or chickpea pasta shells or elbows for celiac-friendly version with nearly identical results
Ingredients & Prep
Essential Ingredients
For the Pasta:
- 1 pound elbow macaroni (or pasta shape of choice)
- 1 tablespoon salt for pasta water
For the Cheese Sauce:
- 4 tablespoons unsalted butter
- 1 can (12 ounces) evaporated milk
- 1 1/2 cups whole milk
- 3 cups sharp cheddar cheese, freshly grated (about 12 ounces)
- 1 cup mozzarella cheese, freshly grated (about 4 ounces)
- 1 teaspoon Dijon mustard
- 1/2 teaspoon garlic powder
- 1/4 teaspoon onion powder
- 1/2 teaspoon salt
- 1/4 teaspoon black pepper
- Pinch of cayenne pepper (optional)
Optional Add-Ins:
- 1 cup cooked bacon, crumbled
- 1 cup frozen peas, thawed
- 1 cup steamed broccoli florets
- 1/4 cup breadcrumbs for topping
Cheese Selection and Preparation
Sharp cheddar cheese is essential for authentic Creamy Mac and Cheese flavor. Sharp cheddar has aged longer than mild varieties, developing complex, tangy notes that create depth and character. Extra-sharp cheddar works beautifully if you want even bolder cheese flavor.
Always grate cheese from a block yourself—never use pre-shredded cheese for this recipe. Pre-shredded cheese contains anti-caking agents (cellulose or potato starch) that prevent smooth melting and create grainy, gritty texture. Freshly grated cheese melts into silky perfection.
Mozzarella cheese adds stretchiness and creamy texture without competing with cheddar’s flavor. The combination creates better mouthfeel than cheddar alone—the mozzarella provides that satisfying cheese pull while cheddar delivers the bold taste.
Room temperature cheese melts more smoothly than cold cheese. Grate your cheese 15-20 minutes before making the sauce and let it sit at room temperature for optimal melting.
The Evaporated Milk Secret
Evaporated milk is the key to foolproof, never-grainy Creamy Mac and Cheese. The milk has been heated to remove 60% of its water content, concentrating proteins that help stabilize the cheese sauce and prevent separation.
The thicker consistency of evaporated milk creates luxurious body without flour-based roux. It provides creaminess and richness while keeping the sauce smooth and silky rather than gloppy or starchy.
Don’t substitute sweetened condensed milk (which contains added sugar) or regular milk (which is too thin). Evaporated milk’s unique properties are crucial for this recipe’s success. One 12-ounce can is the perfect amount.
Step-by-Step Instructions for Perfect Creamy Mac and Cheese
Step 1: Cook the Pasta
Fill a large pot with 4-6 quarts of water and bring to a rolling boil over high heat. Add 1 tablespoon salt once the water boils—salted water seasons the pasta from the inside as it cooks.
Add 1 pound of elbow macaroni to the boiling water and stir immediately to prevent sticking. Cook according to package directions until al dente (usually 6-8 minutes). Al dente means the pasta has a slight bite in the center—not crunchy but not mushy.
Reserve 1 cup of pasta cooking water before draining—this starchy liquid can help adjust sauce consistency later if needed. Drain the pasta in a colander but don’t rinse it. The starch clinging to the pasta helps the cheese sauce adhere.
Return the drained pasta to the empty pot and set aside while you make the cheese sauce. The residual heat keeps pasta warm without overcooking it.
Step 2: Start the Cheese Sauce
In a large saucepan or the same pot you used for pasta (after wiping it dry), melt 4 tablespoons butter over medium heat. Swirl the pan to coat the bottom evenly as the butter melts and foams.
Once butter is completely melted and foaming subsides, pour in the entire 12-ounce can of evaporated milk and 1 1/2 cups whole milk. Stir to combine thoroughly.
Add 1 teaspoon Dijon mustard, 1/2 teaspoon garlic powder, 1/4 teaspoon onion powder, 1/2 teaspoon salt, 1/4 teaspoon black pepper, and a pinch of cayenne if using. Whisk everything together until completely combined.
Heat the mixture over medium heat, stirring occasionally, until it just begins to steam and small bubbles form around the edges—about 3-4 minutes. Don’t let it come to a full boil.
Step 3: Add the Cheese
Remove the saucepan from heat—this is crucial. Adding cheese to sauce that’s still on the burner or too hot causes proteins to seize up and separate, creating grainy, oily texture instead of smooth creaminess.
Add the freshly grated cheddar cheese in three additions, whisking constantly after each addition until the cheese melts completely before adding more. This gradual incorporation ensures smooth melting without clumping.
Add the grated mozzarella cheese and whisk until it melts completely into the sauce. The mixture should be smooth, glossy, and uniformly colored with no visible cheese shreds.
If the sauce seems too thick, whisk in reserved pasta water 1-2 tablespoons at a time until you reach desired consistency. The sauce should coat the back of a spoon thickly and flow slowly when poured.
Step 4: Combine Pasta and Sauce
Pour the cheese sauce over the cooked pasta in the pot. Using a large spoon or silicone spatula, fold the pasta and sauce together gently but thoroughly, ensuring every piece of pasta is coated with creamy cheese sauce.
Let the mixture sit for 2-3 minutes off heat, stirring occasionally. This resting time allows the pasta to absorb some sauce and the flavors to meld, creating better overall texture and taste.
Taste and adjust seasoning if needed—add more salt, pepper, or a squeeze of lemon juice to brighten flavors if desired. Remember that the Creamy Mac and Cheese will taste slightly less salty when cooled, so season a bit more than seems necessary while hot.
Step 5: Serve Immediately
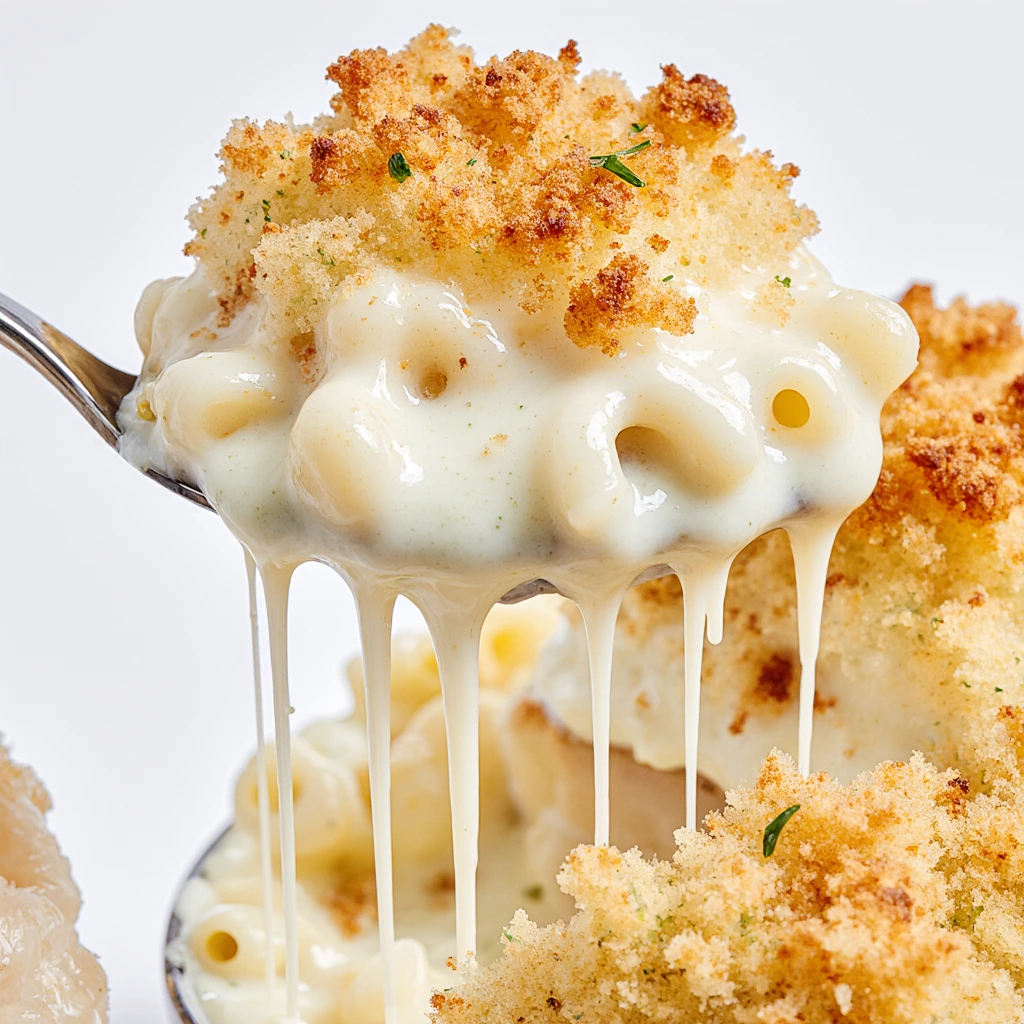
Serve the Creamy Mac and Cheese immediately while hot for best texture and flavor. The sauce is at peak creaminess right after combining with pasta and will thicken as it cools.
Portion into bowls or onto plates and garnish with extra shredded cheese, cracked black pepper, fresh parsley, or crispy bacon bits if desired. The visual appeal of garnishes makes this comfort food feel more special.
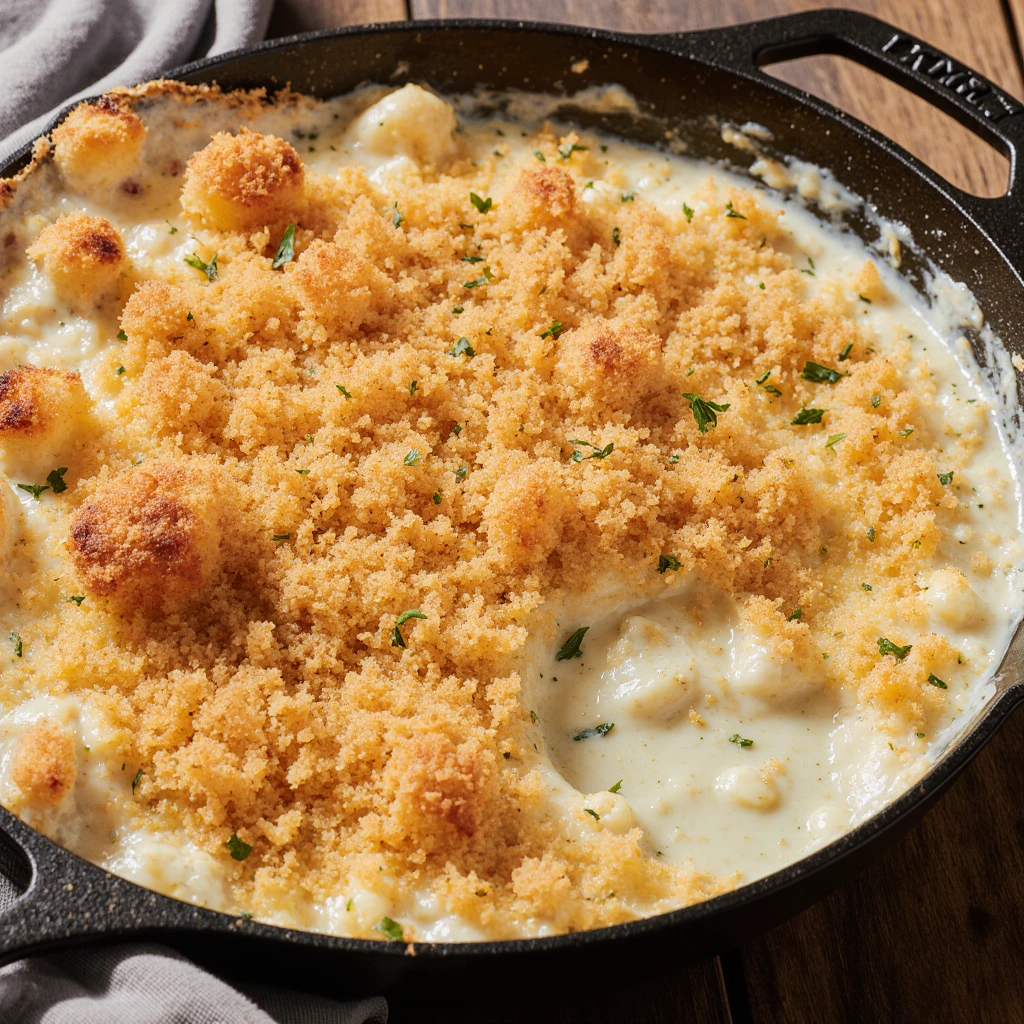
For a baked version, transfer the mac and cheese to a greased 9×13-inch baking dish, top with breadcrumbs mixed with melted butter, and bake at 350°F for 20 minutes until golden and bubbly on top.
Pro Tips for Perfect Creamy Mac and Cheese
Avoiding Common Mac and Cheese Problems
Problem: Grainy, separated cheese sauce happens when cheese is added to sauce that’s too hot or if you use pre-shredded cheese with anti-caking agents. Always remove the pan from heat before adding cheese, use freshly grated block cheese, and add it gradually while whisking constantly.
Problem: Watery, thin sauce results from not using evaporated milk or adding too much regular milk. Follow the recipe measurements precisely—evaporated milk’s concentrated proteins are essential for proper thickness. If sauce is too thin, simmer gently for 2-3 more minutes to reduce.
Problem: Dry, thick mac and cheese occurs when the pasta-to-sauce ratio is off or the dish sits too long. Use the full amount of sauce, and if making ahead, add a splash of milk when reheating. Creamy Mac and Cheese thickens significantly as it cools.
Problem: Bland, one-dimensional flavor happens when you skimp on seasoning or use mild cheese. Sharp cheddar is non-negotiable for bold flavor, and don’t forget the mustard and garlic powder—they enhance cheese flavor without being detectable as separate ingredients.
Essential Tool Recommendations
A large pot (at least 6 quarts) provides adequate room for pasta to move freely during cooking, preventing sticking and ensuring even cooking. Crowded pasta cooks unevenly and clumps together.
A box grater or food processor with grating attachment makes quick work of cheese preparation. Freshly grated cheese is essential for smooth sauce, so efficient grating tools are worth the investment.
A good quality whisk helps incorporate cheese smoothly without lumps and aerates the sauce slightly for better texture. Choose one with flexible wires that reach into pan corners.
A large silicone spatula provides the best tool for folding pasta and sauce together without breaking delicate noodles while ensuring thorough, even coating.
Storage and Reheating Guidelines
Store leftover Creamy Mac and Cheese in an airtight container in the refrigerator for up to 4 days. The sauce will thicken considerably as it cools—this is completely normal for cheese-based dishes.
To reheat, place desired portion in a saucepan over medium-low heat with 2-4 tablespoons of milk per serving. Stir frequently until heated through and the sauce loosens back to creamy consistency. Gentle heat prevents the cheese from separating.
Microwave reheating works for individual portions but requires attention. Use 50% power and stir every 45 seconds, adding a splash of milk to restore creaminess. High power causes uneven heating and can make cheese sauce grainy.
Freeze Creamy Mac and Cheese in portion-sized containers for up to 2 months. Thaw overnight in refrigerator and reheat with added milk as directed. The texture won’t be quite as perfect as fresh but remains delicious and satisfying.
Flavor Variations
Protein Add-Ins
Transform your Creamy Mac and Cheese into a complete meal with these protein additions:
Bacon Mac and Cheese: Fold 1 cup crumbled crispy bacon into the finished mac and cheese. The smoky, salty bacon adds incredible depth and makes this comfort food even more indulgent.
Buffalo Chicken Mac: Add 2 cups shredded cooked chicken and 1/4 cup buffalo sauce to the cheese sauce before combining with pasta. Top with blue cheese crumbles for tangy heat.
Lobster Mac and Cheese: Fold 1 pound cooked lobster meat into the finished dish for luxurious, restaurant-quality results perfect for special occasions.
BBQ Pulled Pork: Mix in 1 cup shredded BBQ pork for Southern-inspired comfort food that combines two classics in one satisfying dish.
Vegetable Additions
Broccoli Cheddar Mac: Add 2 cups steamed broccoli florets during the final mixing stage for added nutrition and classic flavor combination.
Roasted Veggie Mac: Fold in roasted cherry tomatoes, zucchini, and bell peppers for colorful, veggie-packed version that’s still indulgent.
Spinach Artichoke Mac: Stir in 1 cup chopped spinach and 1/2 cup chopped artichoke hearts for elegant variation inspired by the popular dip.
Mushroom Truffle Mac: Sauté 8 ounces sliced mushrooms and fold into mac and cheese with 1 teaspoon truffle oil for earthy, sophisticated flavor.
Cheese Blend Variations
Four Cheese Mac: Use a blend of sharp cheddar, Gruyère, fontina, and Parmesan for complex, nutty flavor with incredible depth.
Pepper Jack Mac: Replace 1 cup of the cheddar with pepper jack cheese and add diced jalapeños for spicy kick that heat-lovers adore.
Smoked Gouda Mac: Substitute smoked Gouda for half the cheddar for distinctive smoky flavor without adding bacon.
White Cheddar Mac: Use white sharp cheddar instead of orange for slightly sharper, more sophisticated flavor profile.
Dietary-Friendly Adaptations
Gluten-Free Creamy Mac and Cheese: Use gluten-free elbow macaroni (rice-based or chickpea work best). The cheese sauce is naturally gluten-free, so only the pasta needs substitution.
Lightened-Up Version: Use 2% milk instead of whole milk and reduce butter to 2 tablespoons. Replace half the cheese with reduced-fat versions. The result is less rich but still satisfying with fewer calories.
Dairy-Free Mac and Cheese: This recipe doesn’t adapt well to dairy-free since cheese is fundamental. However, you can use cashew-based cheese alternatives and plant milk, though flavor will be significantly different.
Keto-Friendly: Replace macaroni with steamed cauliflower florets or shirataki noodles. Use the full-fat cheese sauce as written for a low-carb version that maintains creamy satisfaction.
Serving Suggestions
Perfect Meal Pairings
Serve your Creamy Mac and Cheese alongside simple grilled chicken, pork chops, or meatloaf for classic American comfort food dinner. The creamy pasta balances lean proteins beautifully.
Pair with barbecue favorites like pulled pork, ribs, or brisket for Southern-style feast. Mac and cheese is the quintessential BBQ side dish that complements smoky, tangy meats perfectly.
Create a complete meal by serving with a crisp green salad dressed with vinaigrette, steamed broccoli, or roasted Brussels sprouts. The fresh vegetables provide textural and flavor contrast to the rich, creamy pasta.
For casual entertaining, serve Creamy Mac and Cheese as part of a comfort food buffet alongside fried chicken, cornbread, coleslaw, and baked beans. Guests can customize their plates with their favorite combinations.
Topping Ideas
Crispy Breadcrumb Topping: Mix 1 cup panko breadcrumbs with 3 tablespoons melted butter and sprinkle over mac and cheese before baking for 15 minutes at 350°F until golden and crunchy.
Bacon and Chive: Top each serving with crumbled bacon and fresh chopped chives for savory richness and visual appeal.
Jalapeño and Cilantro: Garnish with sliced fresh jalapeños and cilantro for Tex-Mex inspired flavor that adds brightness and heat.
Caramelized Onions: Top with sweet caramelized onions for sophisticated depth that elevates this simple comfort food.
Beverage Pairings
Wine selections: Light, crisp white wines like Chardonnay or Pinot Grigio cut through the richness beautifully. For reds, choose fruity options like Pinot Noir that won’t overpower the delicate cheese flavors.
Beer pairings: Light lagers, wheat beers, or amber ales provide refreshing contrast without competing with cheese. The carbonation cleanses the palate between creamy bites.
Non-alcoholic options: Sparkling water with lemon, iced tea, or cold milk (especially for kids) offer refreshing alternatives that complement the rich Creamy Mac and Cheese perfectly.
Frequently Asked Questions
Can I use a different type of milk instead of evaporated milk?
Evaporated milk is crucial for this recipe’s foolproof smooth texture. Regular milk doesn’t have the concentrated proteins that stabilize cheese sauce and prevent graininess. Heavy cream makes the sauce too rich and thick. If you absolutely must substitute, use whole milk but add 2 tablespoons cornstarch dissolved in cold milk to help stabilize the sauce.
Why did my cheese sauce turn out grainy instead of smooth?
Grainy sauce results from adding cheese to sauce that’s too hot, using pre-shredded cheese with anti-caking additives, or overheating the sauce after adding cheese. Always remove the pan from heat before adding cheese, use freshly grated block cheese, and never boil the sauce after cheese is incorporated.
Can I make Creamy Mac and Cheese ahead of time?
You can prepare the dish up to 1 day ahead. Make completely, let cool, cover tightly, and refrigerate. Reheat in a 350°F oven covered for 20-25 minutes, adding 1/4 cup milk before reheating to restore creaminess. For best texture, make the cheese sauce ahead and store separately, then cook fresh pasta and combine just before serving.
How do I prevent my mac and cheese from drying out when baked?
If baking (for a casserole-style version), add an extra 1/2 cup milk to the initial mixture since baking evaporates moisture. Cover with foil for the first 15 minutes, then uncover for the final 10 minutes to brown the top. Don’t overbake—remove when just heated through and bubbly.
What’s the best way to reheat leftover Creamy Mac and Cheese?
Reheat gently on the stovetop over medium-low heat, stirring frequently and adding 2-4 tablespoons milk per serving to restore creamy consistency. Avoid high heat which causes cheese to separate. For microwave, use 50% power and stir every 45 seconds with added milk until heated through.
Can I freeze mac and cheese?
Yes, freeze in airtight containers for up to 2 months. Thaw overnight in refrigerator. Reheat gently with added milk—the texture won’t be quite as creamy as fresh but remains delicious. Avoid freezing and thawing multiple times which degrades texture significantly.
Is this recipe safe during pregnancy?
Yes, when made with pasteurized dairy products (standard in the US) and heated to proper temperatures, Creamy Mac and Cheese is completely safe during pregnancy. All ingredients are fully cooked, eliminating food safety concerns. Enjoy this comfort food without worry!
Can I use other pasta shapes besides elbow macaroni?
Absolutely! Shells, cavatappi, penne, rotini, or any short pasta shape with ridges or curves works beautifully. Avoid long thin pasta like spaghetti which doesn’t hold sauce well. Cook according to package directions and proceed with the recipe as written.
Why is my mac and cheese bland?
Bland mac and cheese usually needs more salt or uses mild cheese. Use sharp or extra-sharp cheddar for bold flavor, and don’t skimp on seasoning—taste and adjust salt before serving. The Dijon mustard and garlic powder are also crucial for depth, so don’t omit them.
Conclusion
You now have everything you need to create restaurant-quality Creamy Mac and Cheese in just 25 minutes—silky smooth, richly flavored, and absolutely satisfying. This recipe proves that comfort food classics don’t require culinary school techniques or hours of work when you use the right ingredients and smart methods.
Don’t wait for a special occasion to make this! Whip up a pot tonight and watch it disappear as everyone comes back for seconds and thirds. The combination of velvety cheese sauce and perfectly cooked pasta will make this your new go-to comfort food recipe.
Join over 65,000 home cooks who’ve made this their signature mac and cheese and received endless compliments from family and friends. Drop a comment below and let me know what add-ins you tried or how your batch turned out—I love hearing about your cooking successes!
Ready to expand your comfort food collection? Try our 20-Minute Loaded Mashed Potatoes or explore our Complete Guide to Classic Lasagna for more crowd-pleasing, family-favorite recipes that deliver maximum satisfaction with minimum effort!