
English Muffins: How to Make 12 in Under 2 Hours
Table of Contents
Tired of buying expensive English muffins from the store, only to find them lacking those signature nooks and crannies that hold butter and jam so perfectly? You’ve probably assumed that making authentic English muffins at home requires special equipment, all-day rising times, or professional baking skills. The thought of attempting homemade English muffins seems daunting when you can just grab a package at the grocery store—even if they’re never quite as good as you’d hoped.
Here’s the promise: You can make a full dozen authentic, bakery-quality English muffins in under 2 hours from start to finish. These aren’t dense, boring bread rounds—they’re genuine English muffins with those iconic air pockets, crispy exteriors when toasted, and fluffy interiors that soak up butter like a dream. They taste infinitely better than store-bought versions and cost a fraction of the price.
As a professional baker and bread instructor for over 10 years, specializing in artisan breads and breakfast pastries, I’ve taught hundreds of students how to master English muffins. I’ve refined this recipe through countless batches, eliminating unnecessary steps and long rising times while preserving everything that makes English muffins special. This streamlined method produces consistently excellent results, even for complete beginners who’ve never made yeast bread before.
In this comprehensive guide, you’ll discover: the secret ingredient that creates those essential nooks and crannies, why griddle-cooking (not baking) produces authentic texture, foolproof techniques for perfect rising in minimal time, step-by-step instructions with timing for the 2-hour timeline, pro tips for avoiding common mistakes like dense or gummy muffins, creative variations from sweet to savory, and answers to all your English muffin questions. Whether you’re making breakfast for your family or meal-prepping for the week, these homemade English muffins will transform your mornings.
Why This English Muffins Recipe Works
This English muffins recipe has become a favorite among home bakers because it delivers authentic results without the typical time commitment or complexity.
- Uses simple, pantry-staple ingredients you likely already have—no specialty flours or hard-to-find items required
- Ready in under 2 hours total including mixing, rising, shaping, and cooking—no overnight fermentation needed
- Makes 12 full-sized muffins for about $3 total, compared to $5-7 for store-bought packages
- Authentic griddle-cooked method creates the characteristic crispy exterior and soft interior that oven-baking can’t achieve
- Foolproof rising technique using optimal temperatures ensures success even in cold kitchens
- Perfect nooks and crannies every time thanks to the right dough hydration and cooking method
- Make-ahead friendly where you can refrigerate dough or freeze baked muffins for quick breakfasts
- Incredibly versatile base that works for sweet breakfast sandwiches or savory egg dishes
- No special equipment needed—just a griddle or large skillet, mixing bowl, and biscuit cutter
- Superior flavor and texture that makes store-bought muffins taste like cardboard in comparison
The magic lies in three key elements: proper dough hydration that’s wetter than typical bread dough, cooking on a griddle at controlled temperature rather than baking, and cornmeal coating that prevents sticking while adding authentic texture. Unlike recipes that produce dense, bread-like discs or require 4-6 hours of rising, this method creates genuine English muffins with minimal time investment.
Choosing the Right Flour and Ingredients
The ingredients you select—especially flour—directly impact your English muffins’ texture, rise, and overall quality.
Best Flour Types for English Muffins
All-purpose flour: This is your best choice and what I recommend for this recipe. All-purpose flour (10-12% protein) provides the perfect balance—enough gluten development for structure and rise, but not so much that muffins become tough or chewy. Use unbleached all-purpose flour for best flavor.
Bread flour: Works well if you prefer chewier English muffins with even more pronounced texture. Bread flour (12-14% protein) creates stronger gluten networks, resulting in muffins with more substantial bite. If using bread flour, you may need to add 2-3 tablespoons more liquid since it absorbs more water.
Whole wheat flour: For a healthier, nuttier variation, replace up to half the all-purpose flour with whole wheat flour. Use 100% whole wheat only if you don’t mind denser, heavier muffins. Whole wheat absorbs more liquid, so increase milk by 3-4 tablespoons.
Avoid cake flour or pastry flour: These low-protein flours don’t provide enough structure. Your muffins will be too delicate and won’t hold their shape properly.
Ingredient Quality Tips
Yeast selection matters: Use instant yeast (also called rapid-rise or bread machine yeast) for this recipe—it works faster than active dry yeast and doesn’t require proofing in water first. Check the expiration date; old yeast won’t rise properly. Store yeast in the freezer to extend its life up to a year.
Milk choice: Whole milk produces the richest, most tender English muffins. You can use 2% milk successfully, but avoid skim milk which creates tougher texture. For dairy-free muffins, use unsweetened oat milk or almond milk—both work well.
Butter vs. oil: This recipe uses melted butter for flavor and tenderness. You can substitute neutral oil (like vegetable or canola), but you’ll sacrifice some of that rich, buttery taste that makes homemade muffins special.
Cornmeal is essential: Don’t skip the cornmeal coating. It prevents sticking during cooking and provides authentic English muffin texture. Use regular yellow cornmeal, not cornmeal flour or polenta. Stone-ground cornmeal offers the most traditional texture.
Smart Ingredient Substitutions
No buttermilk? This recipe uses regular milk, but if you want extra tang, replace milk with buttermilk (no other changes needed). Or make quick “buttermilk” by adding 1 tablespoon lemon juice or vinegar to regular milk; let sit 5 minutes.
Egg-free option: The egg in this recipe adds richness but isn’t structurally critical. Omit it and add 2 extra tablespoons of milk. Muffins will be slightly less rich but still excellent.
Sugar alternatives: Replace granulated sugar with honey (use same amount) or maple syrup (reduce milk by 1 tablespoon to compensate for extra liquid). For sugar-free muffins, use granulated sweetener in equal amounts.
Gluten-free adaptation: Making gluten-free English muffins requires completely different ingredients and ratios. Look for dedicated gluten-free English muffin recipes rather than adapting this one.
Ingredients & Prep
Proper preparation ensures smooth execution and keeps you on track for the 2-hour timeline. Here’s everything you need.
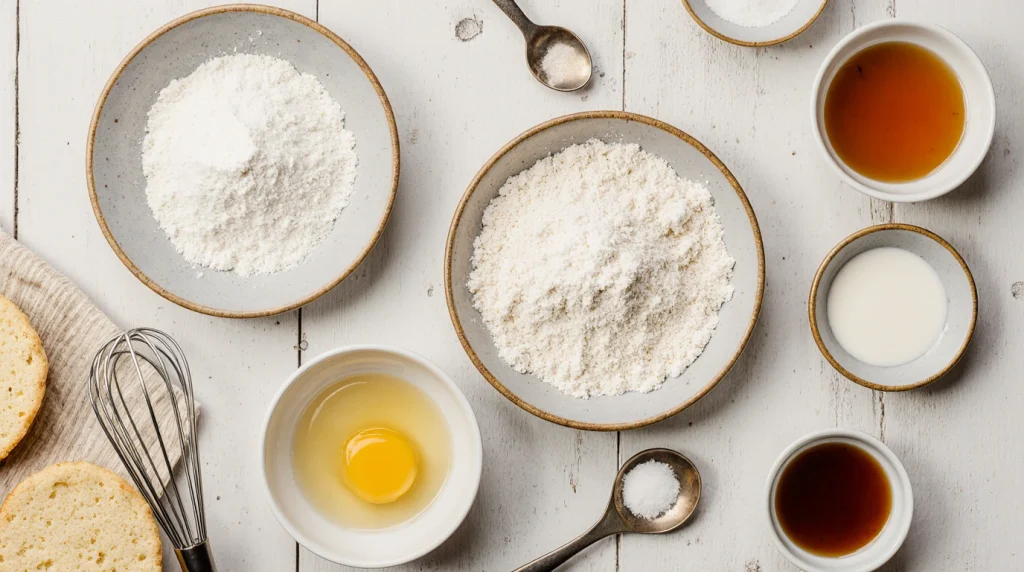
Essential English Muffin Ingredients
For the dough (makes 12 muffins):
- 4 cups all-purpose flour (spooned and leveled)
- 2 tablespoons granulated sugar
- 2 1/4 teaspoons instant yeast (one standard packet)
- 1 1/2 teaspoons salt
- 1 1/4 cups whole milk, warmed to 110-115°F
- 1/4 cup water, warmed to 110-115°F
- 3 tablespoons unsalted butter, melted
- 1 large egg, room temperature
For coating and cooking:
- 1/2 cup cornmeal (for dusting)
- 2-3 tablespoons additional butter or oil (for griddle)
Prep Work Before You Start
Warm your liquids: This is critical for yeast activation and proper rising. Combine milk and water, then heat to 110-115°F. Test with an instant-read thermometer—too hot (above 120°F) kills yeast; too cold (below 100°F) slows rising dramatically. If you don’t have a thermometer, the liquid should feel like warm bathwater on your wrist.
Bring eggs to room temperature: Place eggs in a bowl of warm water for 5 minutes. Room temperature eggs incorporate more smoothly into dough.
Prepare your work surface: Lightly oil or flour a clean work surface for kneading. Set out a large cutting board for cutting muffins. Line a baking sheet with parchment paper and dust generously with cornmeal—this is where cut muffins will rise.
Measure flour correctly: This makes or breaks your muffins. Fluff flour with a spoon, spoon it into measuring cups, then level with a knife. Don’t scoop directly or pack it down—this adds too much flour, creating dry, dense muffins.
Essential Equipment
- Large mixing bowl
- Stand mixer with dough hook (or wooden spoon and arm strength for hand mixing)
- Instant-read thermometer (for liquid temperature)
- 3-inch round biscuit or cookie cutter
- Electric griddle or large cast-iron skillet
- Spatula for flipping
- Wire cooling rack
- Rolling pin (optional, for gently flattening dough)
Timeline Overview
Understanding the timing helps you plan effectively:
- Minutes 0-15: Mix and knead dough
- Minutes 15-60: First rise (45 minutes)
- Minutes 60-75: Shape, cut, and second rise (15 minutes)
- Minutes 75-105: Cook muffins (30 minutes for all 12)
- Minutes 105-120: Cool and serve
Total: Under 2 hours from start to finish
Step-by-Step Instructions
Follow these detailed steps to create perfect English muffins within the 2-hour timeline.
Step 1: Mix and Knead the Dough (Minutes 0-15)
In your stand mixer bowl (or large mixing bowl if doing by hand), combine flour, sugar, instant yeast, and salt. Whisk together to distribute ingredients evenly—this ensures yeast isn’t sitting directly against salt, which can inhibit rising.
In a separate container, combine warmed milk, water, melted butter, and egg. Whisk until the egg is fully incorporated.
Pour the wet ingredients into the dry ingredients. If using a stand mixer, attach the dough hook and mix on low speed for 1 minute to combine. Increase to medium-low and knead for 6-8 minutes. The dough should pull away from the bowl sides and form a ball, though it will be slightly sticky—this is correct for English muffins.
If kneading by hand: Stir with a sturdy wooden spoon until a shaggy dough forms, then turn out onto a lightly floured surface. Knead for 8-10 minutes until smooth and elastic. The dough should spring back when poked.
Dough consistency check: English muffin dough is softer and stickier than typical bread dough. If it’s soup-like and won’t come together at all, add flour 1 tablespoon at a time. If it’s stiff and dry, add water 1 teaspoon at a time.
Step 2: First Rise (Minutes 15-60)
Form the dough into a smooth ball. Lightly oil a clean bowl (or the same mixing bowl, wiped clean). Place dough in the bowl, turning once to coat with oil. Cover tightly with plastic wrap or a damp kitchen towel.
Place in a warm spot to rise for 45 minutes, or until doubled in size. Best rising locations: inside an oven with just the light on (creates 75-80°F environment), near a sunny window, or on top of the refrigerator where warm air rises.
Quick rising tip: If your kitchen is cold, preheat your oven to 200°F for 2 minutes, then turn it OFF. Place the covered bowl inside this slightly warmed (not hot) oven. The dough will rise beautifully.
Don’t skip or rush this rise. Proper fermentation develops flavor and creates the structure needed for those signature nooks and crannies.
Step 3: Shape and Cut Muffins (Minutes 60-70)
Once doubled, punch down the dough to release air. Turn out onto a lightly floured surface. Using a rolling pin or your hands, gently pat or roll the dough into a rectangle about 1/2-inch thick. Don’t roll too thin—thickness determines final muffin height.
Using a 3-inch round biscuit cutter (or a drinking glass), cut out circles. Press straight down without twisting—twisting seals the edges and prevents proper rising. You should get 10-12 muffins depending on how efficiently you cut.
Gather scraps, gently press together (don’t knead), and cut additional muffins. The first cutting produces the best-shaped muffins, but scraps still work fine.
Step 4: Second Rise (Minutes 70-85)
Sprinkle a baking sheet generously with cornmeal. Place cut muffins on the sheet, leaving 2 inches between each. Sprinkle the tops of muffins with more cornmeal—both sides need coating.
Cover loosely with plastic wrap or a kitchen towel. Let rise for 15 minutes. They won’t double in size during this short rise, but should look puffy and feel airy when gently poked. This rest allows the gluten to relax and ensures tender texture.
Time-saving note: While muffins complete their second rise, preheat your griddle or skillet (Step 5).
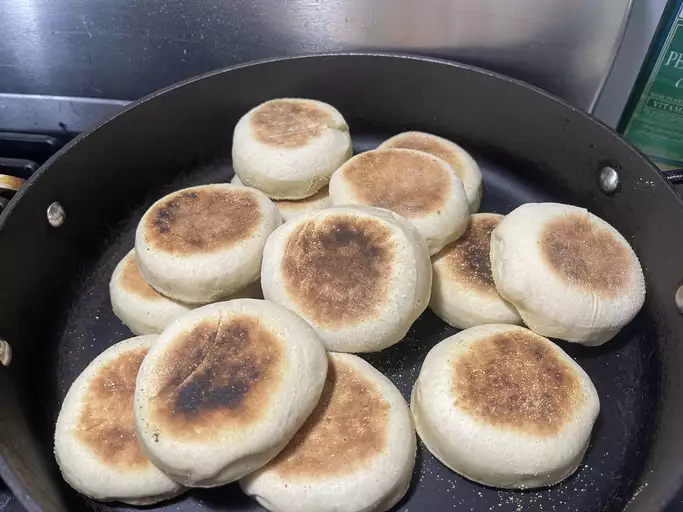
Step 5: Cook on Griddle (Minutes 85-115)
Heat an electric griddle to 325°F, or place a large cast-iron skillet or griddle over medium-low heat. The temperature is crucial—too hot burns the outside before the inside cooks; too cool creates pale, dense muffins.
Temperature test: Sprinkle a few drops of water on the griddle. They should sizzle and evaporate in 2-3 seconds. If they evaporate instantly, it’s too hot.
Lightly grease the cooking surface with butter or oil using a paper towel. Don’t use too much or muffins will fry rather than cook through.
Carefully transfer muffins to the griddle using a wide spatula, keeping the cornmeal coating intact. Cook without moving them for 7-8 minutes. The bottoms should be deep golden brown—lift one with a spatula to check. If browning too quickly, reduce heat.
Flip carefully and cook the second side for another 7-8 minutes. The muffins should feel firm when gently pressed and sound hollow when tapped on the side.
Internal temperature check: If you have an instant-read thermometer, the center should register 200-205°F when fully cooked.
Work in batches if necessary—don’t overcrowd the griddle. Each batch takes about 15 minutes total cooking time.
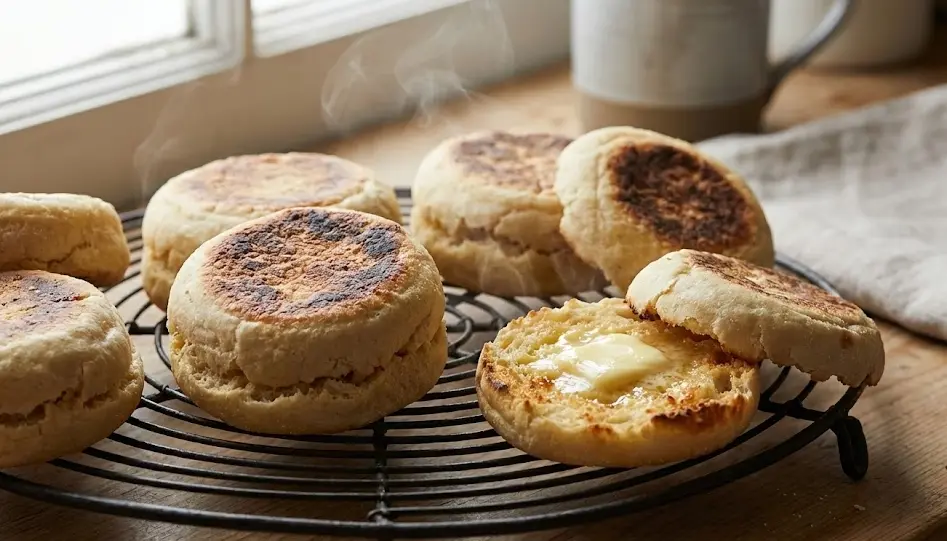
Step 6: Cool and Split (Minutes 115-120)
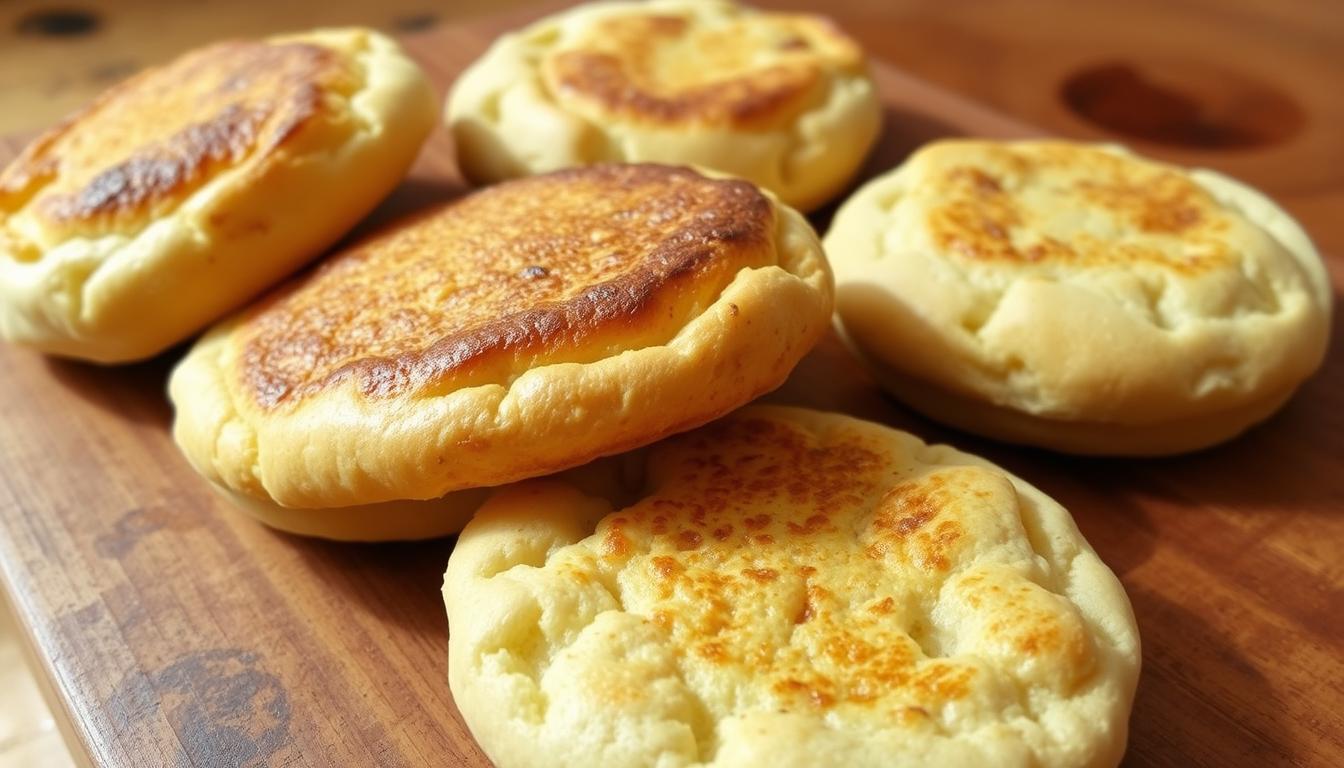
Transfer cooked English muffins to a wire rack. Let cool for at least 5-10 minutes before splitting. Hot muffins are too soft to split properly and will tear.
Proper splitting technique: Never cut English muffins with a knife—this compresses those precious nooks and crannies. Instead, use a fork to pierce around the circumference about 1/2 inch deep, then gently pull the halves apart. This preserves the textured interior that makes English muffins special.
Toast split muffins in a toaster or under the broiler. Spread with butter, jam, or use for breakfast sandwiches. The nooks and crannies catch and hold toppings perfectly.
Pro Tips for Perfect English Muffins
Master these professional techniques to elevate your English muffins from good to absolutely exceptional.
Avoiding Common English Muffin Problems
Dense, heavy muffins: This usually means insufficient rising or too much flour. Ensure your yeast is fresh (check expiration date), and give dough the full 45-minute first rise. Also verify you’re measuring flour correctly using the spoon-and-level method, not scooping.
No nooks and crannies: The signature holes come from proper hydration and cooking method. The dough should be slightly sticky—if it’s too dry, add more liquid next time. Also ensure you’re cooking on a griddle, not baking in the oven. The steam created between the hot griddle and the muffin creates those air pockets.
Burnt outside, raw inside: Your cooking temperature is too high. Reduce heat and cook longer. English muffins need gentle, even heat to cook through without burning. An electric griddle with temperature control makes this easier.
Gummy, undercooked centers: Muffins need the full 7-8 minutes per side. Don’t rush. If the outside browns before the inside cooks, reduce heat slightly and extend cooking time. The internal temperature should reach 200-205°F.
Muffins spread too thin: Your dough was rolled too thin before cutting, or it over-proofed during the second rise. Keep dough at 1/2-inch thickness when cutting, and limit second rise to 15 minutes.
Temperature Control Is Everything
Liquid temperature for yeast: 110-115°F is the sweet spot. Use an instant-read thermometer for accuracy. Too cold (below 100°F) and yeast activates slowly, extending your timeline. Too hot (above 120°F) and you’ll kill the yeast entirely—dough won’t rise.
Rising environment: Yeast thrives at 75-80°F. If your kitchen is cooler than 70°F, use the warm oven trick (preheat to 200°F for 2 minutes, turn off, place dough inside). In warm kitchens above 80°F, rising happens faster—check at 35 minutes.
Griddle cooking temperature: 325°F on an electric griddle, or medium-low on stovetop. This lower-and-slower approach ensures even cooking. Test by cooking one muffin first, then adjust heat if needed before cooking the rest.
Essential Tool Recommendations
An electric griddle provides even, consistent temperature across the entire surface, allowing you to cook 6+ muffins at once. This cuts cooking time significantly. If using a stovetop skillet, choose cast-iron for superior heat retention and even cooking.
An instant-read thermometer takes the guesswork out of both liquid temperature (for yeast activation) and doneness checking (internal temp should be 200-205°F).
A 3-inch biscuit cutter produces perfectly uniform English muffins. Look for one with a sharp edge and comfortable handle. In a pinch, a wide-mouthed drinking glass works.
Bench scraper helps transfer cut muffins from work surface to baking sheet without distorting their shape.
Storage and Make-Ahead Strategies
Room temperature storage: Cool completely, then store in an airtight container or zip-top bag at room temperature for 3-4 days. Don’t refrigerate—this dries them out faster.
Freezing baked muffins: The best storage method for longer keeping. Cool completely, split with a fork, then freeze in a single layer on a baking sheet for 1 hour. Transfer to freezer bags and freeze up to 3 months. Toast directly from frozen—no thawing needed.
Refrigerating dough: After the first rise, punch down dough, cover tightly, and refrigerate up to 24 hours. When ready to use, let come to room temperature (about 30 minutes), then proceed with shaping and second rise. Cold fermentation develops even better flavor.
Freezing shaped, uncooked muffins: After cutting and coating with cornmeal, freeze muffins on a baking sheet until solid, then transfer to freezer bags. Cook from frozen, adding 2-3 extra minutes per side.
Reheating: Always toast English muffins before serving, even fresh ones. Toasting creates crispy edges and enhances flavor. For untoasted muffins, reheat wrapped in foil at 350°F for 10 minutes.
Flavor Variations
Transform your basic English muffins into creative variations that suit any taste or occasion.
Sweet English Muffin Variations
Cinnamon Raisin English Muffins: Add 1/3 cup raisins and 2 teaspoons ground cinnamon to the dry ingredients. Increase sugar to 3 tablespoons. These taste like cinnamon raisin bread in muffin form—perfect with cream cheese.
Honey Whole Wheat English Muffins: Replace 2 cups all-purpose flour with whole wheat flour. Replace sugar with 3 tablespoons honey (reduce milk by 1 tablespoon to compensate for honey’s liquid). These have nutty, slightly sweet flavor and denser texture.
Blueberry English Muffins: Gently fold 3/4 cup fresh or frozen blueberries (don’t thaw) into dough after kneading. Add 1 teaspoon lemon zest for brightness. Handle gently to prevent crushing berries.
Cranberry Orange English Muffins: Add 1/2 cup dried cranberries and 1 tablespoon orange zest to dough. These are perfect for holiday brunches and pair beautifully with butter or orange marmalade.
Savory English Muffin Variations
Cheddar Jalapeño English Muffins: Fold 1 cup shredded sharp cheddar and 2 tablespoons diced pickled jalapeños into dough after kneading. These make incredible breakfast sandwich bases.
Everything Bagel English Muffins: After coating with cornmeal, sprinkle tops generously with everything bagel seasoning before the second rise. Press gently to adhere. These taste like everything bagels but with English muffin texture.
Garlic Herb English Muffins: Add 2 teaspoons garlic powder, 1 tablespoon dried Italian herbs, and 1/4 cup grated Parmesan to dry ingredients. Perfect for eggs Benedict or alongside pasta.
Sourdough-Style English Muffins: Replace 1/2 cup of milk with sourdough discard. This adds tangy complexity without requiring active sourdough maintenance. Increase salt slightly (to 2 teaspoons) to balance the tang.
Dietary-Friendly Adaptations
Whole Grain English Muffins: Use 2 cups all-purpose flour, 1 cup whole wheat flour, and 1 cup of mixed grains (oat flour, rye flour, or wheat bran). Increase liquid by 3-4 tablespoons. These are heartier with more complex flavor.
Dairy-Free English Muffins: Replace milk with unsweetened oat milk or almond milk. Use dairy-free butter or coconut oil. The texture is nearly identical to dairy versions.
Egg-Free English Muffins: Omit the egg and add 2 extra tablespoons of milk. Muffins will be slightly less rich but still delicious. This makes them vegan when combined with dairy-free adaptations.
Low-Sugar English Muffins: Reduce sugar to 1 tablespoon. Sugar feeds yeast and aids browning, so you can’t eliminate it entirely, but this reduced amount creates less-sweet muffins perfect for savory applications.
Gluten-Free: This requires a completely different recipe using gluten-free flour blends and xanthan gum. Standard substitution doesn’t work due to gluten’s structural role.
Serving Suggestions
Make your homemade English muffins shine with these serving ideas and pairings.
Classic English Muffin Preparations
Traditional butter and jam: Split, toast until golden and crispy, then slather with real butter while hot so it melts into the nooks and crannies. Top with your favorite jam, marmalade, or honey.
Eggs Benedict: The iconic brunch dish. Top toasted English muffin halves with Canadian bacon, poached eggs, and hollandaise sauce. The muffin’s texture holds up perfectly under the sauce and runny yolk.
Breakfast sandwiches: Layer with fried or scrambled eggs, cheese, and breakfast meat (bacon, sausage, or ham). The nooks and crannies catch egg and melted cheese beautifully.
Avocado toast: Mash ripe avocado with lemon juice, salt, and red pepper flakes. Spread on toasted English muffins and top with everything bagel seasoning, fried egg, or cherry tomatoes.
Creative Serving Ideas
English muffin pizzas: Split muffins, top with pizza sauce, mozzarella, and your favorite toppings. Broil for 3-4 minutes until cheese melts and bubbles. Kids love these mini pizzas.
Tuna melts: Mix tuna salad (tuna, mayo, diced celery, salt, pepper), spread on English muffin halves, top with cheese, and broil until melted.
French toast English muffins: Dip split muffins in egg-milk mixture seasoned with cinnamon and vanilla. Cook on a buttered griddle until golden. The nooks and crannies soak up custard beautifully.
BLT sandwiches: Toast muffins, then layer with bacon, lettuce, tomato, and mayo. The sturdy texture holds up to juicy tomatoes without getting soggy.
Butter boards: Serve a variety of flavored butters (honey butter, cinnamon butter, herb butter, garlic butter) alongside a basket of toasted English muffins for brunch gatherings.
Perfect Pairings
Coffee and tea: English muffins pair perfectly with morning beverages. The slightly tangy flavor complements coffee’s bitterness and tea’s delicate notes.
Fresh fruit: Serve alongside fresh berries, melon, or citrus segments for a balanced breakfast.
Yogurt parfaits: English muffins with yogurt and granola create a complete, satisfying breakfast.
Soup: Savory English muffins (like garlic herb or cheddar jalapeño) make excellent soup accompaniments. Toast and butter them, then dip in tomato soup, chili, or bisque.
Presentation for Entertaining
Brunch buffet: Arrange toasted English muffin halves in a basket lined with a cloth napkin. Serve with small bowls of various spreads (butter, cream cheese, jam, Nutella, peanut butter) so guests can customize.
Individual breakfast platters: Place two toasted muffin halves on each plate with eggs, breakfast meat, and fruit for a restaurant-style presentation.
Afternoon tea: Cut English muffins into quarters after toasting. Arrange on a tiered stand with tea sandwiches and scones for an elegant afternoon tea service.
FAQs
Can I make English muffins without a stand mixer?
Absolutely! English muffins are very manageable to mix and knead by hand. Combine ingredients in a large bowl with a sturdy wooden spoon until a shaggy dough forms. Turn out onto a lightly floured surface and knead for 8-10 minutes until smooth and elastic. Your arms will get a workout, but the results are identical to machine-mixed dough. The slightly sticky dough consistency actually makes hand kneading easier than stiffer bread doughs.
Why do my English muffins not have nooks and crannies?
The signature holes come from three factors: proper dough hydration (should be slightly sticky), cooking method (griddle-cooked, not baked), and splitting technique (torn with a fork, not cut with a knife). If your muffins are dense throughout, the dough may have been too dry—add more liquid next time. Also ensure you’re cooking on a griddle or skillet, as the steam created during cooking forms those air pockets. Always split with a fork to reveal the texture.
Can I bake English muffins in the oven instead of on a griddle?
While you can bake them at 375°F for 15-18 minutes, you’ll sacrifice authentic texture. Oven-baked English muffins taste more like rolls—still delicious, but missing those characteristic nooks and crannies that form only through griddle cooking. The hot griddle surface creates steam within the dough, producing the signature texture. If you must use an oven, at least cook them on a preheated pizza stone to mimic griddle heat.
How do I know when English muffins are fully cooked?
Visual and tactile cues tell you they’re done: both sides should be deep golden brown (not pale), they should feel firm when gently pressed (not squishy), and they should sound hollow when tapped on the side. If you have an instant-read thermometer, insert it into the side—internal temperature should read 200-205°F. Each side needs 7-8 minutes of cooking time at proper temperature. Don’t rush.
Can I freeze English muffin dough?
Yes! After the first rise, punch down dough, wrap tightly in plastic wrap, then place in a freezer bag. Freeze up to 2 months. Thaw overnight in the refrigerator, then let come to room temperature (30 minutes). Proceed with shaping, second rise, and cooking. Alternatively, freeze already-shaped muffins (after cutting and cornmeal coating) on a baking sheet, then transfer to freezer bags. Cook from frozen, adding 2-3 extra minutes per side.
Are homemade English muffins safe during pregnancy?
Yes, this recipe is completely safe for pregnant women. All ingredients are fully cooked during the griddle-cooking process, reaching internal temperatures of 200-205°F which eliminates any food safety concerns. There are no raw eggs (the egg is mixed into dough and thoroughly cooked), unpasteurized dairy, or high-risk ingredients. English muffins are a wholesome, safe breakfast option throughout pregnancy.
Why are my English muffins gummy inside?
Gummy centers indicate undercooking. English muffins need the full 7-8 minutes per side over medium-low heat. If you’re cooking at too high temperature, the outside browns before the inside cooks through. Reduce heat and extend cooking time. Test doneness with an instant-read thermometer—centers should reach 200-205°F. Also ensure your dough isn’t too wet; while English muffin dough is sticky, it shouldn’t be batter-like.
Can I make mini English muffins?
Definitely! Use a 2-inch biscuit cutter instead of 3-inch. You’ll get about 20-24 mini muffins from this recipe. Reduce cooking time to 5-6 minutes per side since they’re smaller. Mini English muffins are perfect for sliders, kids’ portions, or appetizers. They’re adorable for brunch gatherings and easier for small hands to manage.
Conclusion
You’ve just discovered that authentic, bakery-quality English muffins are completely achievable at home—and in under 2 hours from start to finish. No more settling for store-bought muffins with disappointing texture and bland flavor. No more paying premium prices for artisan versions. With simple ingredients, basic equipment, and this streamlined method, you can create a dozen perfect English muffins whenever the craving strikes.
These homemade English muffins deliver everything you love: those signature nooks and crannies that catch melting butter, crispy exteriors that toast to golden perfection, soft interiors with authentic tang, and endless versatility from sweet breakfast treats to savory sandwich bases. Once you taste the difference, you’ll never go back to store-bought.
Ready to transform your breakfast routine? Clear your schedule for 2 hours, gather your ingredients, and experience the satisfaction of pulling golden, fragrant English muffins off the griddle. Your kitchen will smell incredible, your family will be impressed, and you’ll have breakfast solved for the entire week.
Join over 9,000 home bakers who’ve already mastered this recipe and made it their weekend baking ritual! Share your beautiful English muffins with us on social media—we love seeing those perfect nooks and crannies and hearing about your favorite toppings.
Craving more homemade bread recipes? Don’t miss our [No-Knead Artisan Bread in 3 Hours] for another impressive bread with minimal effort. Looking for more breakfast ideas? Check out our [Ultimate Guide to Homemade Bagels] for another morning favorite. And if you loved the griddle-cooking technique, explore our [Perfect Pancakes Every Time] for mastering temperature control on the griddle.
Happy baking, and may your mornings always feature freshly toasted English muffins with butter melting into every nook and cranny!