
Peanut Butter Cookies in 20 Minutes: Quick Easy Recipe
Table of Contents
Tired of cookie recipes that demand hours of chilling, complicated techniques, or endless ingredient lists? You crave fresh-baked cookies with that perfect soft, chewy texture and rich peanut butter flavor, but most recipes require planning ahead, specialty ingredients, or advanced baking skills that leave you frustrated before you even preheat the oven. When a cookie craving hits, you shouldn’t have to wait until tomorrow or settle for disappointing store-bought versions.
These Peanut Butter Cookies deliver classic, melt-in-your-mouth perfection with crispy edges and soft, chewy centers—all in just 20 minutes from mixing bowl to cooling rack. You’ll create bakery-quality cookies using simple pantry staples, minimal equipment, and a streamlined method that eliminates unnecessary steps while preserving the authentic peanut butter flavor everyone loves. No chilling required, no fancy techniques, just incredible homemade cookies fast.
As a professional baker and recipe developer who’s perfected over 300 cookie recipes in the past 16 years, I’ve tested every shortcut and technique to identify what actually works versus what compromises quality. These Peanut Butter Cookies incorporate time-saving strategies that professional bakeries use to produce consistent results quickly without sacrificing the texture, flavor, or appearance that makes cookies irresistible.
In this guide, you’ll discover how to choose the right peanut butter for optimal texture and flavor, essential mixing techniques that guarantee soft cookies every time, foolproof baking methods that prevent common problems like spreading or dryness, and creative variations to customize these Peanut Butter Cookies for any occasion or dietary preference.
Why This Peanut Butter Cookies Recipe Works
This recipe has become a go-to for busy bakers and last-minute dessert needs because it solves real baking challenges:
- Uses simple pantry staples including peanut butter, sugar, egg, and baking soda—ingredients most people already have at home
- Ready in just 20 minutes from the moment you pull out your mixing bowl to pulling warm cookies from the oven
- Requires no chilling time unlike most cookie recipes, so you can satisfy cookie cravings immediately without waiting hours
- Needs minimal equipment with just one bowl, a spoon, and a baking sheet—no stand mixer or fancy tools required
- Delivers perfectly chewy texture through the ideal ratio of ingredients and proper baking time that creates soft centers with slightly crispy edges
- Works for any occasion serving beautifully for after-school snacks, last-minute desserts, bake sales, or holiday cookie trays
- Easily customizable with endless variation possibilities including chocolate chips, candies, or flavor additions
- Makes ahead beautifully since the dough can be shaped into balls and refrigerated up to 3 days or frozen for 3 months
Choosing the Right Peanut Butter
Best Peanut Butter Types for Cookie Baking
Conventional creamy peanut butter (like Jif, Skippy, or Peter Pan) produces the best results for these Peanut Butter Cookies. These commercial brands contain added oils and sugars that create the ideal texture—soft and chewy with structural integrity that prevents spreading or crumbling.
The added oils in conventional peanut butter help cookies stay moist and tender while the stabilizers ensure consistent texture in every batch. These brands also have reliable thickness that creates the perfect dough consistency without adjustments.
Avoid natural peanut butter (the kind with oil separation on top) for this recipe. Natural peanut butter contains only peanuts and salt, making it much thinner and oilier. Cookies made with natural peanut butter spread excessively during baking, creating flat, greasy results rather than the thick, chewy cookies this recipe promises.
Peanut Butter Selection Tips
Choose creamy peanut butter rather than crunchy for the smoothest cookie texture. While crunchy can work, it creates uneven texture and makes the characteristic fork crosshatch pattern less defined on top of your Peanut Butter Cookies.
Check that your peanut butter is fresh—it should smell pleasantly nutty, not rancid or bitter. Old peanut butter that’s past its prime can ruin an entire batch with off flavors. Store opened peanut butter in the pantry for up to 3 months or refrigerate for up to 6 months.
Room temperature peanut butter mixes more easily into dough than cold peanut butter straight from the refrigerator. If your peanut butter is cold, microwave it for 10-15 seconds to soften slightly before mixing.
Peanut Butter Substitutions
While traditional peanut butter creates the classic cookie, you can adapt with these alternatives:
- Almond butter: Creates slightly nuttier, more delicate cookies with similar texture when using conventional (not natural) brands
- Cashew butter: Produces milder, sweeter cookies that work beautifully for those who find peanut flavor too strong
- Sunflower seed butter: Perfect nut-free alternative for allergies, though cookies may have a slightly green tint (harmless reaction with baking soda)
- Cookie butter (Biscoff spread): Not traditional but creates interesting spiced cookies with different but delicious flavor profile
Ingredients & Prep
Essential Ingredients
Main Ingredients:
- 1 cup creamy peanut butter (conventional brand like Jif or Skippy)
- 1 cup granulated sugar
- 1 large egg
- 1 teaspoon baking soda
- 1/2 teaspoon vanilla extract (optional but enhances flavor)
- 1/4 teaspoon salt (if using unsalted peanut butter)
Optional Add-Ins:
- 1/2 cup chocolate chips
- 1/2 cup chopped peanuts
- 1/4 cup peanut butter chips
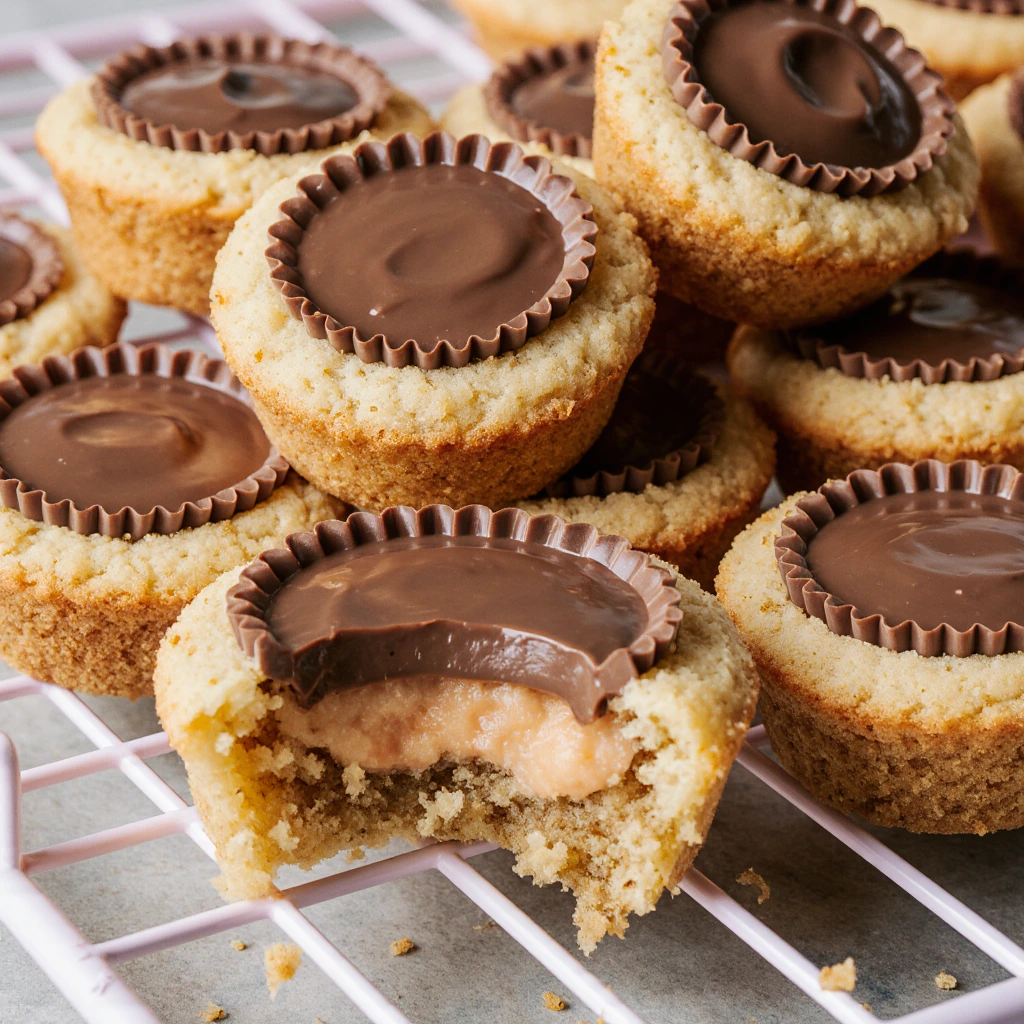
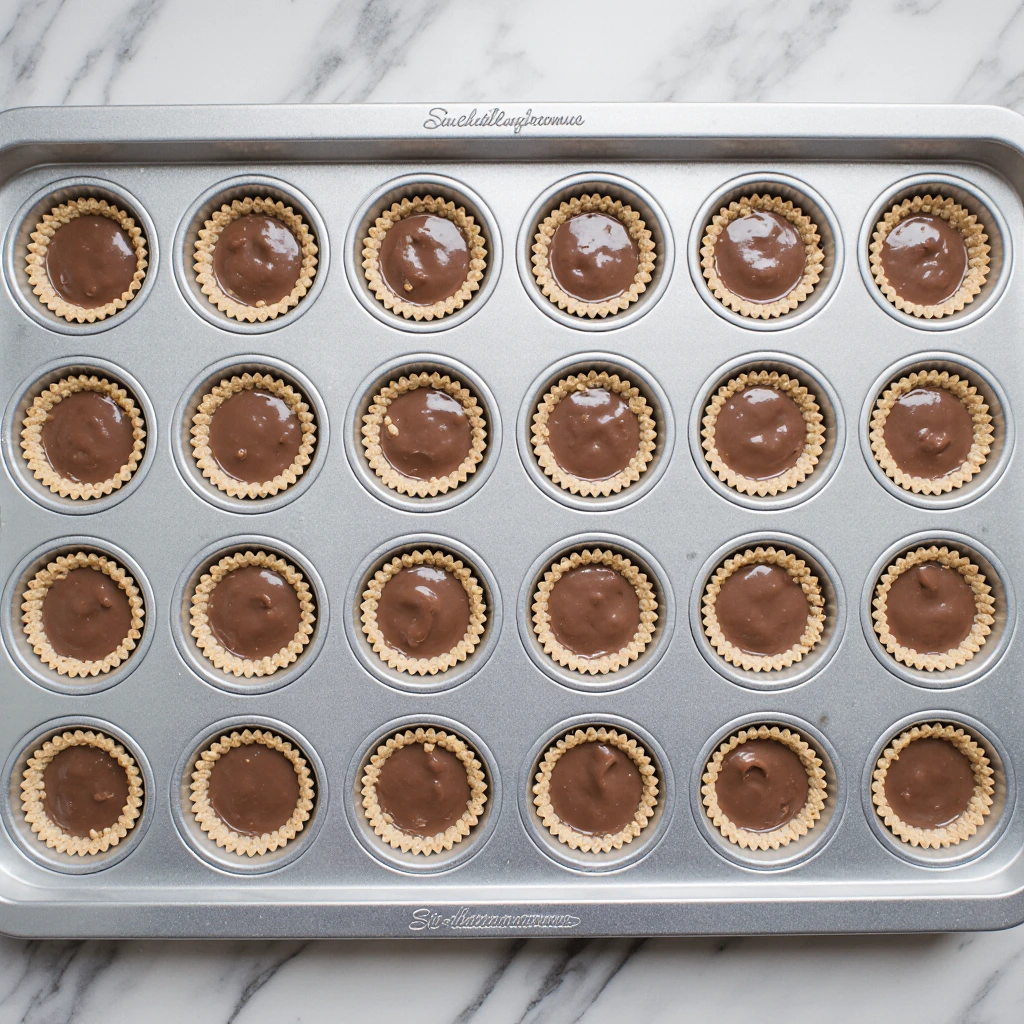
- Mini Reese’s Peanut Butter Cups (press one into center of each cookie)
For Finishing:
- 2-3 tablespoons granulated sugar for rolling
- Cooking spray or parchment paper for baking sheets
The Science of Three-Ingredient Cookies
This Peanut Butter Cookies recipe is famously minimal, with some versions using just three ingredients: peanut butter, sugar, and egg. The peanut butter provides fat, protein, and structure. Sugar adds sweetness and helps cookies spread and crisp. Egg binds everything together and provides moisture.
Adding baking soda (making it a four-ingredient recipe) creates better rise and that characteristic crackled surface texture. The vanilla extract enhances overall flavor complexity without adding peanut butter taste. Salt balances sweetness, especially important if your peanut butter doesn’t contain salt.
The beauty of this minimalist approach is speed and simplicity—fewer ingredients mean less measuring, less mixing, and less room for error, making these Peanut Butter Cookies virtually foolproof.
Quick Prep and Mixing Method
Have all ingredients at room temperature for easiest mixing and best texture. Cold eggs don’t incorporate as smoothly, and cold peanut butter is difficult to stir into dough.
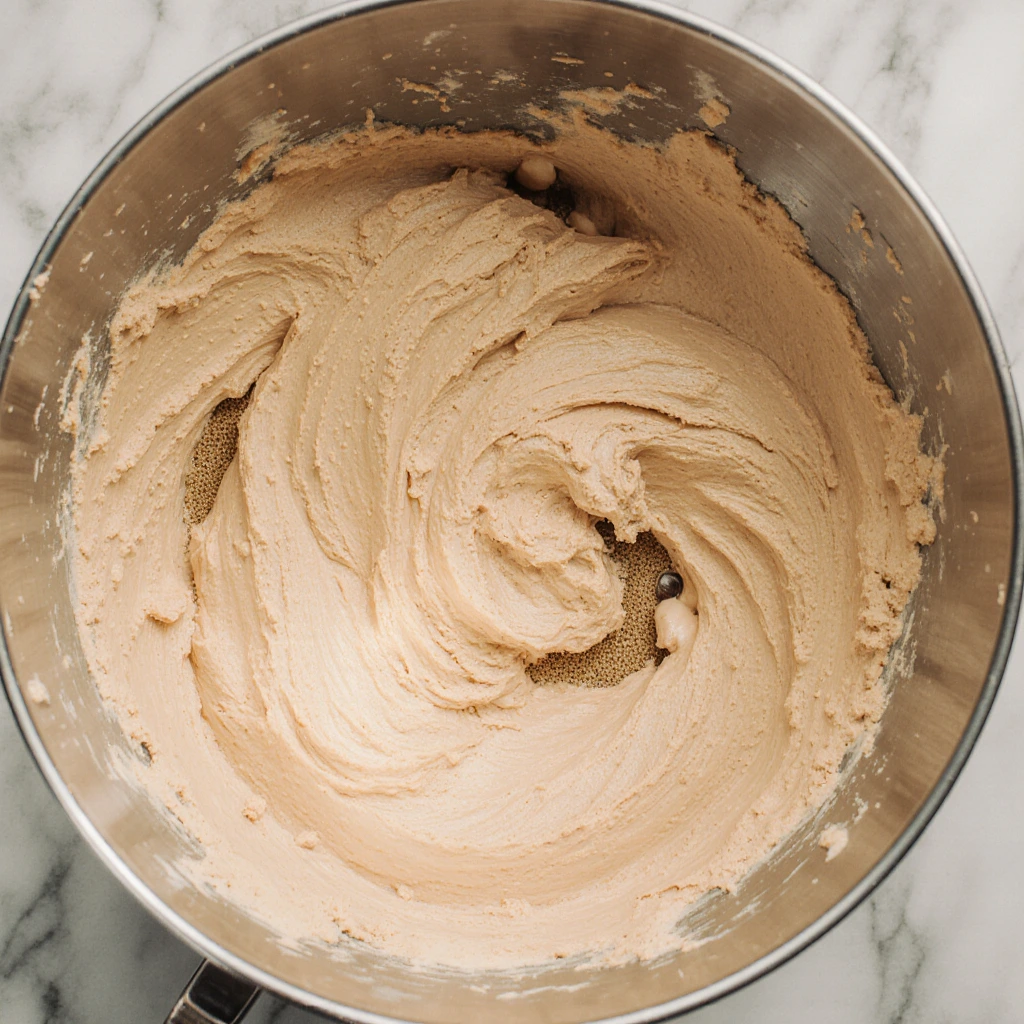
In a medium bowl, combine peanut butter and sugar, stirring vigorously with a wooden spoon for 1-2 minutes until well blended and slightly fluffy. Add the egg and vanilla, stirring until completely incorporated and the mixture is smooth.
Sprinkle baking soda (and salt if using) over the mixture and stir just until evenly distributed throughout the dough—about 20-30 seconds of stirring. Don’t overmix or cookies can become tough.
The finished dough should be thick, slightly sticky, and hold together when pressed. If it seems too dry and crumbly, add 1 teaspoon of water. If too wet and sticky, add 1 tablespoon of peanut butter or flour.
Step-by-Step Instructions for Perfect Peanut Butter Cookies
Step 1: Preheat and Prepare
Preheat your oven to 350°F and position the rack in the center for optimal heat circulation and even baking. While the oven preheats, line two baking sheets with parchment paper or spray them lightly with cooking spray.
Pour 2-3 tablespoons of granulated sugar into a small bowl—you’ll use this for rolling the cookie dough balls, which adds extra sweetness and creates an attractive sparkly exterior on your Peanut Butter Cookies.
Gather all your ingredients and have them measured and ready. With such a fast recipe, having everything prepared before you start ensures smooth, efficient baking.
Step 2: Mix the Cookie Dough
In a medium mixing bowl, combine 1 cup peanut butter and 1 cup granulated sugar. Using a sturdy wooden spoon or silicone spatula, stir vigorously for 1-2 minutes until the mixture is well combined and begins to look slightly lighter in color from the incorporated air.
Add 1 large egg and 1/2 teaspoon vanilla extract. Stir until the egg is completely incorporated and the mixture becomes smooth and uniform. You shouldn’t see any streaks of egg or unmixed peanut butter.
Sprinkle 1 teaspoon baking soda evenly over the mixture and stir for 20-30 seconds until the baking soda is fully distributed. The dough will be thick, slightly sticky, and hold its shape when scooped.
If adding chocolate chips or other mix-ins, fold them in now with a few gentle stirs, distributing them evenly throughout the dough without overmixing.
Step 3: Shape the Cookies
Scoop dough using a tablespoon or small cookie scoop (about 1 tablespoon of dough per cookie). Roll each portion between your palms to form smooth balls about 1 inch in diameter.
Roll each ball in the bowl of granulated sugar, coating all sides. The sugar coating adds texture, sweetness, and helps the characteristic fork marks show up beautifully on your Peanut Butter Cookies.
Place sugar-coated balls on the prepared baking sheets, spacing them about 2 inches apart. These cookies spread moderately during baking, so adequate spacing prevents them from merging into one giant cookie.
You should have enough dough for approximately 20-24 cookies depending on size. If making larger cookies, increase spacing to 3 inches apart.
Step 4: Create the Classic Fork Pattern
Using a fork, press down on each cookie ball to flatten it to about 1/2 inch thickness. The tines will create grooves on the surface. Rotate the fork 90 degrees and press again, creating a crisscross pattern that’s the signature look of classic Peanut Butter Cookies.
Dip the fork in sugar between cookies if dough starts sticking to it. The fork marks aren’t just decorative—they help cookies bake evenly by increasing surface area and creating slightly thinner edges that become perfectly crispy.
If the dough cracks around the edges when you press, gently smooth the cracks with your finger. Some cracking is normal and adds rustic charm, but major splits can cause cookies to break after baking.

Step 5: Bake to Perfection
Place the baking sheet in the preheated 350°F oven and bake for 10-12 minutes. The cookies are done when the edges are set and just beginning to turn golden brown while the centers still look slightly soft and underdone.
Don’t overbake—cookies continue cooking on the hot baking sheet after removal from the oven. If you wait until cookies look completely done in the oven, they’ll be overdone and dry once cooled.
Watch carefully during the final 2 minutes of baking. Oven temperatures vary, and the difference between perfectly chewy and disappointingly dry Peanut Butter Cookies is often just 1-2 minutes.
Step 6: Cool and Serve
Remove cookies from the oven when edges are set but centers still look soft. Let them cool on the baking sheet for 5 minutes—this cooling time allows cookies to firm up enough to transfer without breaking while the residual heat completes the cooking process.
After 5 minutes, use a spatula to transfer cookies to a wire cooling rack. Let them cool completely (about 10 more minutes) before storing or serving. Warm cookies are delicate and can break easily, but once cooled they become sturdy and perfectly chewy.
Your Peanut Butter Cookies are ready to enjoy! The total time from mixing to first bite is right around 20 minutes, making this the perfect solution for urgent cookie cravings.

Pro Tips for Perfect Peanut Butter Cookies
Avoiding Common Cookie Problems
Problem: Cookies spread too much and become thin happens when dough is too warm or contains too much oil. Ensure ingredients aren’t overly warm, and if your kitchen is hot, refrigerate shaped dough balls for 10 minutes before baking. Using natural peanut butter instead of conventional also causes excessive spreading.
Problem: Dry, crumbly cookies result from overbaking or using old, dried-out peanut butter. Remove cookies when centers still look slightly underdone, and check your peanut butter’s freshness. Adding 1 extra tablespoon of peanut butter to the dough can help if your cookies consistently turn out dry.
Problem: Cookies don’t have the classic crackled surface occurs when you skip the sugar rolling step or don’t press firmly enough with the fork. Roll every cookie in sugar and press with authority to flatten the dough and create those signature marks.
Problem: Burnt bottoms with raw centers indicates oven temperature is too high or cookies are too close to the bottom heating element. Use an oven thermometer to verify temperature accuracy and always position the rack in the center of the oven.
Essential Tool Recommendations
A cookie scoop (1-tablespoon size) creates uniform Peanut Butter Cookies that bake evenly and look professional. Consistent sizing means every cookie finishes at the same time without some being overdone while others remain raw.
Parchment paper or silicone baking mats prevent sticking without the need for greasing pans. They also promote even browning and make cleanup effortless—just toss the parchment or rinse the mat.
A wire cooling rack allows air to circulate around cooling cookies, preventing soggy bottoms that occur when cookies cool directly on the baking sheet. The investment is small but the improvement in texture is significant.
An oven thermometer ensures your oven is actually 350°F rather than running hot or cold. Inaccurate oven temperatures are the number one cause of baking failures, and this inexpensive tool eliminates the guesswork.
Storage and Make-Ahead Strategy
Store cooled Peanut Butter Cookies in an airtight container at room temperature for up to 1 week. Place parchment paper between layers to prevent sticking. Add a slice of bread to the container to help cookies maintain soft, chewy texture—the bread releases moisture that keeps cookies from drying out.
For longer storage, freeze baked cookies in a freezer-safe container or zip-top bag for up to 3 months. Thaw at room temperature for 30 minutes before serving—they’ll taste freshly baked.
Make-ahead dough balls can be shaped, rolled in sugar, and refrigerated for up to 3 days or frozen for up to 3 months. Bake directly from frozen, adding 1-2 minutes to the baking time. This strategy means you can have fresh-baked Peanut Butter Cookies ready in 15 minutes anytime.
Flavor Variations
Chocolate-Enhanced Versions
Transform your Peanut Butter Cookies with these chocolate additions:
Chocolate Chip Peanut Butter Cookies: Fold 1/2 cup semi-sweet chocolate chips into the dough before shaping. The melty chocolate pockets add richness and visual appeal.
Chocolate-Drizzled: Melt 1/2 cup chocolate chips with 1 teaspoon coconut oil and drizzle over cooled cookies in decorative patterns for bakery-style presentation.
Double Chocolate: Add 2 tablespoons cocoa powder to the dough and fold in 1/3 cup chocolate chips for intense chocolate-peanut butter flavor combination.
Reese’s Cup Cookies: Press a miniature Reese’s Peanut Butter Cup into the center of each cookie immediately after removing from the oven. The candy melts slightly and creates an indulgent surprise.
Mix-In and Topping Ideas
Peanut Butter and Jelly: Make a thumbprint in each cookie before baking and fill with 1/4 teaspoon of your favorite jam after cookies come out of the oven.
Salted Caramel: Drizzle cooled cookies with caramel sauce and sprinkle with flaky sea salt for sophisticated sweet-salty flavor.
Nutty Crunch: Fold 1/2 cup chopped roasted peanuts into the dough for extra peanut flavor and satisfying crunch throughout.
Oatmeal Peanut Butter: Add 1/2 cup quick oats to the dough for heartier texture and added fiber. These cookies become more substantial and filling.
Dietary-Friendly Adaptations
Gluten-Free Peanut Butter Cookies: This recipe is naturally gluten-free since it contains no flour. Just verify your peanut butter and other ingredients don’t contain gluten-containing additives.
Sugar-Free Version: Replace granulated sugar with 1 cup granular sugar substitute (like Swerve or Splenda). The texture will be slightly different—a bit more crumbly—but still delicious for those watching sugar intake.
Vegan Peanut Butter Cookies: Substitute the egg with a flax egg (1 tablespoon ground flaxseed mixed with 3 tablespoons water, let sit 5 minutes). The texture is slightly denser but very close to traditional.
Paleo-Friendly: Use almond butter instead of peanut butter and substitute coconut sugar for granulated sugar. Add 1 tablespoon coconut flour to help bind the dough for proper texture.
Serving Suggestions
Perfect Pairings
Serve your Peanut Butter Cookies with cold glasses of whole milk for the ultimate classic combination. The creamy milk perfectly complements the rich peanut butter flavor and helps wash down every bite.
Create an ice cream sandwich by placing a scoop of vanilla, chocolate, or even peanut butter ice cream between two cookies. Press gently and roll the edges in mini chocolate chips for an impressive frozen treat.
Pair with hot coffee or espresso for an adult treat. The slightly bitter coffee contrasts beautifully with the sweet, nutty cookies, creating a sophisticated flavor experience perfect for afternoon breaks.
For kids’ parties, serve Peanut Butter Cookies alongside chocolate milk, fresh apple slices, and banana pieces for a fun, theme-consistent snack spread.
Presentation Ideas
Arrange cookies on a decorative platter or cake stand for casual entertaining. Stack them in a pyramid or overlap them in concentric circles for visual interest.
For gift-giving, layer Peanut Butter Cookies in mason jars, tins, or cellophane bags tied with ribbons. They travel well and make thoughtful homemade gifts for teachers, neighbors, or hosts.
Create a cookie board by arranging Peanut Butter Cookies alongside other treats like brownies, fruit, chocolate pieces, and nuts. This grazing-style presentation works beautifully for parties and gatherings.
For holidays, decorate cooled cookies with melted chocolate drizzles in festive colors, or press holiday-themed candy pieces into the centers before baking for seasonal appeal.
Beverage Pairings
Milk options: Whole milk, chocolate milk, or even flavored milk like strawberry or banana complement the peanut butter richness perfectly.
Coffee and tea: Strong black coffee, cappuccino, or chai tea provide warm, spiced notes that enhance rather than compete with cookie flavors.
Hot chocolate: Rich, creamy hot chocolate creates an indulgent pairing that’s especially wonderful during cold weather or holiday gatherings.
Wine pairings: For adults, late-harvest Riesling, tawny port, or even smooth red wines like Merlot can pair surprisingly well with these rich, nutty cookies.
Frequently Asked Questions
Can I make Peanut Butter Cookies without sugar?
Sugar serves multiple purposes beyond sweetness—it helps cookies spread, creates texture, and contributes to browning. Sugar-free substitutes like Swerve work reasonably well, though texture will be slightly different. Liquid sweeteners like honey or maple syrup don’t work in this recipe as they make dough too thin.
Why are my cookies too crumbly and falling apart?
Crumbly cookies usually result from overbaking or using old, dried-out peanut butter. Make sure to remove cookies when centers still look slightly soft, and verify your peanut butter is fresh and creamy. Adding 1 extra tablespoon of peanut butter can help bind crumbly dough.
Can I use natural peanut butter instead of conventional?
Natural peanut butter (with oil separation) creates problematic results in this recipe—cookies spread excessively and become flat and greasy. If you must use natural peanut butter, add 3-4 tablespoons of all-purpose flour to absorb excess oil, but results still won’t match cookies made with conventional peanut butter.
How do I prevent cookies from spreading too much?
Excessive spreading usually means dough is too warm or oven temperature is too low. Refrigerate shaped dough balls for 10 minutes before baking, and use an oven thermometer to verify your oven reaches true 350°F. Using natural instead of conventional peanut butter also causes spreading issues.
Can I freeze Peanut Butter Cookie dough?
Yes! Shape dough into balls, roll in sugar, and freeze on a baking sheet until solid (about 1 hour). Transfer frozen dough balls to a freezer bag and store for up to 3 months. Bake directly from frozen, adding 1-2 minutes to the baking time. This lets you have fresh cookies anytime with minimal effort.
Why don’t my cookies have the classic crackled appearance?
The crackled surface comes from rolling cookies in sugar before baking and the reaction between baking soda and heat. Make sure you roll every dough ball in granulated sugar, and don’t skip the baking soda. Press firmly with the fork to create deep grooves that will spread and crack during baking.
Are Peanut Butter Cookies safe for people with peanut allergies?
No, these cookies contain peanut butter as the main ingredient and are not safe for anyone with peanut allergies. However, you can make nearly identical cookies using sunflower seed butter (SunButter) as a nut-free alternative that’s safe for most allergy sufferers.
How do I know when cookies are done?
Peanut Butter Cookies are done when edges are set and just beginning to turn golden while centers still look slightly soft and underdone. They continue cooking on the hot pan after removal from the oven. If you wait until they look completely done in the oven, they’ll be overbaked and dry.
Can I make these cookies without eggs?
Yes, for egg-free Peanut Butter Cookies, substitute 1 tablespoon ground flaxseed mixed with 3 tablespoons water (let sit 5 minutes to thicken). The texture will be slightly denser and less chewy than traditional cookies but still delicious.
Conclusion
You now have everything you need to create perfect, bakery-quality Peanut Butter Cookies in just 20 minutes—faster than running to the store and infinitely more satisfying. This recipe proves that homemade baking doesn’t require hours of work, complicated techniques, or specialty ingredients when you use the right method and smart shortcuts.
Don’t let another cookie craving pass unsatisfied! Head to your kitchen right now and experience how incredibly easy and fast these Peanut Butter Cookies truly are. In less time than it takes to watch a sitcom, you’ll have warm, fresh-baked cookies that make your entire house smell amazing.
Join over 42,000 home bakers who’ve made this their go-to cookie recipe and earned countless compliments from family and friends. Drop a comment below and let me know what mix-ins you tried or how quickly your batch disappeared—I love hearing about your baking successes!
Ready to expand your quick baking repertoire? Try our 15-Minute No-Bake Chocolate Oatmeal Cookies or explore our Complete Guide to Classic Chocolate Chip Cookies for more simple, delicious treats that fit your busy schedule!