
Apple Cookie Tart: How to Make It in 6 Simple Steps
Table of Contents
Tired of complicated dessert recipes that demand hours of work and advanced pastry skills? You see gorgeous apple tarts in bakery windows and assume they require professional training, specialized equipment, and infinite patience. Most traditional tart recipes involve making pastry dough from scratch, blind-baking shells, and mastering finicky techniques that leave beginners frustrated and discouraged.
This Apple Cookie Tart delivers bakery-quality elegance with tender, caramelized apples nestled in a buttery cookie crust—all in just 6 simple steps that anyone can master. You’ll create a stunning dessert that looks professionally crafted, tastes absolutely divine, and requires no pastry expertise whatsoever. The secret? A genius cookie-based crust that’s easier than traditional pastry but tastes just as incredible.
As a pastry instructor who’s taught baking classes for over 12 years, I’ve helped thousands of nervous beginners create beautiful desserts. I’ve learned exactly which shortcuts work brilliantly and which details truly matter for spectacular results. This Apple Cookie Tart recipe distills all that professional knowledge into a streamlined, foolproof method that delivers consistent success every single time.
In this guide, you’ll discover how to choose the best apples for perfect texture and flavor, essential techniques for creating a cookie crust that stays crisp and never crumbles, foolproof assembly methods that guarantee beautiful presentation, and creative variations to customize your Apple Cookie Tart for any season or occasion.
Why This Apple Cookie Tart Recipe Works
This recipe has become a beloved favorite among home bakers because it solves real dessert-making challenges:
- Uses a simple cookie crust instead of traditional pastry dough, eliminating the most difficult and time-consuming part of tart-making
- Ready in just 6 straightforward steps with clear instructions that beginners can follow confidently without confusion
- Requires only 8 basic ingredients that you likely already have in your pantry—no specialty items or expensive purchases needed
- Creates stunning presentation with minimal effort, producing a dessert that looks like it came from an upscale bakery
- Delivers incredible flavor through proper apple preparation and spice combinations that enhance natural sweetness
- Perfect for any skill level working beautifully whether you’re a complete beginner or experienced baker looking for quick elegance
- Versatile for all occasions serving equally well for weeknight family dinners, holiday gatherings, or impressive dinner party finales
- Makes ahead beautifully since you can prepare components in advance and assemble shortly before baking for fresh-from-the-oven appeal
Choosing the Right Apples
Best Apple Varieties for Tart Baking
The apple variety you choose dramatically affects your Apple Cookie Tart‘s final texture and flavor. Firm, tart-sweet apples that hold their shape during baking work best, while soft or mealy varieties turn to mush and create watery, unappealing results.
Granny Smith apples are the classic choice for baking. Their firm texture withstands heat beautifully, maintaining distinct slices rather than dissolving into applesauce. Their tartness balances the sweet cookie crust perfectly, creating complex flavor rather than one-dimensional sweetness.
Honeycrisp apples offer excellent firmness with sweeter flavor than Granny Smith. They hold their shape well and provide a nice balance of sweet and tart that many people prefer. Their crisp texture creates satisfying bite in the finished tart.
For the most complex flavor profile, use a combination of two varieties—try half Granny Smith for tartness and structure, half Honeycrisp or Braeburn for sweetness and depth. This blend creates more interesting, nuanced flavor than single-variety tarts.
Apple Buying and Storage Tips
Choose apples that feel firm and heavy for their size, indicating high moisture content and fresh quality. The skin should be smooth and unblemished without soft spots, bruises, or wrinkled areas that signal age or poor storage.
Smell the apples near the stem end—fresh apples have a light, pleasant, sweet aroma. Avoid any with no scent (underripe) or fermented smells (overripe). Store apples in the refrigerator crisper drawer to maintain firmness until you’re ready to make your Apple Cookie Tart.
Buy apples within a week of baking for best results. While apples keep for weeks, fresher specimens have better texture and more pronounced flavor that elevates your final dessert.
Apple Substitutions and Alternatives
While fresh apples are traditional and preferred for Apple Cookie Tart, you can adapt with these alternatives:
- Pears: Use firm varieties like Bosc or Anjou for a delicate, floral variation with similar texture to apples
- Peaches: Substitute firm, slightly underripe peaches in summer for a seasonal twist on the classic tart
- Mixed stone fruits: Combine plums, apricots, and nectarines for a colorful, complex fruit tart
- Apples with cranberries: Use 3/4 apples and 1/4 fresh cranberries for tart, jewel-toned holiday appeal

Ingredients & Prep
Cookie Crust Essentials
For the Cookie Crust:
- 1 1/2 cups all-purpose flour
- 1/2 cup granulated sugar
- 1/2 cup cold unsalted butter, cut into small cubes
- 1 large egg yolk
- 1 teaspoon vanilla extract
- 1/4 teaspoon salt
- 2-3 tablespoons cold water
For the Apple Filling:
- 4 medium apples (about 1.5 pounds)
- 3 tablespoons granulated sugar
- 1 tablespoon all-purpose flour
- 1 teaspoon ground cinnamon
- 1/4 teaspoon ground nutmeg
- 1 tablespoon lemon juice
- 2 tablespoons unsalted butter, cut into small pieces
Optional Enhancement Ingredients:
- 2 tablespoons apricot jam for glazing
- 1/4 cup sliced almonds for topping
- Powdered sugar for dusting
- Vanilla ice cream or whipped cream for serving
Apple Preparation Technique
Proper apple preparation is crucial for a successful Apple Cookie Tart. Peel apples using a vegetable peeler, removing all skin for tender texture. Cut apples into quarters, remove the core completely, then slice each quarter into 1/4-inch thick slices.
Immediately toss apple slices with lemon juice to prevent browning. The acid also enhances flavor and helps apples maintain structure during baking. In a large bowl, combine sliced apples with sugar, flour, cinnamon, and nutmeg, tossing gently to coat every slice evenly.
The flour serves a critical purpose—it absorbs excess apple juice during baking, preventing a soggy crust. Don’t skip this ingredient or your Apple Cookie Tart will have texture issues.
Quick Prep Timeline
Step 1 (5 minutes): Make cookie dough by pulsing flour, sugar, salt, and butter in food processor until crumbly. Add egg yolk, vanilla, and water.
Step 2 (10 minutes): Press dough into tart pan and refrigerate while preparing apples.
Step 3 (8 minutes): Peel, core, and slice apples. Toss with lemon juice, sugar, flour, and spices.
Step 4 (5 minutes): Arrange apple slices decoratively in prepared crust and dot with butter.
Step 5 (35-40 minutes): Bake until crust is golden and apples are tender.
Step 6 (5 minutes): Glaze with warmed jam if desired, cool slightly, and serve.
Total active time is about 30 minutes, with 35-40 minutes of hands-off baking time.
Step-by-Step Instructions for Perfect Apple Cookie Tart
Step 1: Make the Cookie Crust Dough
In a food processor, combine 1 1/2 cups flour, 1/2 cup sugar, and 1/4 teaspoon salt. Pulse 2-3 times to mix. Add 1/2 cup cold butter cubes and pulse 10-12 times until the mixture resembles coarse crumbs with pea-sized butter pieces throughout.
Add 1 egg yolk and 1 teaspoon vanilla extract. Pulse 4-5 times to incorporate. Add 2 tablespoons cold water and pulse just until the dough begins to clump together. If the mixture still seems dry and won’t hold together when pinched, add the remaining 1 tablespoon water and pulse 2-3 more times.
Don’t have a food processor? No problem! Use a pastry cutter or two knives to cut the cold butter into the flour mixture, then stir in the egg yolk, vanilla, and water with a fork. The dough won’t be as uniform but will still work beautifully for your Apple Cookie Tart.
The dough should be crumbly but hold together when pressed. If it’s too wet and sticky, add 1 tablespoon flour. If too dry and won’t come together, add another teaspoon of water.
Step 2: Press Dough into Tart Pan
Grease a 9-inch tart pan with removable bottom using butter or cooking spray. Dump the crumbly cookie dough into the center of the pan. Using your fingers, press the dough evenly across the bottom and up the sides of the pan, creating a crust about 1/4 inch thick throughout.
Pay special attention to the corners where the bottom meets the sides—press firmly to ensure the dough is even with no thin spots. Use the bottom of a measuring cup to smooth and compact the bottom crust, which prevents cracks and creates even baking.
The edges should come up to the top of the tart pan sides. Use your thumb to create a neat, even edge around the perimeter. Don’t worry if it’s not perfectly smooth—rustic charm is part of this Apple Cookie Tart’s appeal.
Prick the bottom of the crust all over with a fork to prevent bubbling during baking. Place the pan in the refrigerator for at least 15 minutes while you prepare the apples. This chilling step firms the butter, which helps the crust hold its shape and develop better texture.
Step 3: Prepare the Apple Filling
Peel 4 medium apples completely, removing all skin. Cut each apple into quarters, then use a paring knife to cut out the core and seeds from each quarter. Slice the quarters crosswise into 1/4-inch thick slices—uniform thickness ensures even cooking.
Place apple slices in a large bowl and immediately drizzle with 1 tablespoon lemon juice, tossing to coat. Add 3 tablespoons sugar, 1 tablespoon flour, 1 teaspoon cinnamon, and 1/4 teaspoon nutmeg. Toss everything together gently but thoroughly until every apple slice is coated with the spice mixture.
Let the apples sit for 5 minutes while the crust chills. This resting time allows the sugar to begin drawing out apple juices, which will create a light syrup during baking. The flour will absorb this liquid and prevent the Apple Cookie Tart crust from becoming soggy.
Step 4: Arrange Apples in the Crust
Remove the chilled crust from the refrigerator. Starting from the outer edge, arrange apple slices in overlapping concentric circles, working your way toward the center. Slightly overlap each slice (about half of each slice should be visible) to create an attractive spiral pattern.
For a more casual presentation, simply pile the apple mixture into the crust and spread it evenly without worrying about precise arrangement. Both methods work perfectly—choose based on your desired presentation level.
Dot the arranged apples with 2 tablespoons butter cut into small pieces, distributing the butter evenly across the surface. The butter bastes the apples as they bake, adding richness and helping them caramelize beautifully.
If you have extra apple filling that doesn’t fit, save it for topping oatmeal or yogurt the next day. Don’t overfill the tart or the filling will bubble over during baking and create a mess.
Step 5: Bake the Apple Cookie Tart
Preheat your oven to 375°F with the rack positioned in the center. Place your assembled Apple Cookie Tart on a baking sheet to catch any drips and make it easier to transfer in and out of the oven.
Bake for 35-40 minutes until the cookie crust turns deep golden brown and the apples are tender when pierced with a knife. The edges should be slightly darker than the center, and you’ll see some bubbling around the apples as their juices cook.
If the crust edges brown too quickly (check after 25 minutes), loosely cover just the edges with strips of aluminum foil to prevent burning while the center finishes cooking. The apples need sufficient time to soften and caramelize, so don’t pull the tart out too early even if the crust looks done.
The kitchen will smell absolutely incredible—cinnamon, butter, and caramelizing apples create an irresistible aroma that signals your Apple Cookie Tart is nearly ready.
Step 6: Glaze, Cool, and Serve
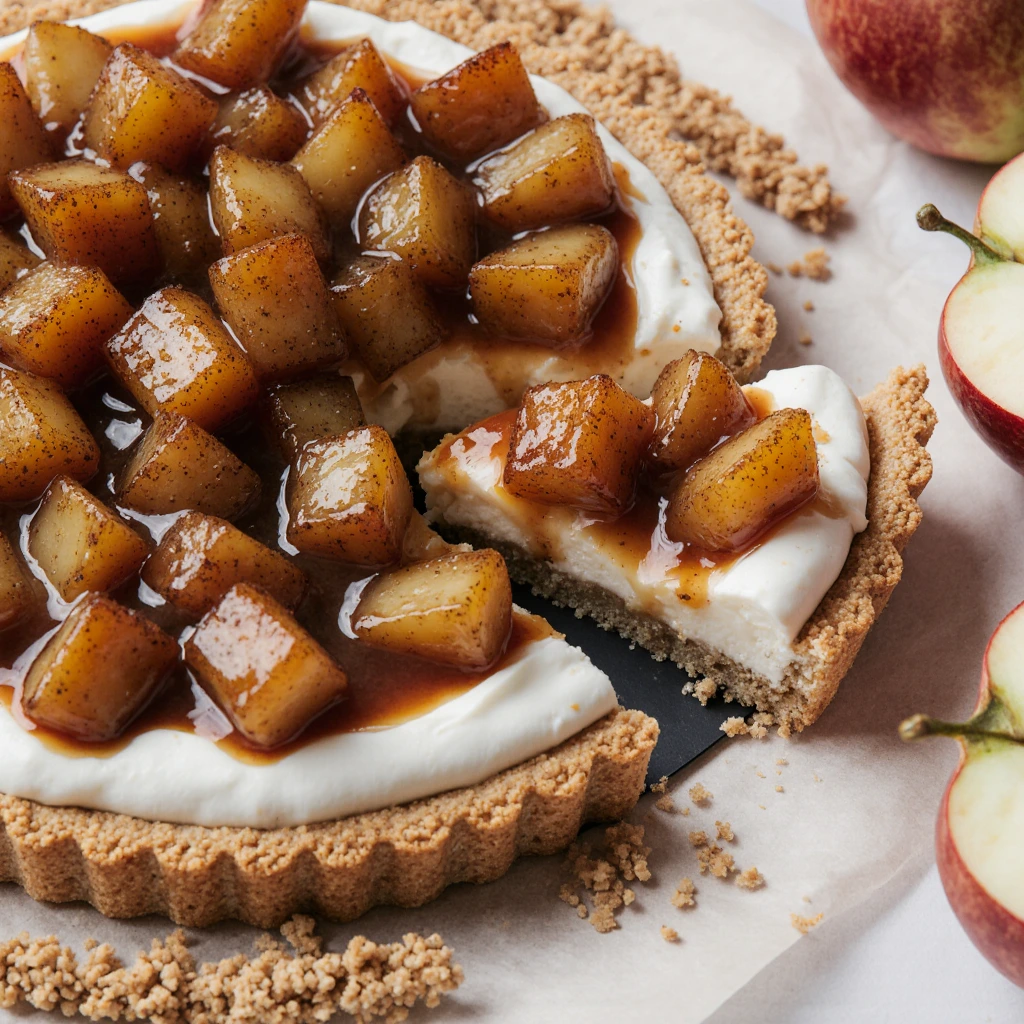
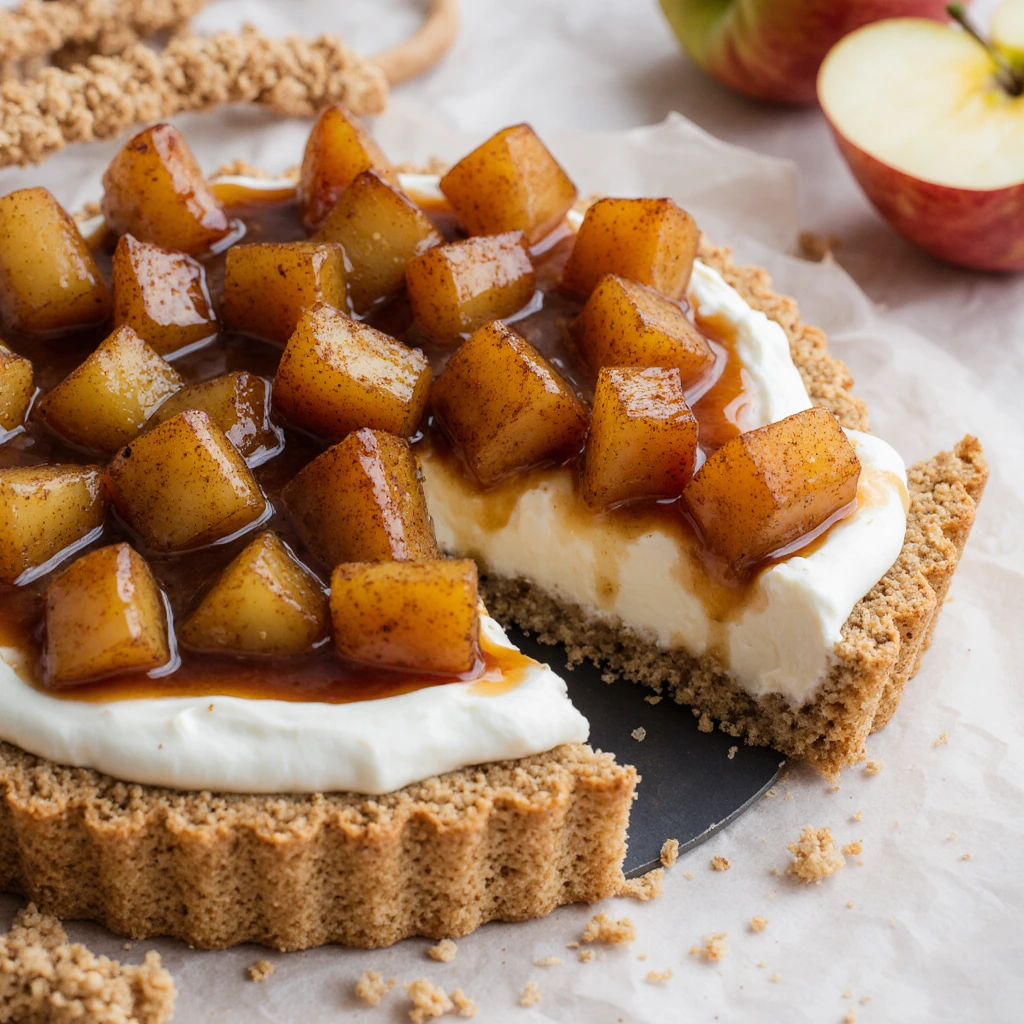
For professional bakery shine, heat 2 tablespoons apricot jam in the microwave for 15-20 seconds until melted and liquid. Use a pastry brush to gently brush the warm glaze over the hot apples immediately after removing the tart from the oven. The glaze creates beautiful sheen and adds a subtle layer of sweetness.
Let the Apple Cookie Tart cool in the pan on a wire rack for at least 20-30 minutes before attempting to remove it. The filling needs time to set slightly, and the crust must firm up or it will crumble when you try to unmold it.
Once cooled, place the tart pan on a large can or sturdy glass and gently push down on the outer ring—it should slide down, leaving the tart on the base. Carefully slide a thin spatula between the tart bottom and the metal base, then transfer the tart to a serving plate.
Serve warm or at room temperature with vanilla ice cream, whipped cream, or simply dusted with powdered sugar. The Apple Cookie Tart is best enjoyed within 8 hours of baking for optimal crust texture.
Pro Tips for Perfect Apple Cookie Tart
Avoiding Common Tart Problems
Problem: Soggy bottom crust happens when apples release too much liquid or you skip the flour in the filling. Always toss apples with 1 tablespoon flour to absorb excess juice, and make sure to prick the crust bottom with a fork before filling to allow steam to escape.
Problem: Crumbly crust that falls apart results from dough that’s too dry or hasn’t been pressed firmly enough into the pan. When pressing dough into the pan, use firm pressure to compact it thoroughly. If the dough seems dry and crumbly in the food processor, add the extra tablespoon of water.
Problem: Undercooked apples with burnt crust occurs when oven temperature is too high or apple slices are too thick. Slice apples uniformly at 1/4 inch thickness, and if your oven runs hot, reduce temperature to 350°F and extend baking time by 5-10 minutes.
Essential Tool Recommendations
A 9-inch tart pan with removable bottom is essential for this Apple Cookie Tart recipe. The removable bottom allows you to unmold the tart cleanly for beautiful presentation. Non-stick pans work best for easy release.
A food processor makes the cookie crust come together in under 2 minutes with perfect texture. If you don’t have one, a pastry cutter works well, though it takes a few extra minutes and requires more arm effort.
An apple peeler/corer/slicer tool speeds up apple preparation dramatically, reducing prep time by half. These inexpensive gadgets create uniform apple slices in seconds and are worth the small investment if you bake with apples frequently.
A pastry brush is necessary for applying the optional apricot glaze smoothly without disturbing the apple arrangement. Silicone brushes are easiest to clean and last longer than natural bristle versions.
Storage and Make-Ahead Strategy
Store leftover Apple Cookie Tart covered loosely with foil at room temperature for up to 2 days. Don’t refrigerate it unless your kitchen is very warm—refrigeration makes the cookie crust lose its crisp texture and become tough.
You can make the cookie dough up to 2 days in advance, wrap it tightly in plastic wrap, and refrigerate. When ready to bake, press the cold dough directly into the tart pan—no need to bring it to room temperature first.
The completely baked Apple Cookie Tart can be frozen for up to 2 months. Wrap it tightly in plastic wrap, then aluminum foil. Thaw overnight in the refrigerator and refresh in a 300°F oven for 10-15 minutes before serving to restore some crispness.
For best results, assemble and bake the Apple Cookie Tart within 3-4 hours of serving. The crust stays crispest when fresh, though the tart remains delicious for 2 days at room temperature.
Flavor Variations
Spiced Apple Variations
Transform your Apple Cookie Tart with these warming spice combinations:
Chai-Spiced: Add 1/2 teaspoon ground cardamom, 1/4 teaspoon ground ginger, and a pinch of black pepper to the apple mixture alongside the cinnamon and nutmeg for exotic Indian-inspired flavor.
Maple-Bourbon: Replace 1 tablespoon of the sugar with pure maple syrup and add 1 tablespoon bourbon to the apple filling for sophisticated adult flavor.
Brown Sugar Crumble: Mix 1/4 cup flour, 1/4 cup brown sugar, and 3 tablespoons cold butter to create streusel topping. Sprinkle over apples before baking for textural contrast.
Nut and Seed Additions
Almond Cream Base: Spread 1/2 cup almond paste mixed with 2 tablespoons softened butter over the crust before adding apples for classic French frangipane flavor.
Pecan Praline: Scatter 1/2 cup chopped pecans over the apples and drizzle with 2 tablespoons caramel sauce before baking for Southern-inspired richness.
Walnut Crust: Replace 1/4 cup of the flour in the cookie crust with finely ground walnuts for nutty depth and interesting texture.
Fruit Combinations
Apple-Cranberry: Add 1/2 cup fresh or frozen cranberries to the apple mixture for tart, jewel-toned holiday appeal and beautiful color contrast.
Apple-Pear: Use 2 apples and 2 firm pears for a more delicate, floral version of the Apple Cookie Tart with layered fruit flavors.
Caramel Apple: Drizzle 3 tablespoons caramel sauce over the arranged apples before baking, then drizzle more caramel over the finished tart for indulgent sweetness.
Dietary-Friendly Adaptations
Gluten-Free Apple Cookie Tart: Replace all-purpose flour in both the crust and filling with gluten-free 1-to-1 baking flour. Add 1/4 teaspoon xanthan gum to the crust if your flour blend doesn’t contain it.
Vegan Version: Use vegan butter in the crust, replace the egg yolk with 1 tablespoon aquafaba (chickpea liquid) or 1 tablespoon ground flaxseed mixed with 3 tablespoons water. The texture will be slightly different but still delicious.
Reduced-Sugar: Cut the sugar in the filling to 1 tablespoon and use a sugar substitute like monk fruit sweetener in the crust. The natural apple sweetness still shines through beautifully.
Serving Suggestions
Perfect Accompaniments
Serve your Apple Cookie Tart warm with a generous scoop of vanilla bean ice cream melting over the top. The temperature contrast between hot tart and cold ice cream creates an irresistible sensory experience.
For elegant dinner parties, serve room-temperature slices with a dollop of bourbon whipped cream (add 1 tablespoon bourbon to 1 cup whipped cream) and a drizzle of salted caramel sauce for sophisticated presentation.
Create a dessert board featuring the Apple Cookie Tart as the centerpiece, surrounded by assorted cheeses (sharp cheddar pairs wonderfully with apple), fresh grapes, candied nuts, and crackers for post-dinner grazing.
Seasonal Presentation Ideas
Fall Harvest: Garnish with a few perfect fall leaves (clean and food-safe), dust with cinnamon, and serve on rustic wooden boards for autumn gatherings.
Holiday Elegance: Top with sugared cranberries and fresh rosemary sprigs, dust with powdered sugar to resemble snow, and serve on fine china for Thanksgiving or Christmas dinner.
Casual Summer: Make the tart with peaches or mixed berries in warm months, serve with lemon sorbet instead of vanilla ice cream, and garnish with fresh mint.
Beverage Pairings
Coffee service: Fresh-brewed coffee, cappuccino, or caramel macchiato complement the warm spices in the Apple Cookie Tart perfectly. The slight bitterness balances the sweet fruit.
Tea pairings: English Breakfast, chai, or cinnamon spice tea echo the tart’s flavors without competing. Serve tea alongside rather than over the tart to maintain the cookie crust’s crispness.
Wine selections: Late-harvest Riesling, Moscato d’Asti, or ice wine provide sweet accompaniment that matches the dessert’s elegance. For something drier, try sparkling Prosecco for celebratory contrast.
Non-alcoholic options: Hot apple cider, mulled grape juice, or vanilla cream soda offer family-friendly pairings that enhance the apple flavor in your Apple Cookie Tart.
Frequently Asked Questions
Can I make Apple Cookie Tart without a tart pan?
Yes! Use a 9-inch pie plate or even a square baking dish instead. Press the cookie dough to cover the bottom and partway up the sides, creating a rustic free-form edge. The tart will look more casual but taste equally delicious. You can also create a free-form galette by rolling the dough into a circle, piling apples in the center, and folding edges over the filling.
Why did my cookie crust shrink during baking?
Crust shrinkage happens when the dough is overworked or not chilled sufficiently before baking. Always refrigerate the pressed crust for at least 15 minutes before adding filling and baking. Don’t stretch the dough when pressing into the pan—gently press it into place without pulling or stretching, which causes it to snap back during baking.
How do I prevent apples from turning brown while I work?
Toss apple slices with lemon juice immediately after cutting. The citric acid prevents oxidation that causes browning. You can also briefly submerge cut apples in a bowl of cold water with a tablespoon of lemon juice, but drain them thoroughly before mixing with other ingredients or they’ll make your Apple Cookie Tart filling watery.
Can I use store-bought cookie dough for the crust?
While homemade is best, you can use refrigerated sugar cookie dough in a pinch. Press about 16 ounces of dough into the tart pan, adding 1 tablespoon flour to make it less sticky if needed. The texture will be different—more cake-like and less crisp—but still tasty.
What’s the best way to reheat leftover Apple Cookie Tart?
Place individual slices on a baking sheet and warm in a 325°F oven for 8-10 minutes until heated through. This method restores some crispness to the cookie crust. Avoid microwaving, which makes the crust soggy and tough. Room temperature is also delicious—no reheating necessary if you prefer.
Can I use frozen apples for this recipe?
Fresh apples are strongly preferred for proper texture. Frozen apples release excessive water during thawing and baking, creating a soggy Apple Cookie Tart with watery filling. If you must use frozen, thaw them completely, drain thoroughly, and increase the flour in the filling to 2 tablespoons to absorb extra moisture.
Is Apple Cookie Tart safe during pregnancy?
Yes, this recipe is completely safe during pregnancy. All ingredients are fully cooked, and there are no raw eggs or unpasteurized dairy. The tart bakes at 375°F, which eliminates any potential food safety concerns. Enjoy without worry!
How do I know when the tart is done baking?
The Apple Cookie Tart is done when the cookie crust is deep golden brown around the edges and the apples are tender when pierced with a knife. You should see some bubbling around the apples. If the crust is golden but apples still feel firm, tent the edges with foil and continue baking for 5-10 more minutes.
Can I make mini individual Apple Cookie Tarts?
Absolutely! Use a muffin tin or 4-inch mini tart pans. Divide the dough among 12 muffin cups or 6 mini tart pans, press into place, and fill with apples. Reduce baking time to 20-25 minutes. These individual portions are perfect for parties and portion control.
Conclusion
You now have everything you need to create a stunning, bakery-worthy Apple Cookie Tart using just 6 simple steps that anyone can master. This recipe proves that impressive desserts don’t require professional training, expensive equipment, or culinary school techniques—just good ingredients, clear instructions, and confidence.
Don’t wait for a special occasion to try this! Grab some apples this weekend and experience how achievable elegant baking truly is. Your kitchen will smell incredible, and you’ll have a gorgeous Apple Cookie Tart that tastes even better than it looks.
Join over 22,000 home bakers who’ve made this their signature dessert and shared photos of their beautiful creations. Drop a comment below and let me know what apple variety you used or how you customized your tart—I love hearing about your baking adventures!
Ready to expand your fruit dessert repertoire? Try our Classic Berry Galette with Almond Cream or explore our Complete Guide to Homemade Fruit Pies for more impressive sweets that fit your schedule and skill level!